
Replacing a circuit breaker is a task that should only be attempted when the replacement is straightforward, the breaker type is clearly identified, and the person doing the work understands electrical safety procedures. The basic process is simple in theory: isolate power, remove the panel cover, disconnect the branch conductor from the faulty breaker, remove the breaker, install the correct replacement, reconnect the conductor, and verify normal operation.
The safety risk is what makes this job different from an ordinary repair. Even after the main breaker is turned off, some parts of the panel may still remain energized depending on the panel design. That is why this guide focuses first on when replacement is appropriate, when to stop, and how to proceed safely.
Key Takeaways
- Replace a circuit breaker only with the correct brand, type, pole arrangement, and ampere rating specified for the panel.
- A breaker that trips repeatedly is not always a bad breaker. The real problem may be overload, short circuit, ground fault, or damaged wiring.
- If the panel is old, damaged, wet, hot, or unfamiliar, stop and call a licensed electrician.
- The safest workflow is: identify the problem -> confirm the replacement is appropriate -> isolate power -> replace -> test -> monitor.
- If the new breaker still trips, the problem is usually elsewhere in the circuit.
When Should You Replace a Circuit Breaker?
A breaker should only be replaced when there is good reason to believe the breaker itself is faulty or when the circuit is being legitimately modified in a code-compliant way.
Common reasons for replacement
- the breaker will not reset even after the load has been removed and the circuit has been checked
- the handle feels mechanically damaged or unreliable
- the breaker shows visible heat damage
- the breaker has failed internally
- the circuit design is being changed and the replacement is approved for the application
Common warning signs
- breaker will not stay in the ON position
- physical damage to the breaker housing
- burn marks or overheating smell near the breaker
- breaker trips without a valid load-related explanation
If the breaker is tripping because the circuit is overloaded or faulted, replacing the breaker alone will not solve the real problem.
When Not to DIY
This is the most important section in the article.
Do not replace the breaker yourself if:
- the panel shows signs of heat, corrosion, or moisture
- you are unsure which breaker type is correct
- the breaker is a main breaker
- the panel is old, damaged, or from a problematic legacy brand
- the circuit involves repeated unexplained tripping
- local rules require licensed electrical work
- you are not comfortable identifying live versus isolated parts inside the panel
If any of those apply, a licensed electrician is the safer choice.
Before You Start: Confirm the Replacement Is Correct
Never treat breakers as interchangeable.
Before replacement, verify:
- panel manufacturer
- breaker family and compatibility
- single-pole or double-pole arrangement
- ampere rating
- trip function, such as standard thermal-magnetic, AFCI, GFCI, or dual-function
The replacement breaker must match the panel and the application. A “close enough” substitution is not a safe approach.
For product background on low-voltage protection devices, see MCB Full Form in Electrical and What Is the Difference Between MCB, MCCB, RCB, RCD, RCCB, and RCBO.
If you need a product-level reference while confirming device type, see the VIOX MCB page for miniature circuit breaker applications and the VIOX MCCB page for molded case circuit breaker applications.
Treat isolation seriously in shared work environments
If the equipment is in a workshop, commercial site, plant room, or any location where another person could restore power unexpectedly, basic lockout/tagout (LOTO) discipline matters. The safety goal is not only to switch the supply off. The goal is to keep it under control while the work is being done.
That usually means:
- isolating the correct source
- applying a lock or approved isolation device when required
- attaching a warning tag
- making sure no one can restore power unexpectedly
In small residential situations, the exact method may be simpler than in an industrial facility, but the principle is the same: the person doing the work must control the isolation state.
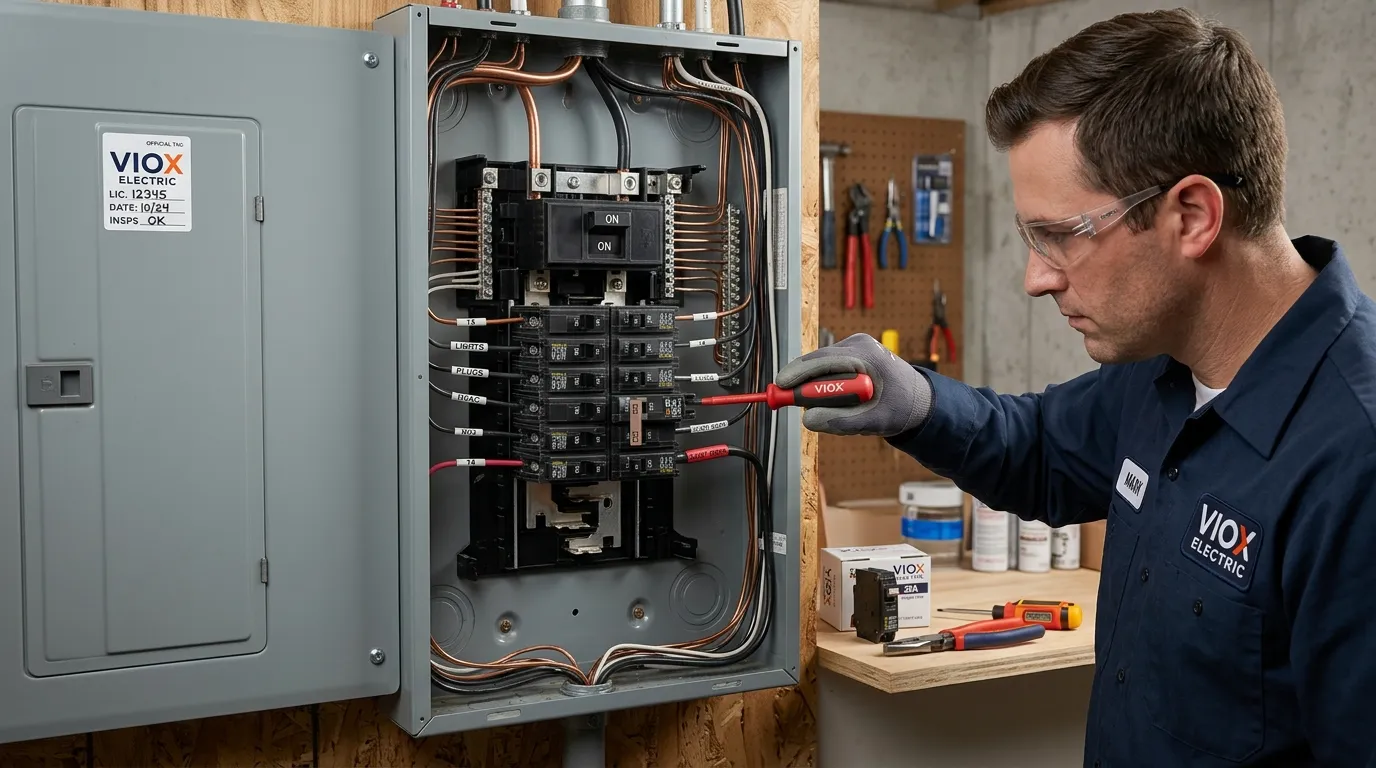
Tools and Safety Equipment
Use only insulated tools and basic protective equipment appropriate to the job.
Typical tools
- insulated screwdriver
- voltage tester for quick screening
- digital multimeter
- flashlight or work light
- camera or phone for reference photos
Basic safety equipment
- safety glasses
- appropriate insulated gloves if required by the task and site practice
- dry work area and stable footing
The goal is not just to remove and replace the part. The goal is to do it without confusion, accidental contact, or wiring mistakes.
Step-by-Step: How to Replace a Circuit Breaker
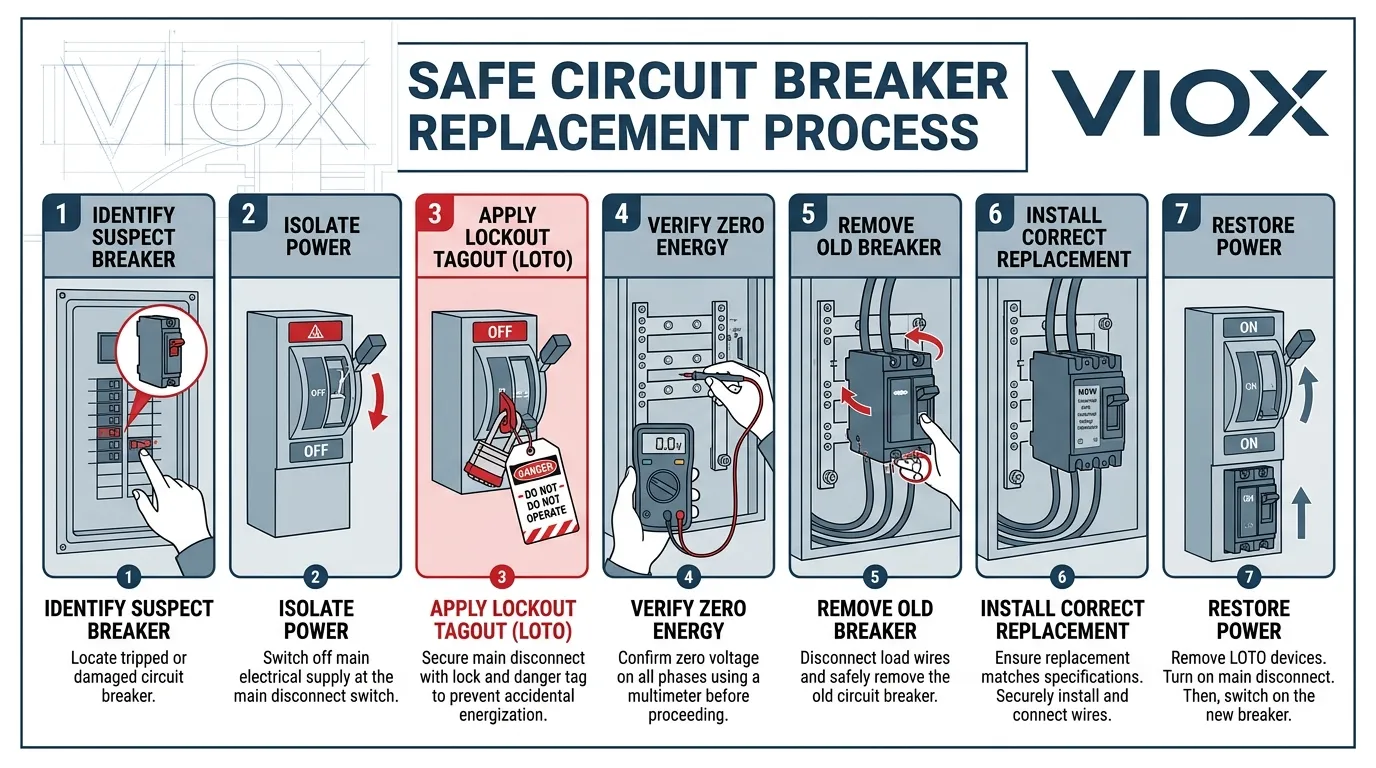
Step 1: Identify the Suspect Breaker
Confirm which breaker is being replaced and which circuit it serves.
Before touching the panel:
- identify the affected load or circuit
- confirm the breaker label if available
- reduce or remove connected load where possible
If the fault pattern suggests a short circuit, ground fault, or damaged wiring, stop and investigate that first.
Step 2: Obtain the Correct Replacement
Before opening the panel, confirm the replacement breaker matches:
- panel brand and listed compatibility
- pole count
- ampere rating
- breaker function
Do not increase the breaker rating unless the entire circuit design justifies it.
In many residential and light commercial branch-circuit replacements, the device is effectively in the MCB class. In larger feeder or industrial distribution work, the relevant breaker may be closer to an MCCB, which is a different application and should not be treated as the same replacement job.
Step 3: Shut Off Power
Turn off the branch breaker being replaced, then turn off the main breaker if the job requires panel access beyond the branch space.
After that:
- verify the panel area is dry
- remember that some line-side parts may still remain energized
- use a digital multimeter, not only a quick tester, to verify the parts you may approach
What to verify with the multimeter
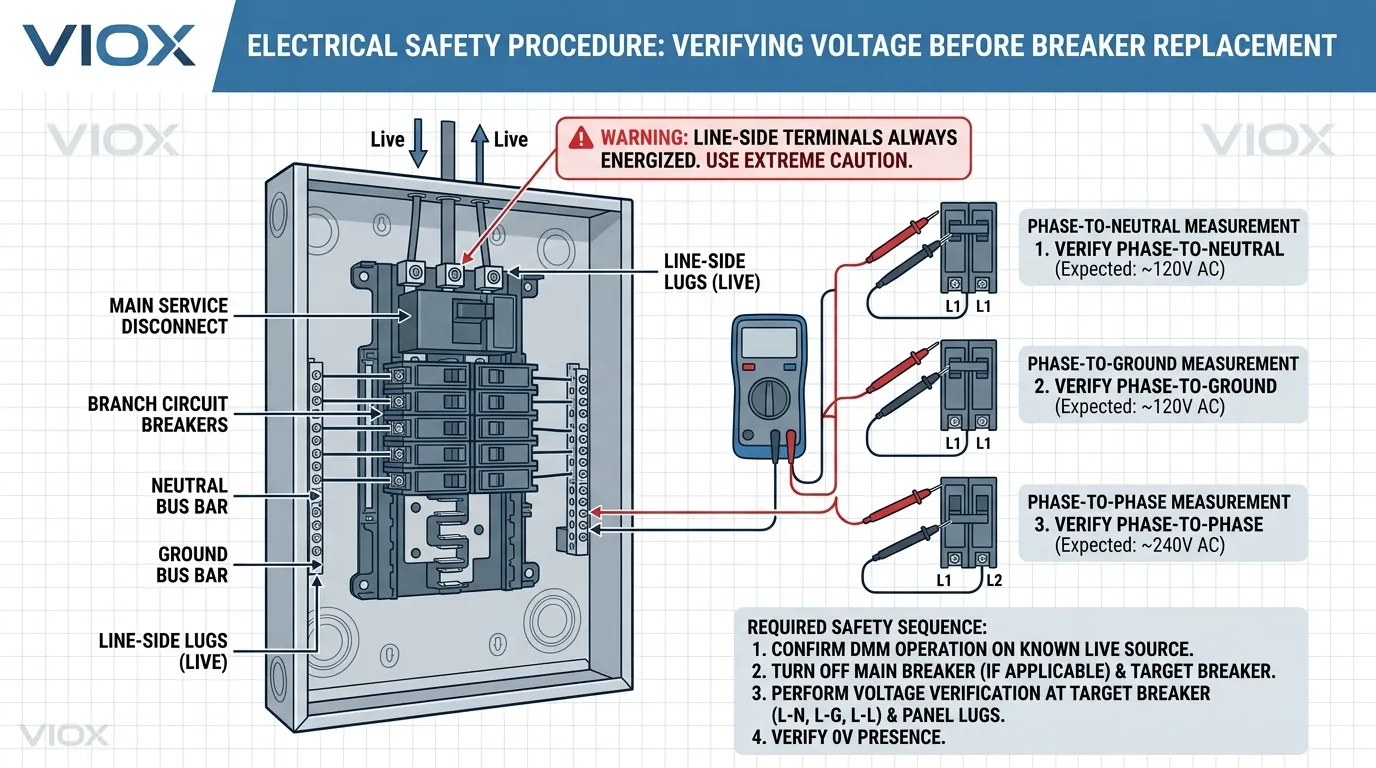
Depending on the panel and system type, verify as appropriate:
- phase-to-phase voltage
- phase-to-neutral voltage
- phase-to-ground voltage
This matters because a non-contact tester is useful for quick indication, but it is not a substitute for deliberate meter verification. On multi-pole or multi-phase systems, the absence of one expected voltage does not automatically mean the whole work area is safe.
This is where many DIY articles become too casual. Panel interiors can still present serious shock hazard even when the main breaker is off.
Step 4: Remove the Panel Cover
Support the dead front or cover carefully as screws are removed.
Before touching anything inside:
- inspect for overheating
- inspect for corrosion
- inspect for loose or damaged conductors
- inspect for signs that the panel condition is worse than expected
If the panel condition looks unsafe, stop and call an electrician.
Step 5: Document the Existing Setup
Take a clear photo before disconnecting the conductor.
This helps confirm:
- conductor routing
- terminal position
- breaker location
- any neutral or pigtail arrangement in special breaker types
Step 6: Disconnect the Branch Conductor
With the panel in a safe state and the breaker identified:
- loosen the breaker terminal screw
- remove the branch hot conductor
- keep the conductor positioned safely away from contact points
If the breaker is AFCI, GFCI, or dual-function, additional conductors may also be involved. Those should be documented and handled carefully.
Step 7: Remove the Old Breaker
Remove the breaker according to its mounting design.
Most plug-in panel breakers release by:
- disengaging from the retaining edge
- lifting or rocking away from the bus connection
Do not force the breaker. If it does not release normally, recheck the mounting style.
Step 8: Install the New Breaker
Make sure the new breaker is in the OFF position before installation.
Then:
- seat it correctly in the panel
- confirm it is fully engaged
- reconnect the branch conductor
- tighten the terminal correctly according to the breaker requirements
The conductor should be secure, properly stripped, and free of damaged strands.
Step 9: Reinstall the Panel Cover
Before closing the panel:
- confirm no conductors are pinched
- confirm the breaker handle lines up correctly through the opening
- confirm the work area inside the panel is clean and orderly
Then reinstall the cover securely.
Step 10: Restore Power and Test
Restore power in a controlled way.
Then:
- turn on the main breaker if it was shut off
- switch on the new breaker
- test the circuit
- observe whether the breaker remains stable
A successful replacement should restore normal operation without immediate tripping, abnormal heat, or unusual smell.
If the New Breaker Trips Again
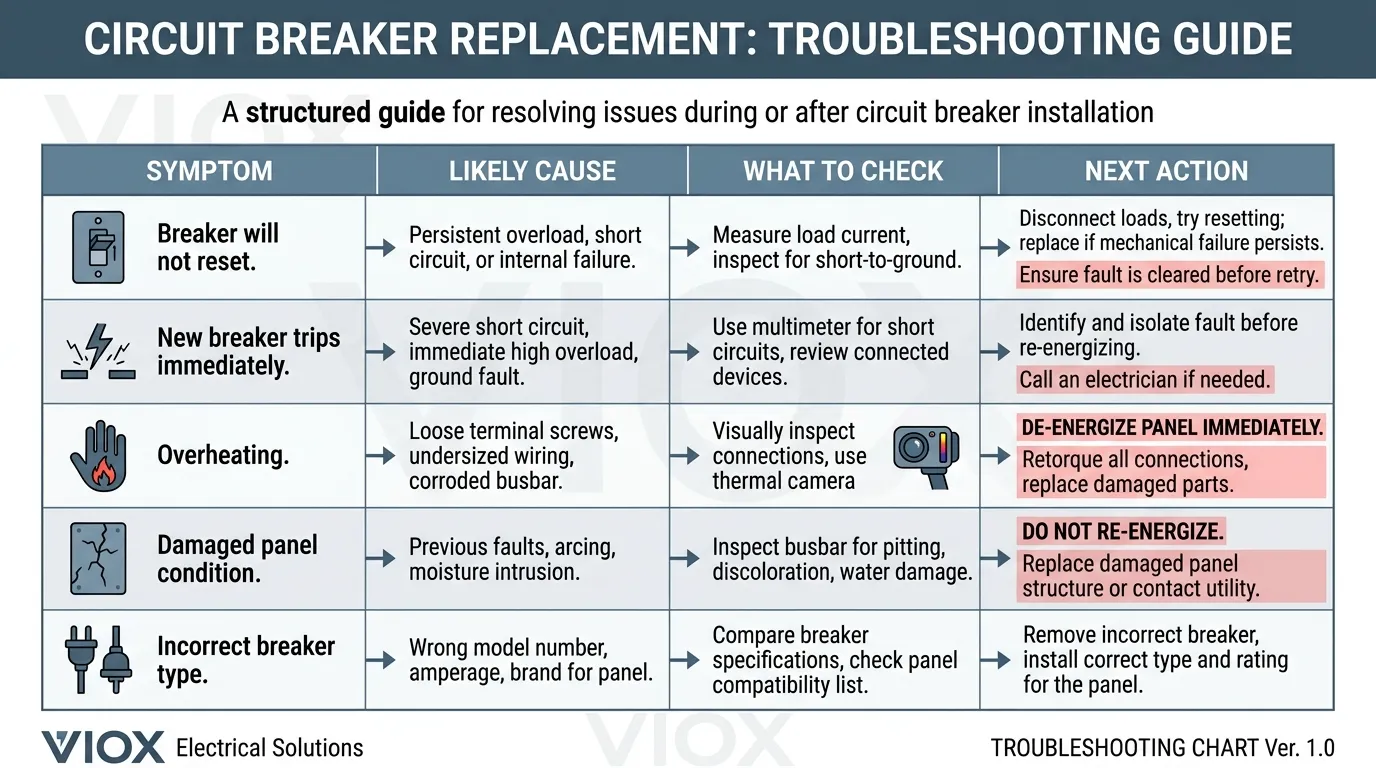
This usually means the breaker was not the real problem.
Common causes include:
- overloaded circuit
- short circuit
- ground fault
- failed appliance
- damaged conductor
- incorrect breaker type for the circuit
If the new breaker trips immediately or repeatedly, do not keep resetting it. The circuit needs diagnosis, not repeated forcing.
Common Mistakes to Avoid
Replacing the breaker without diagnosing the trip cause
Repeated tripping often points to a circuit problem, not a breaker problem.
Using an incompatible breaker
Brand, family, and listing compatibility matter.
Upsizing the breaker without redesigning the circuit
This is dangerous and can expose wiring to overcurrent risk.
Ignoring panel condition
Heat damage, moisture, corrosion, and damaged bus connection points change the risk profile completely.
Treating all breaker types the same
Standard breakers, AFCI breakers, GFCI breakers, and dual-function breakers do not all wire and reset the same way.
Repair vs Replacement
A breaker itself is generally replaced, not repaired.
If the breaker shows:
- internal failure
- mechanical handle failure
- visible thermal damage
- unreliable reset behavior
replacement is the normal path.
But if the real fault is in the branch circuit, appliance, or panel bus connection, breaker replacement alone is not a full repair.
Related Circuit Breaker Topics
- MCB Full Form in Electrical
- What Is a Miniature Circuit Breaker (MCB)?
- Which Is On and Off in MCB
- Can I Use a 3-Pole Breaker for a 2-Pole Circuit?
Conclusion
If you want to know how to replace a circuit breaker, the right answer is not just “remove and install.” The right answer is to confirm first that the breaker is actually the problem, verify the exact replacement, work safely inside the panel, and stop immediately if the panel condition or circuit behavior suggests a larger fault.
Breaker replacement can look simple, but the risk is real. A careful, safety-first approach is what makes the job manageable.
FAQ
Can I replace a circuit breaker myself?
Only if the replacement is straightforward, the correct breaker is clearly identified, the panel is in safe condition, and you understand electrical safety procedures. If not, call a licensed electrician.
How do I know if a circuit breaker is bad?
Possible signs include failure to reset, mechanical handle problems, overheating, visible damage, or tripping behavior that persists after the circuit has been checked and the load has been reduced.
Why does the new breaker trip immediately?
That usually means the circuit still has a real fault, such as overload, short circuit, ground fault, or a failed connected device.
Can I replace a 15A breaker with a 20A breaker?
Not unless the circuit wiring and design are properly rated for it and the change is justified by code-compliant design. The breaker should protect the circuit, not exceed it.
Do I need to turn off the main breaker first?
In many branch-breaker replacement situations, yes, but even then some parts of the panel may remain energized depending on the panel design. That is one reason this work requires caution.
Should a damaged breaker be repaired or replaced?
Circuit breakers are generally replaced rather than repaired.
