

On this page
A replacement GFCI breaker can match the old breaker’s amperage and pole count yet still fail to fit the panel. Check four things separately: authorization for the exact panel, mounting geometry, neutral connection method, and the space needed by the installed breaker and conductors. A component that looks suitable on a retailer’s page is not automatically suitable for the complete installation.
For a two-pole replacement in a compact outdoor or pool panel, the obstruction may be the breaker body, an incompatible mounting interface, the neutral arrangement, or a conductor route that no longer clears the cover. Identify which condition applies before ordering another part.
Key Takeaways
- Matching amperage, poles and brand does not establish exact-panel compatibility.
- Check the installed envelope, not just the housing dimensions or number of breaker spaces.
- Pigtail and plug-on-neutral arrangements require model-specific verification.
- Do not force the breaker, modify its housing, or remove required GFCI protection to make room.
Safety boundary: This is a document-and-fit diagnostic guide, not an energized inspection or installation procedure. Homeowners should collect accessible labels and records without removing protective covers. A qualified electrician must isolate all supplies and verify absence of voltage before inspecting exposed parts; opening a main breaker alone does not establish that the entire enclosure is de-energized. The separate circuit breaker replacement guide covers the broader replacement task.
Identify the Symptom Before Choosing a Fix
Use this table to organize an inspection performed by a qualified person on equipment verified de-energized. A fit check cannot substitute for product approval.
| Symptom | Check | What the finding means | Next action |
|---|---|---|---|
| Breaker will not engage the retaining feature or bus interface | Exact panel label and approved breaker type; mounting instructions | Wrong interface or damaged equipment is possible | Stop; confirm the approved part and inspect damage |
| Mounting appears correct but the body meets another component | Dimension drawing and obstruction location | Installed-envelope conflict | Request an exact-panel replacement determination |
| Body clears, but conductors must be squeezed aside | Terminal positions, wire route and applicable bending-space requirements | The usable wiring envelope is inadequate | Have the route or assembly reviewed; do not compress wiring |
| Breaker seems seated, but the deadfront will not close normally | Cover identity, handle alignment and conductor clearance | A mechanical or assembly mismatch remains | Keep it out of service until the cause is resolved |
| Neutral connection cannot be made as instructed | Pigtail versus plug-on-neutral requirements and panel interface | Electrical-interface compatibility is unresolved | Confirm the exact instructions; do not improvise a connection |
Gate 1: Is the Breaker Authorized for This Exact Panel?
Start with the panel’s catalog number and breaker-type label, not its brand alone. Then check the replacement’s full catalog number, instructions and any compatibility documentation. Preserve suffixes: they may distinguish configurations that matter to the installation.
UL distinguishes breakers intended and marked for use in particular equipment from Classified replacements for specified panelboards. A Classified replacement must be used within its documented compatibility and rating limits; it is not blanket permission to interchange brands. UL’s circuit breaker application guide explains this distinction.
Ask two separate questions:
- Is this exact replacement permitted in this exact panel and application?
- Can it be installed according to its instructions without interference?
An online cross-reference or a matching two-pole footprint is insufficient if either answer remains unknown. Likewise, a manufacturer-approved alternative still needs the correct cover, position and installation conditions. If documents appear to conflict, obtain clarification rather than choosing the answer that makes the part fit.
Gate 2: Compare the Installed Envelope, Not Just Body Length
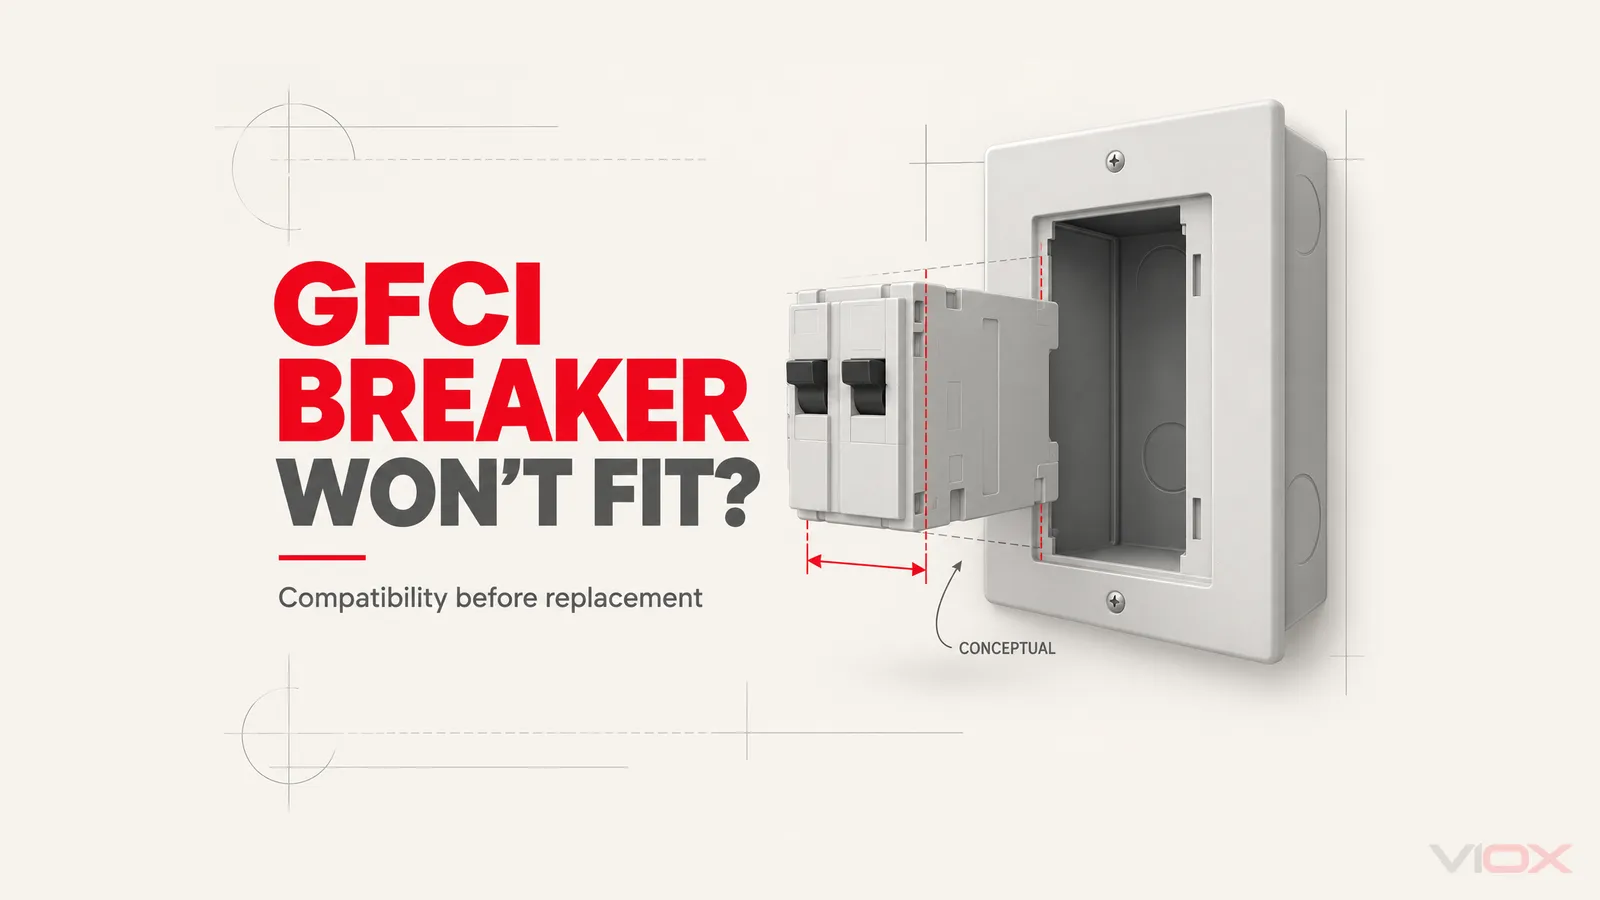
A housing measurement describes only the component. For this diagnosis, the installed envelope includes the housing, mounting engagement, access to terminals, conductor routing and clearance to the deadfront and surrounding equipment.
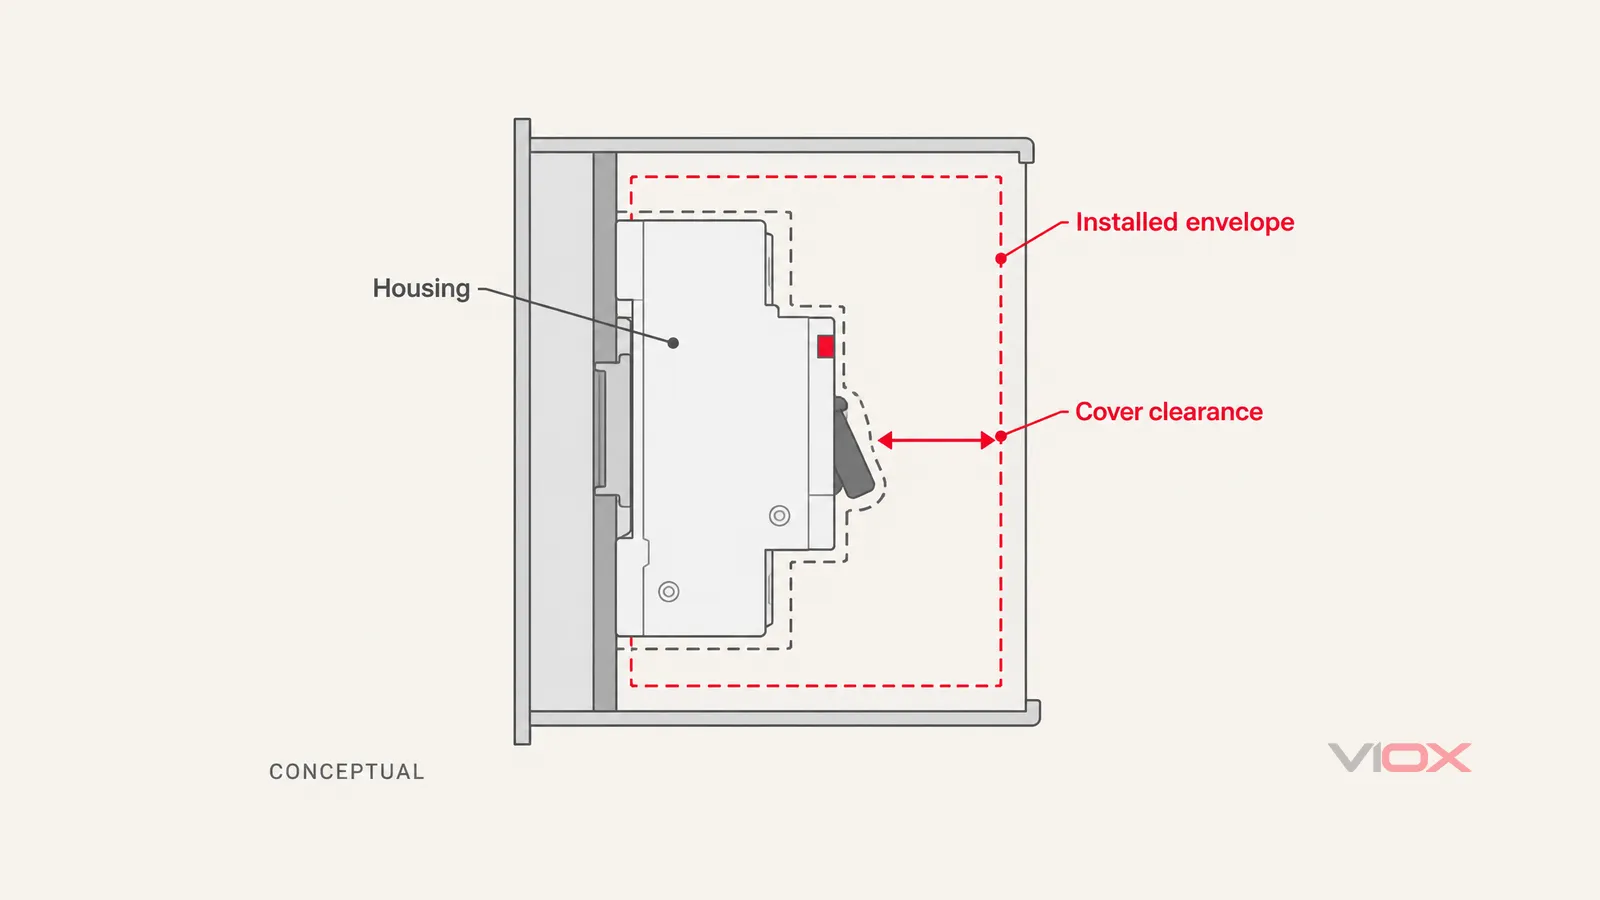
Conceptual geometry, not a dimensioned panel drawing. No minimum clearance or approved replacement is established by this illustration.
Record exactly where the interference occurs: body-to-neutral-bar, terminal-to-wall, conductor-to-cover, or handle-to-deadfront opening. These observations lead to different questions. Saying only “the new breaker is too big” hides the most useful evidence.
Compare corresponding axes on the old and proposed dimension drawings. Catalogs may describe length, width and depth differently; a number without its drawing orientation can be misleading. Do not infer compatibility by rotating a loose breaker until it seems smaller.
Wire bending space is also a separate requirement. It depends on the relevant terminals, conductors and assembly arrangement, not a universal spare gap around every GFCI. UL’s panelboard application guide discusses enclosure and wire-bending-space considerations. A cover that closes only by pressing on wiring is not an acceptable fit result.
Do not cut the deadfront, relocate a neutral bar, trim a breaker case, or alter a retaining feature as an informal repair. Such changes require an evaluated plan, not a physical workaround.
Gate 3: Verify the Neutral Interface Independently
For a pigtail-neutral breaker, check the supplied lead requirements and the permitted neutral termination. For a plug-on-neutral breaker, check that the exact panel provides the specified neutral interface. These alternative arrangements are described in the International Association of Electrical Inspectors’ GFCI technical explanation; its historical code discussion is not a current installation rule. The absence of a pigtail does not establish compatibility, and the presence of a lead does not settle the mounting question.
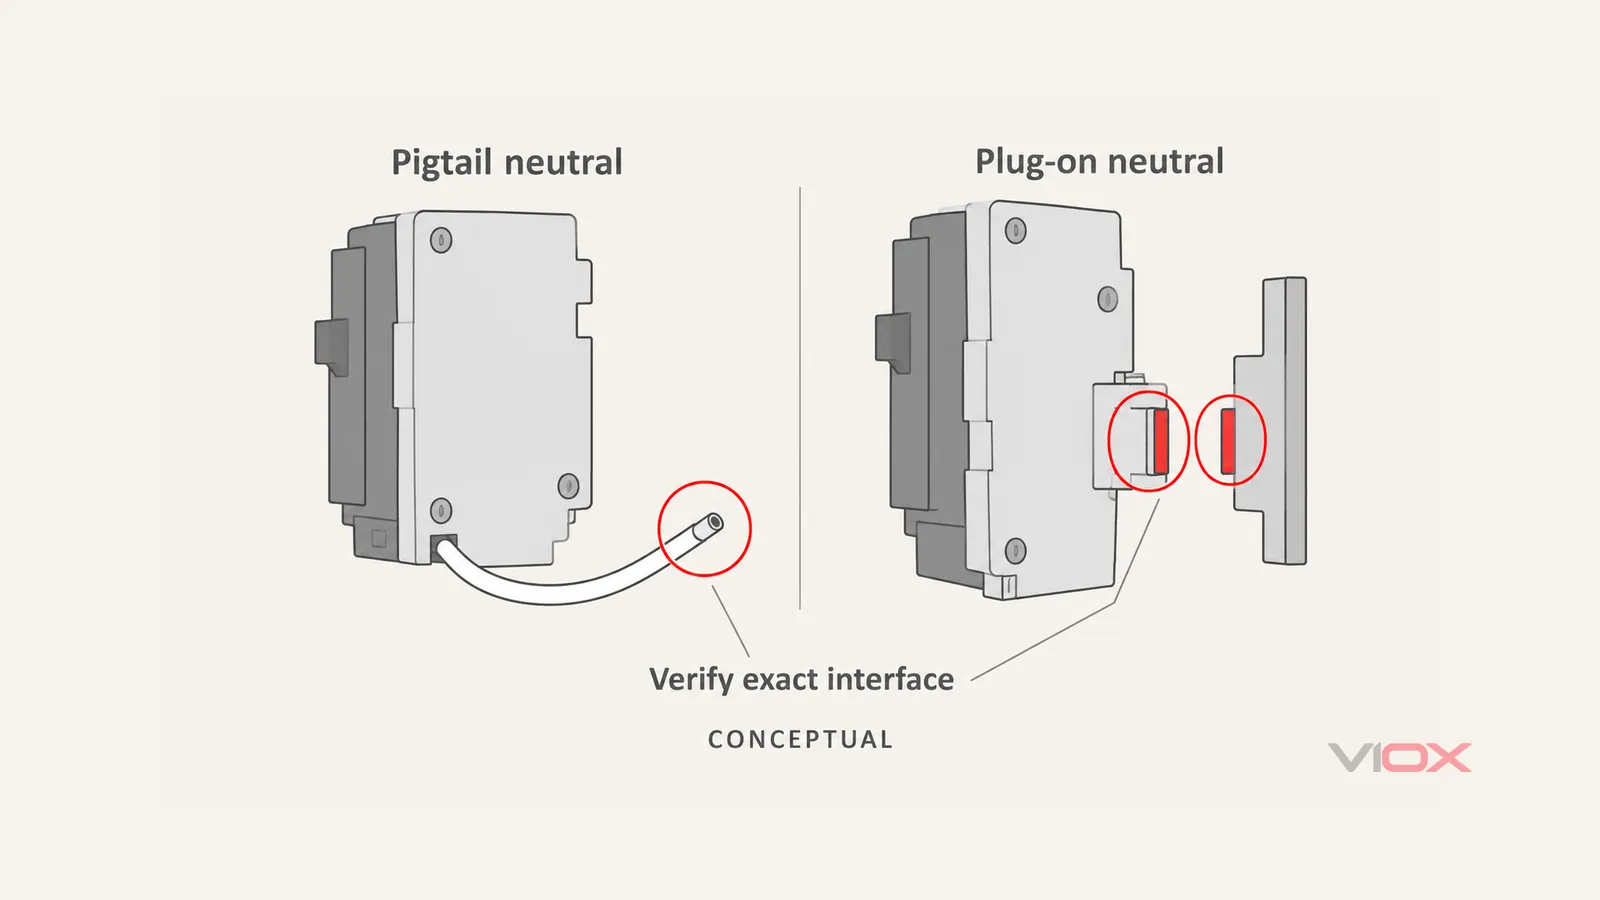
Generic interface concepts only. The lead is shown unconnected; this is not a terminal wiring diagram or an interchangeability statement.
Also distinguish the breaker’s supply-neutral connection from any load-neutral requirement. A two-pole load description alone does not answer which connections a particular GFCI needs. Obtain the manufacturer’s wiring diagram for that exact device and circuit configuration; do not transfer wiring assumptions from the old model.
The North American product framework matters too: UL identifies circuit-breaker GFCIs as subject to UL 943 and additionally investigated to UL 489. A residual-current device built to International Electrotechnical Commission (IEC) standards is not automatically a panel-compatible substitute. See UL’s GFCI certification scope and VIOX’s RCD versus GFCI explanation for the terminology boundary.
Gate 4: Preserve the Protection Required by the Installation
Compact pool installations make fit problems consequential: the required protection cannot be removed just because a smaller ordinary breaker fits. Pool pumps, heaters, lighting and receptacles must be assessed as their actual circuits, not grouped under one generic “pool breaker” rule.
The CPSC recommends inspection and upgrades by an electrician qualified in pool and spa repairs, following applicable local codes and the National Electrical Code. Its pool electrical safety guidance supports professional review, not a substitute for checking the locally adopted code edition and amendments.
A downstream GFCI arrangement may be a redesign option, but it is not an automatic repair. The electrician must verify which equipment and circuit portions need protection, the device’s voltage and current suitability, neutral configuration, permitted location, enclosure suitability and disconnect requirements. The fact that an unprotected upstream section exists cannot simply be ignored.
When to Change the Part, Seek Clarification or Redesign
Use a documented replacement when the exact-panel approval and all fit gates can be satisfied. Do not assume that a superseding product number establishes every installation condition.
Request technical clarification when the replacement is described as compatible but a physical conflict remains. Provide the panel identity, cover identity, breaker suffix and obstruction evidence. There may be a permitted position, accessory or alternative configuration, but do not presume one exists.
Review the assembly or protection architecture when no documented part can meet both the protective duty and installation requirements. A larger approved panel or a separately evaluated protection arrangement may be necessary. More breaker spaces alone do not prove more usable clearance or suitability for the circuit.
Do not treat refurbished stock as the solution. UL’s reconditioned equipment guide identifies personnel-protection GFCIs and molded-case circuit breakers among equipment that the 2020 NEC does not permit to be reconditioned. Unused old stock is a different category, but still needs genuine identity, acceptable condition and exact-application verification; a continuity or insulation test alone establishes neither compatibility nor GFCI performance.
Send a Support Request That Can Be Answered
Before purchasing another replacement, assemble this record from documents and a qualified inspection:
- Panel: manufacturer, complete catalog number, breaker-type label and cover identification.
- Devices: full old and proposed catalog numbers, including suffixes; photographs of accessible markings.
- Circuit: voltage, required current rating, poles, load type and protection function.
- Interfaces: mounting type, neutral connection method and relevant instruction sheets.
- Obstruction: the exact contact point, corresponding drawing axes, and photographs taken only under safe inspection conditions.
- Installation: conductor information and pool/outdoor context, plus the jurisdiction’s adopted code requirements.
Ask: “Is this exact breaker approved for this exact panel and circuit, and what documented installation resolves this interference without modifying equipment or reducing required protection?”
Once installation compatibility is resolved, testing and restoration still belong to the qualified replacement process. If the properly installed device subsequently trips, follow the separate arc-fault circuit interrupter (AFCI) and GFCI nuisance-tripping diagnostic guide rather than treating a functional trip as another fit problem.
The acceptance rule is straightforward: documented compatibility, correct interfaces, unobstructed installation and retained protection must all be satisfied. If one remains unresolved, keep the circuit out of service and escalate.