DIYソーラーコンバイナーボックス:ほとんどの自家製設計が火災の危険性がある理由(および実際に必要なもの)

You've got 10 REC 350W solar panels ready to mount. Five strings of two panels each. Each string pumping out 93.4 volts DC at 9 amps. You've researched DIY solar combiner box designs online, and you've done the math—everything checks out.Then you price out a proper solar combiner box. $300. Maybe $400 if you want the one with integrated monitoring. You look at the Square D subpanel sitting in your garage—the one you paid $60 for last year. Same metal box. Same bus bars. Same circuit breakers. Why exactly are you supposed to pay 5× more for what looks like the same thing?Here's why: Because that $240 price gap is the difference between a system that works for 20 years and one that catches fire in 6 months.The Arc That Won't Die: Why DC Destroys AC EquipmentThe moment you flip an AC breaker open under load, an electrical arc forms between the separating contacts. It's plasma—ionized gas carrying thousands of amps through what used to be air, generating temperatures that hit 35,000°F, which for reference is four times hotter than the surface of the sun.But here's the thing about AC arcs: they die on their own.Sixty times per second, standard AC power crosses through zero volts as the current alternates direction. At that exact moment—lasting just milliseconds—the arc loses its energy source and extinguishes. Contacts keep moving apart. Circuit opens. Done.DC doesn't do this.When you interrupt 93.4 volts DC, that arc lights up and stays lit for as long as the contacts are close enough to sustain it. There's no zero crossing. No natural interruption. Just continuous, unrelenting current trying to bridge that gap with a river of plasma that melts metal, ignites insulation, and keeps burning until the contacts have physically separated far enough—typically 3-4 times farther than AC equipment is designed for.This is "The Arc That Won't Die," and it's why every component inside a real DC-rated combiner box looks different from AC equipment. The contact spacing is wider. The arc chutes (those zigzag metal plates that stretch and cool the arc) are longer. Some DC breakers even use magnetic coils to physically blow the arc out, like extinguishing a candle.Your $60 AC subpanel has none of this.Its breakers are designed assuming the arc will naturally extinguish within 8 milliseconds. Put 93 volts DC through them, and that assumption becomes a liability. The contacts try to open, the arc forms, and instead of dying at the zero-crossing, it just... continues. The breaker's arc chutes aren't long enough. The contact separation isn't wide enough. The materials aren't rated for sustained DC arcing.Eventually, one of two things happens: the contacts weld together (permanently closing the circuit even when you think it's "off"), or the breaker's internal components melt and fail catastrophically. Neither outcome involves your solar system shutting down safely when you need it to.The 48V Confusion: Your Battery Voltage ≠ Your String VoltageThis is where most DIY solar combiner box plans go sideways.You see "48V system" in your planning documents. You find an AC subpanel rated for "48 volts." Perfect match, right?Wrong on three counts.First: That 48V battery rating is the nominal voltage—the average operating point. Your 48V battery actually operates between 40V (discharged) and 58V (charging). Not relevant for combiner box sizing, but important to know the numbers move around.Second: Your solar strings don't care what voltage your batteries run at. Each REC 350W panel has an open-circuit voltage (Voc) of 46.7V. Two panels in series? That's 93.4 volts—nearly double your battery voltage—and that's the number your DIY combiner box has to handle. You're not combining 48V; you're combining five separate 93.4V strings into one DC output circuit.Third—and this is The Voltage Rating Trap: When an AC-rated panel says "48 volts," it means 48 volts AC. If it has any DC rating at all (most don't), it's buried in the fine print and dramatically lower. A breaker rated for 240VAC might only be safe to 48VDC. A panel rated for 480VAC? Maybe 60-80VDC if you're lucky.Why the massive difference? Back to The Arc That Won't Die. AC voltage ratings assume the arc extinguishes naturally. DC voltage ratings assume the arc fights back and tries to sustain itself across wider gaps. The higher the DC voltage, the wider the gap it can jump, and the more robust the interrupting mechanism needs to be.So that Square D panel "rated for 48V"? Even if that's a DC rating (check the datasheet—I'll wait), you're trying to push 93.4V through it. You're operating at 195% of its design voltage. That's not a safety margin; that's a countdown timer.What $240 Actually Buys You: Inside UL 1741 Certification"It's just a UL sticker," you might think. "I can skip that for a DIY setup."But UL 1741—the standard for solar combiner boxes and interconnection equipment—isn't checking whether your box has rounded corners and a nice paint job. It's testing whether your equipment survives the exact failure modes that happen in real-world PV systems.Here's what a combiner box goes through to earn that UL 1741 listing:DC arc fault testing: Can the breakers interrupt an arc at full string voltage under maximum current? They test this hundreds of times. Your AC panel's breakers? Never tested for DC arcing. Zero times.Short-circuit current testing: What happens when two strings accidentally short together, dumping 90 amps through a bus bar rated for 20? The test exposes every connection point to fault currents 10-20× normal operating current. Everything that's going to melt, melts in the lab instead of on your roof.Temperature cycling: Rooftop combiner boxes swing from -40°F winter nights to 140°F summer days under direct sun. UL cycles the equipment through these extremes while fully loaded. Connections that would loosen after three years of thermal expansion? They fail in the test chamber.Environmental protection: That NEMA 3R rating isn't decorative. It means the box survives horizontal rain, doesn't accumulate ice that blocks ventilation, and keeps dust off the bus bars even when mounted in a dusty industrial environment. Your garage subpanel is NEMA 1—designed for nice, clean indoor use at room temperature.The real cost of that $240 upgrade isn't the materials. A DC-rated breaker costs maybe $30 instead of $12 for an AC breaker. The metal enclosure costs another $50. The rest? It's the engineering hours spent making sure those components work together reliably under worst-case conditions, and the testing to prove it.When you skip UL 1741, you're not just missing a sticker. You're missing 10,000 hours of destructive testing that identified every single failure mode your roof-mounted box is going to face over the next 20 years. You're beta-testing those failure modes yourself.In real-time.On your roof.4 Non-Negotiable Requirements for a Safe DIY Solar Combiner BoxLet's be clear: building your own solar combiner box is technically possible. But it's only worth doing if you meet every single one of these requirements. Skip even one, and you'd be better off buying the pre-made box.Requirement #1: DC-Rated Components with Proper Voltage RatingsYour shopping list for a DIY solar combiner box starts here: every breaker, fuse, bus bar, terminal block, and disconnect inside that box must be explicitly rated for DC voltage and for at least 600 volts DC.Not 600VAC. Not "suitable for solar." Not "probably fine." The datasheet must state: "600VDC" in plain text.Why 600V when your strings are only 93.4V? Two reasons. First, NEC Article 690.7 requires voltage calculations based on the coldest expected temperature in your location. Solar panels produce higher voltage when cold—up to 10-15% higher than nameplate Voc depending on your climate zone. Your 46.7V panels might hit 53V each on a January morning. Two in series? 106 volts per string.Second, you need safety margin for transient voltage spikes during cloud-edge effects (when sunlight intensity changes rapidly) and for equipment degradation over time. Industry standard: if your maximum system voltage is under 150VDC, use 600VDC-rated components. It's not overkill; it's the minimum for 25-year service life.Where to source DC-rated components:DC breakers: Manufacturers like ABB, Eaton, Mersen, and Littelfuse make DC-rated molded case circuit breakers (MCCBs). Expect to pay $35-60 per breaker vs $12-18 for equivalent AC breakers. Check for "UL 489 supplement" DC rating or "IEC 60947-2 DC" marking.Fuses: Ferraz Shawmut, Mersen, and Littelfuse offer PV-rated fuses with 600VDC to 1000VDC ratings. Use 15A fuses for standard 350W panels (calculated as Isc × 1.56 per NEC 690.8). Cost: $8-15 per fuse plus $25-40 per fuse holder.Bus bars: Copper or aluminum rated for 90°C minimum. Many AC-rated bus bars work fine, but verify the material spec handles DC current density (1.5-2.0 A/mm² for copper).Pro-Tip #1: That "48V" marking on AC equipment? It refers to your battery voltage, not your panel string voltage. Your 48V battery system has 93.4V strings that need proper 600VDC-rated DC equipment.Requirement #2: UL 1741-Listed Enclosure or Equivalent ProtectionThe metal box itself matters more than you think when building a DIY solar combiner box.For rooftop installation, you need at minimum a NEMA 3R (rain-tight) or IP54 (dust and splash protected) rated enclosure. NEMA 1 indoor panels are not suitable. The enclosure must:Handle thermal cycling: Rooftop temperatures swing 80-100°F daily. The enclosure needs gaskets that maintain their seal, knockouts that don't crack from expansion/contraction, and paint that doesn't flake off and contaminate electrical connections.Provide adequate ventilation: DC breakers generate heat when carrying current. Without proper ventilation, internal temperatures can exceed component ratings even when the ambient temperature is acceptable. Look for enclosures with ventilation calculated for at least 30% more thermal load than your maximum string current.Include proper grounding provisions: Your enclosure needs dedicated grounding bus bars with mechanical lugs (not spring clips) rated for #6 AWG copper minimum. Every metal surface inside the box must be bonded to ground. This isn't optional—NEC 690.43 requires it.Cost reality check: A proper NEMA 3R enclosure sized for 5-6 strings (approximately 12" × 16" × 6") runs $80-150. A weatherproof outdoor-rated enclosure with the right knockouts, bus bars, and mounting hardware? $120-200. That's 50-60% of your total DIY combiner box cost right there.If you're thinking "I'll just use the AC panel and add a weatherproof cover," stop. Those covers are designed to keep rain off the switches during momentary use—not provide continuous NEMA 3R protection for equipment that lives outdoors 24/7 for 25 years.Requirement #3: Arc Fault Protection (NEC 690.11 Compliance)Here's where most DIY solar combiner box builds fail code inspection.NEC 690.11 mandates arc fault circuit interrupters (AFCI) for any PV system with DC circuits operating at 80 volts or higher. Your 93.4V strings? You're 17% over the threshold. AFCI is non-negotiable.What AFCI actually does: It monitors the electrical signature of current flowing through the DC circuits and detects the specific noise pattern of an arc fault—the chaotic, high-frequency signal that appears when current jumps across a gap. When detected, it immediately interrupts the circuit before the arc can ignite nearby materials.Remember The Arc That Won't Die? AFCI is specifically designed to kill it.Your two options:Option 1 - Inverter with integrated AFCI: Most modern string inverters (SMA, SolarEdge, Fronius, etc.) have built-in arc fault detection per UL 1741. If your inverter has this, you don't need separate AFCI in your DIY combiner box. Verify this by checking your inverter's spec sheet for "UL 1741 AFCI compliant" or "NEC 690.11 arc fault protection."Option 2 - Standalone AFCI device: If your inverter doesn't include AFCI, you need a listed arc fault detector installed in your combiner box or within 6 feet of it. These cost $200-400 and require additional wiring. Brands include Sensata, Eaton, and Mersen. This alone might make your DIY combiner box more expensive than buying a pre-made one.Exception: If your DC wiring runs in metal conduit or metal-clad cable, and never exits that metal raceway between the panels and the inverter, you can skip AFCI. But realistically? Rooftop installations use exposed PV wire with MC4 connectors, which means AFCI is required.Pro-Tip #2: DC arcs don't die when you flip the switch—they keep burning at 35,000°F until physically suppressed. AFCI is how you suppress them before they start fires.Requirement #4: Proper Labeling and Documentation (NEC 690.7, 690.15)Code inspectors will red-tag your DIY solar combiner box installation for missing labels faster than for questionable component choices.Required labels on your DIY combiner box:1. Maximum DC voltage label (NEC 690.7):MAXIMUM DC VOLTAGE: 106V(Based on 2× 46.7V panels at -10°C ambient)COMPLIES WITH NEC 690.7(D)This label must be placed on the combiner box exterior and visible without opening the enclosure.2. DC combiner identification (NEC 690.15):WARNING:DC COMBINER BOXMULTIPLE DC VOLTAGE SOURCESDO NOT DISCONNECT UNDER LOAD3. Conductor identification (NEC 690.31):Every incoming string must be labeled with its source location:"STRING 1 - ARRAY NORTH""STRING 2 - ARRAY NORTH""STRING 3 - ARRAY SOUTH"etc.4. Grounding electrode conductor label (if applicable):If your grounding conductor terminates in the combiner box, label it per NEC 690.47.Use outdoor-rated label stock (3M or Brady polyester labels with UV-resistant ink). Printed paper labels in weatherproof sleeves won't pass inspection—they degrade too quickly.Documentation you need:One-line diagram showing string configuration and voltagesComponent datasheets proving DC ratingsCalculation showing NEC 690.7 max voltageNEC 690.8 current calculationsKeep copies inside the combiner box in a weatherproof document pouch. Inspectors may request them.The Real Math: $300 Combiner Box vs. The AlternativeLet's talk money. Real money.Your compliant DIY solar combiner box parts list:NEMA 3R enclosure with breaker mounts: $120Five DC-rated 15A breakers at $45 each: $225DC-rated bus bars and terminals: $60Hardware, labels, wire, connectors: $40Total: $445Wait. The pre-made UL 1741-listed combiner box costs $320. Your "DIY savings"? You're losing $125 plus 6-8 hours of assembly and wiring time.But that's assuming you don't need separate AFCI. Add that $300 device? Now you're at $745 vs. $320 for the pre-made box that includes integrated AFCI.The math doesn't work for most DIY solar combiner box projects. Unless you're building for 10+ strings where pre-made boxes get expensive (over $800), or you need a custom configuration that's not available off-the-shelf, DIY combiner boxes are often more expensive than buying properly certified equipment.Here's the math that really matters:Cost of one electrical fire: $50,000-$250,000 in structural damage, depending on when the fire department arrives.Cost of homeowner's insurance premium increase after an electrical fire: 20-40% increase for 3-5 years = $1,200-$3,000 additional cost.Cost of insurance claim denial because you used non-listed equipment: 100% of the damages = whatever the fire costs.Cost of permitting issues when you try to sell your house: Delays, re-inspections, potential contractor costs to bring to code = $2,000-$8,000.That $240 price difference? It's not buying a fancy label. It's buying peace of mind that every single component was torture-tested for the exact failure modes that happen on rooftops. It's buying insurance-compliant equipment that won't void your policy. It's buying inspector-approved hardware that won't delay your permit by three months.Pro-Tip #3: The real DIY skill isn't figuring out how to build everything yourself—it's knowing which corners you can cut and which ones cut back. Combiner boxes cut back.When DIY Actually Makes SenseDon't mistake this article for "never build anything yourself." Solar installations have plenty of legitimate DIY opportunities:Smart DIY projects:Racking and mounting: You can absolutely design and install your own panel mounting system. It's mechanical, it's verifiable, and there's no Arc That Won't Die trying to kill you if you get something wrong.Conduit runs: Running EMT or PVC conduit from your combiner box to your inverter? Great DIY project. Just follow NEC conduit fill calculations.System monitoring: Adding performance monitoring, data logging, even IoT integrations to track your system? Go wild. Worst case is you lose some data.Reckless DIY projects:Combiner boxes (as we've discussed)DC disconnects between combiner and inverter (same issues: DC arc interruption, voltage ratings)Inverter installation (complex electrical connections, AC/DC integration points)Service panel interconnections (requires licensed electrician in most jurisdictions)The pattern? If it's carrying high-voltage DC or connecting to your main electrical service, hire professionals or buy listed equipment. If it's structural, mechanical, or low-voltage monitoring, DIY away.The Bottom Line: Build Smart, Not Just CheapIf you made it this far, you're already ahead of 90% of DIY solar installers. You're asking the right questions.Here's what you've learned:The Arc That Won't Die: DC arcs don't self-extinguish like AC arcs. They burn at 35,000°F until physically suppressed. AC equipment isn't designed for this.The 48V Confusion: Your battery voltage isn't your string voltage. That 48V system has 93.4V strings that need 600VDC-rated equipment, not repurposed AC panels.The Voltage Rating Trap: AC voltage ratings don't translate to DC. A 240VAC breaker might only be safe to 48VDC. Your 93.4V strings exceed most AC equipment's DC capability.The Compliance Cost: Building a code-compliant DIY solar combiner box costs $445-$745. Buying a pre-made UL 1741-listed box? $320. The math doesn't support DIY unless you need custom configurations.Can you technically build your own combiner box? Yes. With the right components, proper enclosures, AFCI protection, and correct labeling, it's possible.Should you? Probably not. The cost savings evaporate once you price out DC-rated components and AFCI. The time investment (8-10 hours for first build, 4-6 for subsequent ones) rarely justifies the marginal savings. And the liability if something goes wrong—that insurance claim denial, that permit rejection, that inspector's red tag—wipes out any financial benefit.The real DIY move? Know when to build and when to buy.Save your DIY energy for the racking, the monitoring systems, the conduit runs, the parts of solar installations where your effort actually multiplies your money instead of just increasing your risk.And that $60 Square D panel in your garage? Use it where it belongs—on an AC circuit, where the zero-crossing does the heavy lifting and arcs die on their own like they're supposed to.Because in solar PV, the most expensive mistake isn't the one that costs you $300 up front. It's the one that saves you $240 today and costs you $50,000 six months from now when The Arc That Won't Die finds something flammable.Ready to do your solar installation right? Check out our complete line of UL 1741-listed combiner boxes and DC-rated protection equipment designed specifically for residential and commercial PV systems. We've already done the engineering and testing—you get reliable equipment at prices that make DIY look expensive.

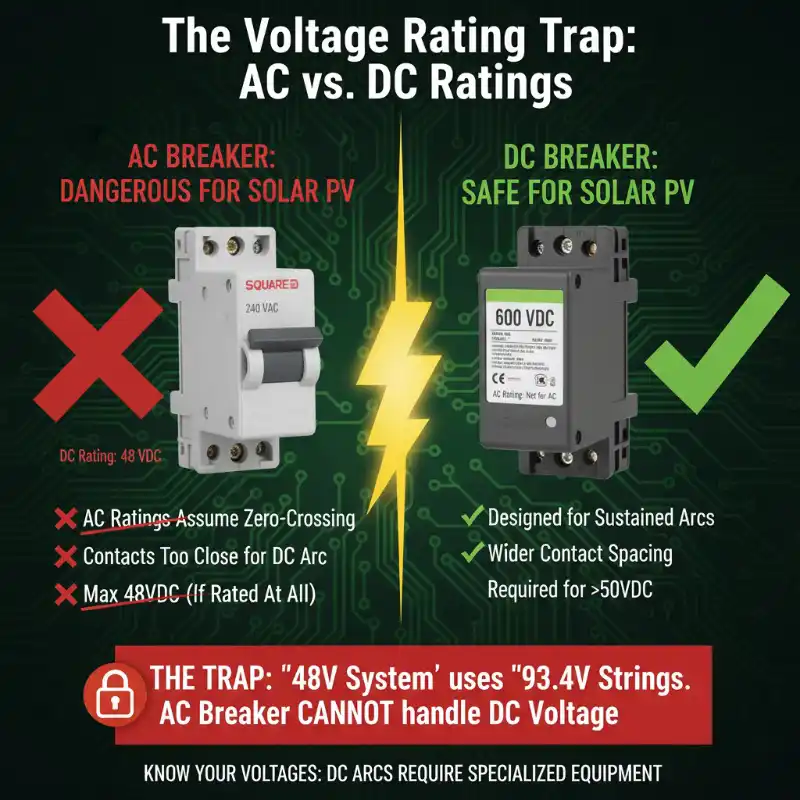
取り付け準備ができたREC 350Wソーラーパネルが10枚あります。2枚のパネルを直列接続したストリングが5つ。各ストリングは93.4V DC、9アンペアを出力します。DIYソーラーコンバイナーボックスの設計をオンラインで調べ、計算も行い、すべて問題ないことを確認しました。.

次に、適切なソーラーコンバイナーボックスの価格を調べます。$300。統合モニタリングが必要な場合は、$400かもしれません。ガレージにあるSquare Dのサブパネル(昨年$60で購入)を見ます。同じ金属製の箱。同じバスバー。同じ回路ブレーカー。なぜ同じようなものに5倍も払わなければならないのでしょうか?

その理由は、$240の価格差が、20年間動作するシステムと6ヶ月で発火するシステムの違いだからです。.

消えないアーク:DCがAC機器を破壊する理由

The Arc That Won't Die: AC vs. DC Interruption

スイッチを入れると ACブレーカー 負荷がかかった状態で開くと、分離する接点間に電気アークが発生します。それはプラズマであり、かつて空気だったものを通過する数千アンペアのイオン化ガスであり、太陽の表面の4倍の35,000°Fに達する温度を生成します。.

しかし、ACアークには、自然に消滅するという特徴があります。.

標準的なAC電源は、電流の方向が交互に変わるため、1秒間に60回、ゼロボルトを通過します。その瞬間(わずか数ミリ秒)に、アークはエネルギー源を失い、消滅します。接点は離れ続けます。回路が開きます。完了です。.

DCはそうではありません。.

93.4V DCを遮断すると、アークが点灯し、接点がそれを維持できるほど近い限り点灯し続けます。ゼロクロスはありません。自然な遮断はありません。金属を溶かし、絶縁体を燃やし、接点が物理的に十分に離れるまで燃え続けるプラズマの川で、そのギャップを埋めようとする継続的で容赦のない電流があるだけです。通常、AC機器用に設計されているよりも3〜4倍遠くまで離れる必要があります。.

これが「消えないアーク」であり、実際のDC定格のコンバイナーボックス内のすべてのコンポーネントがAC機器とは異なって見える理由です。接点間隔が広くなっています。アークシュート(アークを伸ばして冷却するジグザグの金属板)が長くなっています。一部のDCブレーカーは、ろうそくを消すように、磁気コイルを使用してアークを物理的に吹き飛ばします。.

あなたの$60 ACサブパネルには、これらが何もありません。.

そのブレーカーは、アークが8ミリ秒以内に自然に消滅することを前提に設計されています。93ボルトのDCを流すと、その前提が弱点になります。接点が開こうとし、アークが形成されますが、ゼロクロスで消滅する代わりに、ただ…継続します。ブレーカーのアークシュートは十分に長くありません。接点分離は十分に広くありません。材料は持続的なDCアークに対応していません。.

最終的に、次の2つのうちのいずれかが発生します。接点が溶接されて(オフになっていると思っても回路が永久に閉じます)、またはブレーカーの内部コンポーネントが溶けて壊滅的に故障します。どちらの結果も、必要なときにソーラーシステムが安全にシャットダウンすることはありません。.

48Vの混乱:バッテリー電圧≠ストリング電圧

The Voltage Rating Trap: AC vs. DC Ratings.

これは、ほとんどのDIYソーラーコンバイナーボックスの計画がうまくいかないところです。.

計画書に「48Vシステム」と記載されています。「48ボルト」定格のACサブパネルを見つけます。完璧な一致ですよね?

3つの点で間違っています。.

まず: その48Vバッテリー定格は 公称 電圧—平均動作点です。あなたの48Vバッテリーは、実際には40V(放電)から58V(充電)の間で動作します。コンバイナーボックスのサイジングには関係ありませんが、数値が変動することを知っておくことは重要です。.

次に: ソーラーストリングは、バッテリーがどの電圧で動作するかを気にしません。各REC 350Wパネルの開放電圧(Voc)は46.7Vです。2枚のパネルを直列に接続すると?それは93.4ボルト—バッテリー電圧のほぼ2倍—であり、それがDIYコンバイナーボックスが処理する必要がある数値です。48Vを組み合わせているのではなく、5つの別々の93.4Vストリングを1つのDC出力回路に組み合わせているのです。.

3番目—そしてこれが電圧定格の罠です: AC定格のパネルに「48ボルト」と記載されている場合、それは48ボルトを意味します 交流. 。DC定格がまったくある場合(ほとんどありません)、それは細かい文字で埋もれており、劇的に低くなっています。240VAC定格のブレーカーは、48VDCまでしか安全ではない可能性があります。480VAC定格のパネル?運が良ければ60〜80VDCかもしれません。.

なぜこれほど大きな違いがあるのでしょうか?消えないアークに戻ります。AC電圧定格は、アークが自然に消滅することを前提としています。DC電圧定格は、アークが反撃し、より広いギャップでそれ自体を維持しようとすることを前提としています。DC電圧が高いほど、ジャンプできるギャップが広くなり、遮断メカニズムがより堅牢である必要があります。.

したがって、Square Dパネルは「48V定格」ですか?それがDC定格であっても(データシートを確認してください—お待ちします)、93.4Vを押し込もうとしています。設計電圧の195%で動作しています。それは安全マージンではありません。それはカウントダウンタイマーです。.

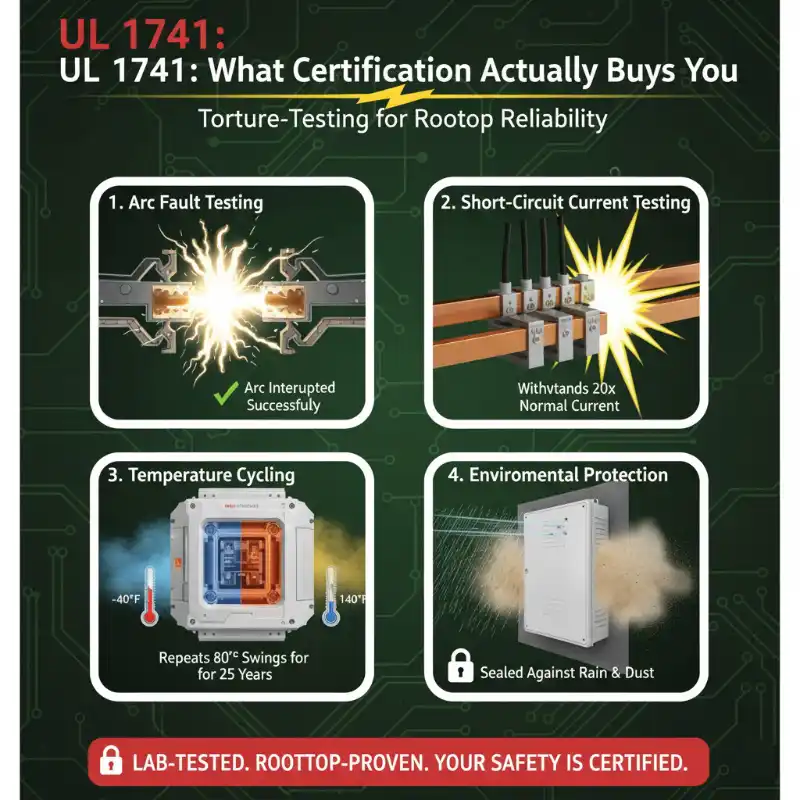
$240で実際に何が得られるか:UL 1741認証の内側

UL 1741- What Certification Actually Buys You.webp

“「それは単なるULステッカーだ」と思うかもしれません。「DIYセットアップではそれをスキップできる」と。”

しかし、ソーラーコンバイナーボックスおよび相互接続機器の規格であるUL 1741は、ボックスに丸みを帯びた角と素敵な塗装が施されているかどうかを確認しているわけではありません。実際のPVシステムで発生する正確な故障モードを機器が乗り越えるかどうかをテストしているのです。.

コンバイナーボックスがUL 1741リストを獲得するために経る手順は次のとおりです。

DCアーク故障テスト: ブレーカーは、最大電流下でフルストリング電圧でアークを遮断できますか?彼らはこれを何百回もテストします。ACパネルのブレーカー?DCアークのテストは一度も行われていません。ゼロ回です。.

短絡電流テスト: 2つのストリングが誤って短絡し、20定格のバスバーに90アンペアを流し込んだ場合、どうなりますか?テストでは、すべての接続ポイントを通常の動作電流の10〜20倍の故障電流にさらします。溶けるものはすべて、屋根の上ではなく実験室で溶けます。.

温度サイクル: 屋上のコンバイナーボックスは、-40°Fの冬の夜から直射日光下で140°Fの夏の日まで変動します。ULは、機器を完全にロードした状態でこれらの極端な状態を繰り返します。3年間の熱膨張後に緩む接続?それらはテストチャンバーで失敗します。.

環境保護: そのNEMA 3R定格は装飾的ではありません。それは、ボックスが水平方向の雨に耐え、換気を妨げる氷が蓄積せず、ほこりの多い産業環境に取り付けられていても、バスバーからほこりを防ぐことを意味します。あなたのガレージのサブパネルはNEMA 1—部屋の温度で、きれいで快適な屋内での使用のために設計されています。.

$240の実際のコストは、材料ではありません。DC定格のブレーカーは、ACブレーカーの$12の代わりに$30程度かかる場合があります。金属製のエンクロージャーにはさらに$50かかります。残りは?それは、最悪の条件下でこれらのコンポーネントが確実に連携して動作するようにするためのエンジニアリング時間と、それを証明するためのテストです。.

UL 1741をスキップすると、単なるステッカーを見逃すだけではありません。今後20年間に屋根に取り付けられたボックスが直面するすべての単一の故障モードを特定した10,000時間の破壊テストを見逃しています。あなたはそれらの故障モードを自分でベータテストしています。.

リアルタイムで。.

あなたの屋根の上で。.

安全なDIYソーラーコンバイナーボックスのための4つの譲れない要件

明確にしておきましょう。独自のソーラーコンバイナーボックスを構築することは技術的に可能です。しかし、これらの要件をすべて満たしている場合にのみ、それを行う価値があります。1つでもスキップすると、既製のボックスを購入する方が良いでしょう。.

4 Non-Negotiable Requirements for a Safe DIY Solar Combiner Box

要件1:適切な電圧定格のDC定格コンポーネント

DIYソーラーコンバイナーボックスの買い物リストはここから始まります。すべてのブレーカー、, ヒューズ, バスバー, 端子台, 、およびボックス内の遮断器は、DC電圧用に明示的に定格されている必要があります そして 少なくとも600ボルトDC。.

600VACではありません。「ソーラーに適しています」ではありません。「おそらく大丈夫」ではありません。データシートには、次のように記載されている必要があります。 “「600VDC」” 平易なテキストで。.

ストリングがわずか93.4Vの場合、なぜ600Vなのですか?2つの理由があります。まず、NEC第690.7条では、電圧計算は 最も寒い あなたの場所で予想される温度。ソーラーパネルは、低温時に高い電圧を生成します—気候帯に応じて、銘板Vocよりも最大10〜15%高くなります。あなたの46.7Vパネルは、1月の朝にそれぞれ53Vに達する可能性があります。直列に2つ?ストリングあたり106ボルト。.

次に、クラウドエッジ効果(日光の強度が急速に変化する場合)中の過渡電圧スパイク、および時間の経過に伴う機器の劣化に対する安全マージンが必要です。業界標準:最大システム電圧が150VDC未満の場合は、600VDC定格のコンポーネントを使用してください。それは過剰ではありません。それは25年の耐用年数のための最小限のものです。.

DC定格コンポーネントの調達先:

  • DCブレーカー: ABB、Eaton、Mersen、Littelfuseなどのメーカーは、DC定格のモールドケース回路ブレーカー(MCCB)を製造しています。同等のACブレーカーの$12-18に対して、ブレーカーあたり$35-60を支払うことを期待してください。「UL 489サプリメント」DC定格または「IEC 60947-2 DC」マーキングを確認してください。.
  • ヒューズ: Ferraz Shawmut、Mersen、Littelfuseは、600VDC〜1000VDC定格のPV定格ヒューズを提供しています。標準の350Wパネルには15Aヒューズを使用します(NEC 690.8に従ってIsc×1.56として計算)。コスト:ヒューズあたり$8-15、ヒューズホルダーあたり$25-40。.
  • バスバー: 90°C以上の定格の銅またはアルミニウム。多くのAC定格バスバーは正常に機能しますが、材料仕様がDC電流密度(銅の場合は1.5〜2.0 A / mm²)を処理することを確認してください。.

Proチップ#1: AC機器に記載されている「48V」という表示は、パネルストリング電圧ではなく、バッテリー電圧を指します。48Vバッテリーシステムには93.4Vのストリングがあり、適切な600VDC定格のDC機器が必要です。.

要件#2: UL 1741-UL規格適合エンクロージャーまたは同等の保護

DIYソーラーコンバイナーボックスを構築する際、金属製のボックス自体が想像以上に重要です。.

屋根への設置には、少なくとも NEMA 3R (防雨型)または IP54 (防塵・防滴型)の定格エンクロージャーが必要です。NEMA 1の屋内用パネルは適していません。エンクロージャーは以下を満たす必要があります。

熱サイクルへの対応: 屋根の温度は1日に80〜100°F変動します。エンクロージャーには、シールを維持するガスケット、伸縮によってひび割れないノックアウト、剥がれ落ちて電気接続を汚染しない塗料が必要です。.

適切な換気の確保: DCブレーカーは電流を流すと熱を発生します。適切な換気がないと、周囲温度が許容範囲内であっても、内部温度がコンポーネントの定格を超える可能性があります。最大ストリング電流よりも少なくとも30%多い熱負荷に対応できる換気が計算されたエンクロージャーを探してください。.

適切な接地規定の包含: エンクロージャーには、最小#6 AWGの銅線に対応する機械式ラグ(スプリングクリップではない)を備えた専用の接地バスバーが必要です。ボックス内のすべての金属面は、接地にボンディングする必要があります。これはオプションではありません。NEC 690.43で義務付けられています。.

コストの現実: 5〜6ストリングに対応する適切なNEMA 3Rエンクロージャー(約12インチ×16インチ×6インチ)の費用は$80〜150ドルです。適切なノックアウト、バスバー、および取り付け金具を備えた耐候性屋外定格エンクロージャーは?$120〜200ドルです。これは、DIYコンバイナーボックスの総コストの50〜60%を占めます。.

「ACパネルを使用して、耐候性カバーを追加するだけだ」と考えている場合は、やめてください。これらのカバーは、スイッチを一時的に使用する際に雨を防ぐように設計されており、24時間365日、25年間屋外に設置される機器に継続的なNEMA 3R保護を提供するようには設計されていません。.

要件#3:アーク故障保護(NEC 690.11準拠)

ほとんどのDIYソーラーコンバイナーボックスの構築は、ここでコード検査に失敗します。.

NEC 690.11は、DC回路が 80ボルト以上. で動作するすべてのPVシステムに、アーク故障回路遮断器(AFCI)を義務付けています。93.4Vのストリングは?あなたは閾値を17%超えています。AFCIは必須です。.

AFCIの実際の機能: DC回路を流れる電流の電気的特性を監視し、アーク故障の特定のノイズパターン(電流がギャップを飛び越えるときに現れる、混沌とした高周波信号)を検出します。検出されると、アークが近くの物質に引火する前に、回路を即座に遮断します。.

「The Arc That Won’t Die」を覚えていますか?AFCIは、それを阻止するように特別に設計されています。.

2つのオプション:

オプション1 – AFCI内蔵インバーター: 最新のストリングインバーター(SMA、SolarEdge、Froniusなど)のほとんどは、UL 1741に準拠したアーク故障検出機能を内蔵しています。インバーターにこれが搭載されている場合は、DIYコンバイナーボックスに個別のAFCIは必要ありません。インバーターの仕様書で「UL 1741 AFCI準拠」または「NEC 690.11アーク故障保護」を確認して、これを確認してください。“

オプション2 – スタンドアロンAFCIデバイス: インバーターにAFCIが含まれていない場合は、コンバイナーボックス内またはその6フィート以内に、UL規格適合のアーク故障検出器を設置する必要があります。これらの費用は$200〜400ドルで、追加の配線が必要です。ブランドには、Sensata、Eaton、およびMersenが含まれます。これだけでも、DIYコンバイナーボックスが既製品よりも高価になる可能性があります。.

検査のためだけに構築するのではなく、その後の20年間の運用のために構築してください。 DC配線が金属製電線管または金属被覆ケーブルで配線され、パネルとインバーターの間でその金属製電線路から出ない場合は、AFCIを省略できます。しかし、現実的には?屋根への設置では、MC4コネクター付きの露出したPVワイヤーが使用されるため、AFCIが必要です。.

Proチップ#2: スイッチを切ってもDCアークは消えません。物理的に抑制されるまで35,000°Fで燃え続けます。AFCIは、火災が発生する前にそれらを抑制する方法です。.

要件#4:適切なラベル表示とドキュメント(NEC 690.7、690.15)

コード検査官は、疑わしいコンポーネントの選択よりも早く、ラベルが不足しているDIYソーラーコンバイナーボックスの設置にレッドタグを付けます。.

DIYコンバイナーボックスに必要なラベル:

1. 最大DC電圧ラベル(NEC 690.7):

最大DC電圧:106V

このラベルは、エンクロージャーを開けなくても見えるように、コンバイナーボックスの外側に貼付する必要があります。.

2. DCコンバイナーの識別(NEC 690.15):

警告:

3. 導体の識別(NEC 690.31):
すべての入力ストリングには、そのソースの場所を示すラベルを付ける必要があります。

  • “「ストリング1 – アレイ北」”
  • “「ストリング2 – アレイ北」”
  • “「ストリング3 – アレイ南」”
  • 等.

4. 接地電極導体ラベル(該当する場合):
接地導体がコンバイナーボックスで終端する場合は、NEC 690.47に従ってラベルを付けます。.

屋外定格のラベル用紙(UV耐性インクを使用した3MまたはBradyポリエステルラベル)を使用してください。耐候性スリーブに入れた印刷された紙のラベルは、検査に合格しません。劣化が速すぎるためです。.

必要なドキュメント:

  • ストリング構成と電圧を示す単線図
  • DC定格を証明するコンポーネントのデータシート
  • NEC 690.7の最大電圧を示す計算
  • NEC 690.8の電流計算

耐候性ドキュメントポーチに入れて、コンバイナーボックス内にコピーを保管してください。検査官が要求する場合があります。.

実際の計算:$300コンバイナーボックスと代替案

お金の話をしましょう。本当のお金です。.

準拠したDIYソーラーコンバイナーボックスの部品リスト:

  • ブレーカーマウント付きNEMA 3Rエンクロージャー:$120
  • 5つのDC定格15Aブレーカー(各$45):$225
  • DC定格バスバーと端子:$60
  • ハードウェア、ラベル、ワイヤー、コネクター:$40
  • 合計:$445

待ってください。既製のUL 1741規格適合コンバイナーボックスの費用は$320ドルです。「DIYの節約」?組み立てと配線に6〜8時間かかることに加えて、$125ドルを失っています。.

ただし、これは個別のAFCIが必要ないことを前提としています。その$300デバイスを追加しますか?これで、AFCIが統合された既製のボックスの$320ドルに対して、$745ドルになります。.

DIYソーラーコンバイナーボックスのほとんどのプロジェクトでは、計算が合いません。既製品のボックスが高価になる(800ドル以上)10ストリング以上を構築する場合や、既製品では入手できないカスタム構成が必要な場合を除き、DIYコンバイナーボックスは多くの場合、 より 適切に認証された機器を購入するよりも高価です。.

ここで本当に重要な計算を示します。

電気火災1件の費用:消防署の到着時間にもよりますが、構造的損傷で50,000ドル~250,000ドル。.

電気火災後の住宅所有者保険料の値上げ:20~40%の値上げが3~5年間=追加費用1,200ドル~3,000ドル。.

未掲載の機器を使用したために保険金請求が拒否された場合の費用:損害額の100%=火災費用。.

家を売却しようとしたときに発生する許可の問題の費用:遅延、再検査、コードに準拠させるための潜在的な請負業者の費用=2,000ドル~8,000ドル。.

その240ドルの価格差は? 単なる派手なラベルを買うのではありません。屋根で発生する正確な故障モードに対して、すべてのコンポーネントが過酷なテストを受けているという安心感を買うのです。保険に準拠した機器を購入することで、保険契約が無効になることはありません。検査官が承認したハードウェアを購入することで、許可が3か月遅れることはありません。.

Proチップ#3: 真のDIYスキルは、すべてを自分で構築する方法を見つけることではなく、どこを妥協できるか、どこを妥協すべきでないかを知ることです。コンバイナーボックスは妥協すべきではありません。.

DIYが実際に意味をなす場合

この記事を「自分で何も構築するな」と誤解しないでください。ソーラー設備には、正当なDIYの機会がたくさんあります。

スマートなDIYプロジェクト:

  • 架台と取り付け: パネル取り付けシステムを自分で設計および設置することは絶対に可能です。それは機械的で、検証可能であり、何か間違ったことをしてもあなたを殺そうとする「決して消えないアーク」はありません。.
  • 電線管の配線: コンバイナーボックスからインバーターまでEMTまたはPVC電線管を配線しますか?素晴らしいDIYプロジェクトです。NEC電線管充填計算に従ってください。.
  • システム監視: システムのパフォーマンス監視、データロギング、さらにはIoT統合を追加してシステムを追跡しますか?どんどんやってください。最悪の場合、いくつかのデータを失うだけです。.

無謀なDIYプロジェクト:

  • コンバイナーボックス (すでに説明したように)
  • DC遮断器 コンバイナーとインバーターの間(同じ問題:DCアーク遮断、電圧定格)
  • インバーターの設置 (複雑な電気接続、AC/DC統合ポイント)
  • サービスパネルの相互接続 (ほとんどの管轄区域で免許を持った電気技師が必要)

パターンは?高電圧DCを運んでいる場合、または主電源に接続している場合は、専門家を雇うか、掲載されている機器を購入してください。構造的、機械的、または低電圧監視の場合は、DIYでどうぞ。.

pv combiner box

結論:ただ安いだけでなく、賢く構築する

ここまでたどり着いたあなたは、すでにDIYソーラー設置者の90%よりも先を行っています。あなたは正しい質問をしています。.

ここで学んだこと:

決して消えないアーク: DCアークはACアークのように自然に消えません。物理的に抑制されるまで35,000°Fで燃焼します。AC機器はこれに対応するように設計されていません。.

48Vの混乱: バッテリー電圧はストリング電圧ではありません。その48Vシステムには93.4Vのストリングがあり、転用されたACパネルではなく、600VDC定格の機器が必要です。.

電圧定格の罠: AC電圧定格はDCに変換されません。240VACブレーカーは48VDCまでしか安全でない可能性があります。93.4Vのストリングは、ほとんどのAC機器のDC能力を超えています。.

コンプライアンスコスト: コードに準拠したDIYソーラーコンバイナーボックスの構築には、445ドルから745ドルかかります。既製のUL 1741リストボックスを購入しますか?320ドル。カスタム構成が必要な場合を除き、計算はDIYをサポートしていません。.

技術的に独自のコンバイナーボックスを構築できますか?はい。適切なコンポーネント、適切なエンクロージャー、AFCI保護、および正しいラベルがあれば可能です。.

そうすべきですか?おそらくそうではありません。DC定格コンポーネントとAFCIの価格を調べると、コスト削減はなくなります。時間投資(最初の構築で8~10時間、その後の構築で4~6時間)は、わずかな節約を正当化することはめったにありません。そして、何か問題が発生した場合の責任—保険金請求の拒否、許可の拒否、検査官の赤いタグ—は、経済的な利益をすべて消し去ります。.

真のDIYの動きは? いつ構築し、いつ購入するかを知ることです。.

DIYのエネルギーを、架台、監視システム、電線管の配線、ソーラー設備の努力がリスクを高めるだけでなく、実際にお金を増やす部分に費やしてください。.

そして、ガレージにあるその60ドルのSquare Dパネルは?本来あるべき場所、つまりゼロクロスが重労働を行い、アークが自然に消えるAC回路で使用してください。.

なぜなら、ソーラーPVにおいて、最も高価な間違いは、最初に300ドルかかるものではないからです。それは、今日240ドルを節約し、6か月後に「決して消えないアーク」が可燃物を見つけたときに50,000ドルかかる間違いです。.


ソーラー設備を正しく行う準備はできましたか? 住宅用および商業用PVシステム向けに特別に設計された、UL 1741リストのコンバイナーボックスとDC定格保護機器の完全なラインナップをご覧ください。エンジニアリングとテストはすでに完了しています。DIYが高価に見える価格で信頼性の高い機器を入手できます。.

About Author
Author picture

こんにちは、私はジョー、専用のプロフェッショナルで12年以上の経験を電気産業です。 でVIOX電気、私は高品質の電気的ソリューションのニーズに応えております。 私の専門知識に及ぶ産業用オートメーション、住宅の配線は、商用電気システム。お問い合わせ[email protected] がることができます。

要件をお知らせください
今すぐ見積もりを依頼する