DIY 태양광 결합기 박스: 대부분의 자작 설계가 화재 위험인 이유 (그리고 실제로 필요한 것)

You've got 10 REC 350W solar panels ready to mount. Five strings of two panels each. Each string pumping out 93.4 volts DC at 9 amps. You've researched DIY solar combiner box designs online, and you've done the math—everything checks out.Then you price out a proper solar combiner box. $300. Maybe $400 if you want the one with integrated monitoring. You look at the Square D subpanel sitting in your garage—the one you paid $60 for last year. Same metal box. Same bus bars. Same circuit breakers. Why exactly are you supposed to pay 5× more for what looks like the same thing?Here's why: Because that $240 price gap is the difference between a system that works for 20 years and one that catches fire in 6 months.The Arc That Won't Die: Why DC Destroys AC EquipmentThe moment you flip an AC breaker open under load, an electrical arc forms between the separating contacts. It's plasma—ionized gas carrying thousands of amps through what used to be air, generating temperatures that hit 35,000°F, which for reference is four times hotter than the surface of the sun.But here's the thing about AC arcs: they die on their own.Sixty times per second, standard AC power crosses through zero volts as the current alternates direction. At that exact moment—lasting just milliseconds—the arc loses its energy source and extinguishes. Contacts keep moving apart. Circuit opens. Done.DC doesn't do this.When you interrupt 93.4 volts DC, that arc lights up and stays lit for as long as the contacts are close enough to sustain it. There's no zero crossing. No natural interruption. Just continuous, unrelenting current trying to bridge that gap with a river of plasma that melts metal, ignites insulation, and keeps burning until the contacts have physically separated far enough—typically 3-4 times farther than AC equipment is designed for.This is "The Arc That Won't Die," and it's why every component inside a real DC-rated combiner box looks different from AC equipment. The contact spacing is wider. The arc chutes (those zigzag metal plates that stretch and cool the arc) are longer. Some DC breakers even use magnetic coils to physically blow the arc out, like extinguishing a candle.Your $60 AC subpanel has none of this.Its breakers are designed assuming the arc will naturally extinguish within 8 milliseconds. Put 93 volts DC through them, and that assumption becomes a liability. The contacts try to open, the arc forms, and instead of dying at the zero-crossing, it just... continues. The breaker's arc chutes aren't long enough. The contact separation isn't wide enough. The materials aren't rated for sustained DC arcing.Eventually, one of two things happens: the contacts weld together (permanently closing the circuit even when you think it's "off"), or the breaker's internal components melt and fail catastrophically. Neither outcome involves your solar system shutting down safely when you need it to.The 48V Confusion: Your Battery Voltage ≠ Your String VoltageThis is where most DIY solar combiner box plans go sideways.You see "48V system" in your planning documents. You find an AC subpanel rated for "48 volts." Perfect match, right?Wrong on three counts.First: That 48V battery rating is the nominal voltage—the average operating point. Your 48V battery actually operates between 40V (discharged) and 58V (charging). Not relevant for combiner box sizing, but important to know the numbers move around.Second: Your solar strings don't care what voltage your batteries run at. Each REC 350W panel has an open-circuit voltage (Voc) of 46.7V. Two panels in series? That's 93.4 volts—nearly double your battery voltage—and that's the number your DIY combiner box has to handle. You're not combining 48V; you're combining five separate 93.4V strings into one DC output circuit.Third—and this is The Voltage Rating Trap: When an AC-rated panel says "48 volts," it means 48 volts AC. If it has any DC rating at all (most don't), it's buried in the fine print and dramatically lower. A breaker rated for 240VAC might only be safe to 48VDC. A panel rated for 480VAC? Maybe 60-80VDC if you're lucky.Why the massive difference? Back to The Arc That Won't Die. AC voltage ratings assume the arc extinguishes naturally. DC voltage ratings assume the arc fights back and tries to sustain itself across wider gaps. The higher the DC voltage, the wider the gap it can jump, and the more robust the interrupting mechanism needs to be.So that Square D panel "rated for 48V"? Even if that's a DC rating (check the datasheet—I'll wait), you're trying to push 93.4V through it. You're operating at 195% of its design voltage. That's not a safety margin; that's a countdown timer.What $240 Actually Buys You: Inside UL 1741 Certification"It's just a UL sticker," you might think. "I can skip that for a DIY setup."But UL 1741—the standard for solar combiner boxes and interconnection equipment—isn't checking whether your box has rounded corners and a nice paint job. It's testing whether your equipment survives the exact failure modes that happen in real-world PV systems.Here's what a combiner box goes through to earn that UL 1741 listing:DC arc fault testing: Can the breakers interrupt an arc at full string voltage under maximum current? They test this hundreds of times. Your AC panel's breakers? Never tested for DC arcing. Zero times.Short-circuit current testing: What happens when two strings accidentally short together, dumping 90 amps through a bus bar rated for 20? The test exposes every connection point to fault currents 10-20× normal operating current. Everything that's going to melt, melts in the lab instead of on your roof.Temperature cycling: Rooftop combiner boxes swing from -40°F winter nights to 140°F summer days under direct sun. UL cycles the equipment through these extremes while fully loaded. Connections that would loosen after three years of thermal expansion? They fail in the test chamber.Environmental protection: That NEMA 3R rating isn't decorative. It means the box survives horizontal rain, doesn't accumulate ice that blocks ventilation, and keeps dust off the bus bars even when mounted in a dusty industrial environment. Your garage subpanel is NEMA 1—designed for nice, clean indoor use at room temperature.The real cost of that $240 upgrade isn't the materials. A DC-rated breaker costs maybe $30 instead of $12 for an AC breaker. The metal enclosure costs another $50. The rest? It's the engineering hours spent making sure those components work together reliably under worst-case conditions, and the testing to prove it.When you skip UL 1741, you're not just missing a sticker. You're missing 10,000 hours of destructive testing that identified every single failure mode your roof-mounted box is going to face over the next 20 years. You're beta-testing those failure modes yourself.In real-time.On your roof.4 Non-Negotiable Requirements for a Safe DIY Solar Combiner BoxLet's be clear: building your own solar combiner box is technically possible. But it's only worth doing if you meet every single one of these requirements. Skip even one, and you'd be better off buying the pre-made box.Requirement #1: DC-Rated Components with Proper Voltage RatingsYour shopping list for a DIY solar combiner box starts here: every breaker, fuse, bus bar, terminal block, and disconnect inside that box must be explicitly rated for DC voltage and for at least 600 volts DC.Not 600VAC. Not "suitable for solar." Not "probably fine." The datasheet must state: "600VDC" in plain text.Why 600V when your strings are only 93.4V? Two reasons. First, NEC Article 690.7 requires voltage calculations based on the coldest expected temperature in your location. Solar panels produce higher voltage when cold—up to 10-15% higher than nameplate Voc depending on your climate zone. Your 46.7V panels might hit 53V each on a January morning. Two in series? 106 volts per string.Second, you need safety margin for transient voltage spikes during cloud-edge effects (when sunlight intensity changes rapidly) and for equipment degradation over time. Industry standard: if your maximum system voltage is under 150VDC, use 600VDC-rated components. It's not overkill; it's the minimum for 25-year service life.Where to source DC-rated components:DC breakers: Manufacturers like ABB, Eaton, Mersen, and Littelfuse make DC-rated molded case circuit breakers (MCCBs). Expect to pay $35-60 per breaker vs $12-18 for equivalent AC breakers. Check for "UL 489 supplement" DC rating or "IEC 60947-2 DC" marking.Fuses: Ferraz Shawmut, Mersen, and Littelfuse offer PV-rated fuses with 600VDC to 1000VDC ratings. Use 15A fuses for standard 350W panels (calculated as Isc × 1.56 per NEC 690.8). Cost: $8-15 per fuse plus $25-40 per fuse holder.Bus bars: Copper or aluminum rated for 90°C minimum. Many AC-rated bus bars work fine, but verify the material spec handles DC current density (1.5-2.0 A/mm² for copper).Pro-Tip #1: That "48V" marking on AC equipment? It refers to your battery voltage, not your panel string voltage. Your 48V battery system has 93.4V strings that need proper 600VDC-rated DC equipment.Requirement #2: UL 1741-Listed Enclosure or Equivalent ProtectionThe metal box itself matters more than you think when building a DIY solar combiner box.For rooftop installation, you need at minimum a NEMA 3R (rain-tight) or IP54 (dust and splash protected) rated enclosure. NEMA 1 indoor panels are not suitable. The enclosure must:Handle thermal cycling: Rooftop temperatures swing 80-100°F daily. The enclosure needs gaskets that maintain their seal, knockouts that don't crack from expansion/contraction, and paint that doesn't flake off and contaminate electrical connections.Provide adequate ventilation: DC breakers generate heat when carrying current. Without proper ventilation, internal temperatures can exceed component ratings even when the ambient temperature is acceptable. Look for enclosures with ventilation calculated for at least 30% more thermal load than your maximum string current.Include proper grounding provisions: Your enclosure needs dedicated grounding bus bars with mechanical lugs (not spring clips) rated for #6 AWG copper minimum. Every metal surface inside the box must be bonded to ground. This isn't optional—NEC 690.43 requires it.Cost reality check: A proper NEMA 3R enclosure sized for 5-6 strings (approximately 12" × 16" × 6") runs $80-150. A weatherproof outdoor-rated enclosure with the right knockouts, bus bars, and mounting hardware? $120-200. That's 50-60% of your total DIY combiner box cost right there.If you're thinking "I'll just use the AC panel and add a weatherproof cover," stop. Those covers are designed to keep rain off the switches during momentary use—not provide continuous NEMA 3R protection for equipment that lives outdoors 24/7 for 25 years.Requirement #3: Arc Fault Protection (NEC 690.11 Compliance)Here's where most DIY solar combiner box builds fail code inspection.NEC 690.11 mandates arc fault circuit interrupters (AFCI) for any PV system with DC circuits operating at 80 volts or higher. Your 93.4V strings? You're 17% over the threshold. AFCI is non-negotiable.What AFCI actually does: It monitors the electrical signature of current flowing through the DC circuits and detects the specific noise pattern of an arc fault—the chaotic, high-frequency signal that appears when current jumps across a gap. When detected, it immediately interrupts the circuit before the arc can ignite nearby materials.Remember The Arc That Won't Die? AFCI is specifically designed to kill it.Your two options:Option 1 - Inverter with integrated AFCI: Most modern string inverters (SMA, SolarEdge, Fronius, etc.) have built-in arc fault detection per UL 1741. If your inverter has this, you don't need separate AFCI in your DIY combiner box. Verify this by checking your inverter's spec sheet for "UL 1741 AFCI compliant" or "NEC 690.11 arc fault protection."Option 2 - Standalone AFCI device: If your inverter doesn't include AFCI, you need a listed arc fault detector installed in your combiner box or within 6 feet of it. These cost $200-400 and require additional wiring. Brands include Sensata, Eaton, and Mersen. This alone might make your DIY combiner box more expensive than buying a pre-made one.Exception: If your DC wiring runs in metal conduit or metal-clad cable, and never exits that metal raceway between the panels and the inverter, you can skip AFCI. But realistically? Rooftop installations use exposed PV wire with MC4 connectors, which means AFCI is required.Pro-Tip #2: DC arcs don't die when you flip the switch—they keep burning at 35,000°F until physically suppressed. AFCI is how you suppress them before they start fires.Requirement #4: Proper Labeling and Documentation (NEC 690.7, 690.15)Code inspectors will red-tag your DIY solar combiner box installation for missing labels faster than for questionable component choices.Required labels on your DIY combiner box:1. Maximum DC voltage label (NEC 690.7):MAXIMUM DC VOLTAGE: 106V(Based on 2× 46.7V panels at -10°C ambient)COMPLIES WITH NEC 690.7(D)This label must be placed on the combiner box exterior and visible without opening the enclosure.2. DC combiner identification (NEC 690.15):WARNING:DC COMBINER BOXMULTIPLE DC VOLTAGE SOURCESDO NOT DISCONNECT UNDER LOAD3. Conductor identification (NEC 690.31):Every incoming string must be labeled with its source location:"STRING 1 - ARRAY NORTH""STRING 2 - ARRAY NORTH""STRING 3 - ARRAY SOUTH"etc.4. Grounding electrode conductor label (if applicable):If your grounding conductor terminates in the combiner box, label it per NEC 690.47.Use outdoor-rated label stock (3M or Brady polyester labels with UV-resistant ink). Printed paper labels in weatherproof sleeves won't pass inspection—they degrade too quickly.Documentation you need:One-line diagram showing string configuration and voltagesComponent datasheets proving DC ratingsCalculation showing NEC 690.7 max voltageNEC 690.8 current calculationsKeep copies inside the combiner box in a weatherproof document pouch. Inspectors may request them.The Real Math: $300 Combiner Box vs. The AlternativeLet's talk money. Real money.Your compliant DIY solar combiner box parts list:NEMA 3R enclosure with breaker mounts: $120Five DC-rated 15A breakers at $45 each: $225DC-rated bus bars and terminals: $60Hardware, labels, wire, connectors: $40Total: $445Wait. The pre-made UL 1741-listed combiner box costs $320. Your "DIY savings"? You're losing $125 plus 6-8 hours of assembly and wiring time.But that's assuming you don't need separate AFCI. Add that $300 device? Now you're at $745 vs. $320 for the pre-made box that includes integrated AFCI.The math doesn't work for most DIY solar combiner box projects. Unless you're building for 10+ strings where pre-made boxes get expensive (over $800), or you need a custom configuration that's not available off-the-shelf, DIY combiner boxes are often more expensive than buying properly certified equipment.Here's the math that really matters:Cost of one electrical fire: $50,000-$250,000 in structural damage, depending on when the fire department arrives.Cost of homeowner's insurance premium increase after an electrical fire: 20-40% increase for 3-5 years = $1,200-$3,000 additional cost.Cost of insurance claim denial because you used non-listed equipment: 100% of the damages = whatever the fire costs.Cost of permitting issues when you try to sell your house: Delays, re-inspections, potential contractor costs to bring to code = $2,000-$8,000.That $240 price difference? It's not buying a fancy label. It's buying peace of mind that every single component was torture-tested for the exact failure modes that happen on rooftops. It's buying insurance-compliant equipment that won't void your policy. It's buying inspector-approved hardware that won't delay your permit by three months.Pro-Tip #3: The real DIY skill isn't figuring out how to build everything yourself—it's knowing which corners you can cut and which ones cut back. Combiner boxes cut back.When DIY Actually Makes SenseDon't mistake this article for "never build anything yourself." Solar installations have plenty of legitimate DIY opportunities:Smart DIY projects:Racking and mounting: You can absolutely design and install your own panel mounting system. It's mechanical, it's verifiable, and there's no Arc That Won't Die trying to kill you if you get something wrong.Conduit runs: Running EMT or PVC conduit from your combiner box to your inverter? Great DIY project. Just follow NEC conduit fill calculations.System monitoring: Adding performance monitoring, data logging, even IoT integrations to track your system? Go wild. Worst case is you lose some data.Reckless DIY projects:Combiner boxes (as we've discussed)DC disconnects between combiner and inverter (same issues: DC arc interruption, voltage ratings)Inverter installation (complex electrical connections, AC/DC integration points)Service panel interconnections (requires licensed electrician in most jurisdictions)The pattern? If it's carrying high-voltage DC or connecting to your main electrical service, hire professionals or buy listed equipment. If it's structural, mechanical, or low-voltage monitoring, DIY away.The Bottom Line: Build Smart, Not Just CheapIf you made it this far, you're already ahead of 90% of DIY solar installers. You're asking the right questions.Here's what you've learned:The Arc That Won't Die: DC arcs don't self-extinguish like AC arcs. They burn at 35,000°F until physically suppressed. AC equipment isn't designed for this.The 48V Confusion: Your battery voltage isn't your string voltage. That 48V system has 93.4V strings that need 600VDC-rated equipment, not repurposed AC panels.The Voltage Rating Trap: AC voltage ratings don't translate to DC. A 240VAC breaker might only be safe to 48VDC. Your 93.4V strings exceed most AC equipment's DC capability.The Compliance Cost: Building a code-compliant DIY solar combiner box costs $445-$745. Buying a pre-made UL 1741-listed box? $320. The math doesn't support DIY unless you need custom configurations.Can you technically build your own combiner box? Yes. With the right components, proper enclosures, AFCI protection, and correct labeling, it's possible.Should you? Probably not. The cost savings evaporate once you price out DC-rated components and AFCI. The time investment (8-10 hours for first build, 4-6 for subsequent ones) rarely justifies the marginal savings. And the liability if something goes wrong—that insurance claim denial, that permit rejection, that inspector's red tag—wipes out any financial benefit.The real DIY move? Know when to build and when to buy.Save your DIY energy for the racking, the monitoring systems, the conduit runs, the parts of solar installations where your effort actually multiplies your money instead of just increasing your risk.And that $60 Square D panel in your garage? Use it where it belongs—on an AC circuit, where the zero-crossing does the heavy lifting and arcs die on their own like they're supposed to.Because in solar PV, the most expensive mistake isn't the one that costs you $300 up front. It's the one that saves you $240 today and costs you $50,000 six months from now when The Arc That Won't Die finds something flammable.Ready to do your solar installation right? Check out our complete line of UL 1741-listed combiner boxes and DC-rated protection equipment designed specifically for residential and commercial PV systems. We've already done the engineering and testing—you get reliable equipment at prices that make DIY look expensive.

장착할 준비가 된 REC 350W 태양광 패널이 10개 있습니다. 각 패널 2개씩 5개의 스트링으로 구성됩니다. 각 스트링은 93.4볼트 DC에서 9암페어를 출력합니다. 온라인에서 DIY 태양광 결합기 박스 설계를 조사했고, 모든 계산을 마쳤습니다. 모든 것이 확인되었습니다.

그런 다음 적절한 태양광 결합기 박스의 가격을 알아봅니다. $300. 통합 모니터링 기능이 있는 것을 원한다면 $400일 수도 있습니다. 차고에 있는 Square D 서브패널(작년에 $60을 주고 산 것)을 봅니다. 같은 금속 박스. 같은 버스 바. 같은 회로 차단기. 정확히 왜 똑같은 것처럼 보이는 것에 5배나 더 많은 돈을 내야 할까요?

이유는 다음과 같습니다. $240의 가격 차이는 20년 동안 작동하는 시스템과 6개월 만에 화재가 발생하는 시스템의 차이이기 때문입니다.

꺼지지 않는 아크: DC가 AC 장비를 파괴하는 이유

The Arc That Won't Die: AC vs. DC Interruption

AC 차단기를 여는 순간 부하 상태에서 분리되면 분리되는 접점 사이에 전기 아크가 형성됩니다. 이것은 플라즈마입니다. 이온화된 가스가 수천 암페어를 공기를 통해 운반하며, 섭씨 19,426도(화씨 35,000도)에 달하는 온도를 생성합니다. 이는 태양 표면보다 4배 더 뜨거운 온도입니다.

하지만 AC 아크에는 한 가지 특징이 있습니다. 저절로 꺼진다는 것입니다.

표준 AC 전력은 전류 방향이 바뀌면서 초당 60번 0볼트를 통과합니다. 바로 그 순간(단 몇 밀리초 동안 지속됨) 아크는 에너지원을 잃고 꺼집니다. 접점은 계속 멀어집니다. 회로가 열립니다. 완료되었습니다.

DC는 그렇지 않습니다.

93.4볼트 DC를 차단하면 아크가 켜지고 접점이 유지될 만큼 가까이 있는 한 계속 켜져 있습니다. 제로 크로싱이 없습니다. 자연적인 차단이 없습니다. 금속을 녹이고, 절연체를 점화하고, 접점이 물리적으로 충분히 멀리 떨어질 때까지(일반적으로 AC 장비보다 3-4배 더 멀리) 계속 타는 플라즈마 강으로 그 간격을 메우려는 지속적이고 끈질긴 전류만 있을 뿐입니다.

이것이 “꺼지지 않는 아크”이며, 실제 DC 정격 결합기 박스 내부의 모든 구성 요소가 AC 장비와 다르게 보이는 이유입니다. 접점 간격이 더 넓습니다. 아크 슈트(아크를 늘리고 냉각시키는 지그재그 금속판)가 더 깁니다. 일부 DC 차단기는 촛불을 끄는 것처럼 자기 코일을 사용하여 아크를 물리적으로 날려 버리기도 합니다.

$60 AC 서브패널에는 이러한 기능이 없습니다.

이 차단기는 아크가 8밀리초 이내에 자연적으로 꺼질 것이라고 가정하고 설계되었습니다. 여기에 93볼트 DC를 통과시키면 그 가정이 부채가 됩니다. 접점이 열리려고 시도하고 아크가 형성되지만 제로 크로싱에서 꺼지는 대신 그냥... 계속됩니다. 차단기의 아크 슈트가 충분히 길지 않습니다. 접점 분리가 충분히 넓지 않습니다. 재료가 지속적인 DC 아크에 대한 정격이 아닙니다.

결국 두 가지 중 하나가 발생합니다. 접점이 함께 용접되거나(“꺼짐”이라고 생각하더라도 회로를 영구적으로 닫음) 차단기의 내부 구성 요소가 녹아서 치명적으로 고장납니다. 어느 결과도 필요할 때 태양광 시스템이 안전하게 종료되는 것과는 관련이 없습니다.

48V 혼란: 배터리 전압 ≠ 스트링 전압

The Voltage Rating Trap: AC vs. DC Ratings.

대부분의 DIY 태양광 결합기 박스 계획이 빗나가는 지점이 바로 여기입니다.

계획 문서에서 “48V 시스템”을 봅니다. “48볼트” 정격의 AC 서브패널을 찾습니다. 완벽한 조합이죠?

세 가지 면에서 틀렸습니다.

첫째: 48V 배터리 정격은 공칭 전압(평균 작동 지점)입니다. 48V 배터리는 실제로 40V(방전)와 58V(충전) 사이에서 작동합니다. 결합기 박스 크기 조정에는 관련이 없지만 숫자가 움직인다는 것을 아는 것이 중요합니다.

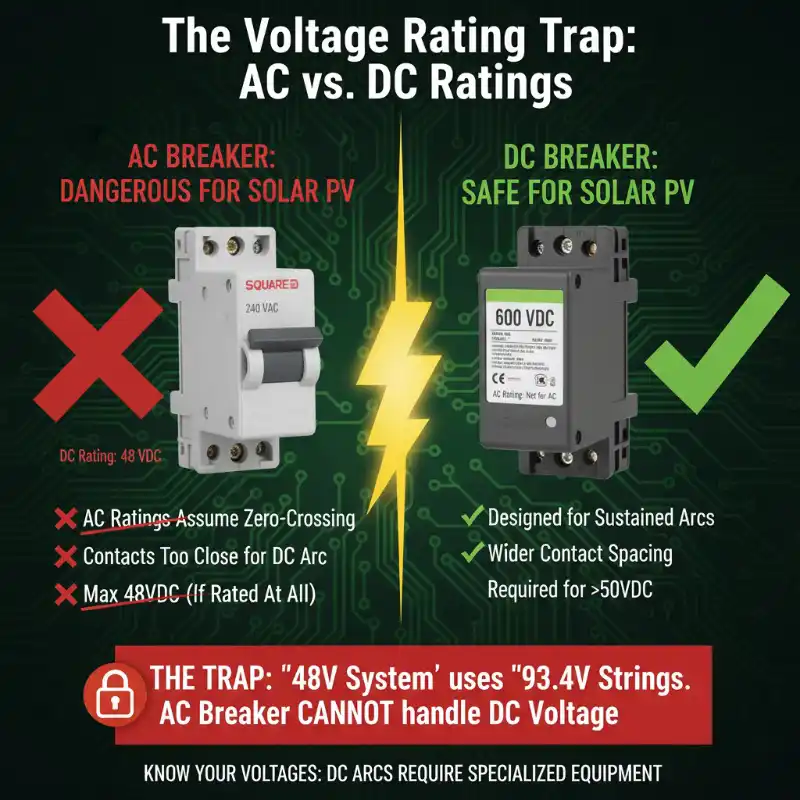
둘째: 태양광 스트링은 배터리가 어떤 전압으로 작동하는지 신경 쓰지 않습니다. 각 REC 350W 패널의 개방 회로 전압(Voc)은 46.7V입니다. 직렬로 연결된 패널 2개? 93.4볼트입니다. 배터리 전압의 거의 두 배이며, DIY 결합기 박스가 처리해야 하는 숫자입니다. 48V를 결합하는 것이 아니라 5개의 개별 93.4V 스트링을 하나의 DC 출력 회로로 결합하는 것입니다.

셋째(이것이 전압 정격 함정입니다.): AC 정격 패널에 “48볼트”라고 표시되어 있으면 48볼트를 의미합니다. AC. DC 정격이 전혀 없는 경우(대부분 없음) 작은 글씨로 숨겨져 있으며 극적으로 낮습니다. 240VAC 정격의 차단기는 48VDC까지만 안전할 수 있습니다. 480VAC 정격의 패널? 운이 좋으면 60-80VDC일 수 있습니다.

왜 이렇게 큰 차이가 있을까요? 꺼지지 않는 아크로 돌아갑니다. AC 전압 정격은 아크가 자연적으로 꺼진다고 가정합니다. DC 전압 정격은 아크가 반격하여 더 넓은 간격으로 스스로를 유지하려고 한다고 가정합니다. DC 전압이 높을수록 점프할 수 있는 간격이 넓어지고 차단 메커니즘이 더 강력해야 합니다.

따라서 Square D 패널이 “48V 정격”이라고 되어 있습니까? DC 정격이라고 해도(데이터시트를 확인하세요. 기다리겠습니다) 93.4V를 통과시키려고 합니다. 설계 전압의 195%로 작동하고 있습니다. 이것은 안전 여유가 아니라 카운트다운 타이머입니다.

$240으로 실제로 얻을 수 있는 것: UL 1741 인증 내부

UL 1741- What Certification Actually Buys You.webp

“그냥 UL 스티커일 뿐이야.”라고 생각할 수도 있습니다. “DIY 설정에서는 건너뛸 수 있어.”

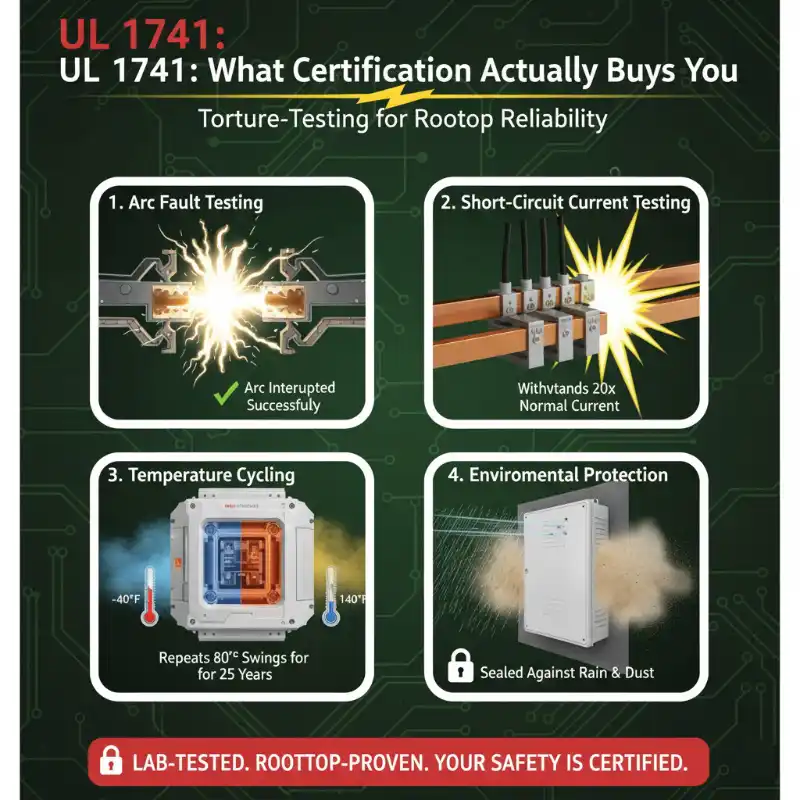
하지만 태양광 결합기 박스 및 상호 연결 장비에 대한 표준인 UL 1741은 박스의 모서리가 둥글고 페인트가 잘 칠해져 있는지 확인하는 것이 아닙니다. 실제 PV 시스템에서 발생하는 정확한 고장 모드에서 장비가 살아남는지 테스트하는 것입니다.

결합기 박스가 UL 1741 목록을 얻기 위해 거치는 과정은 다음과 같습니다.

DC 아크 고장 테스트: 차단기가 최대 전류에서 전체 스트링 전압으로 아크를 차단할 수 있습니까? 이 테스트를 수백 번 수행합니다. AC 패널의 차단기? DC 아크에 대한 테스트는 전혀 수행하지 않습니다. 0번입니다.

단락 전류 테스트: 두 스트링이 실수로 단락되어 20 정격의 버스 바를 통해 90암페어를 쏟아부으면 어떻게 될까요? 이 테스트는 모든 연결 지점을 정상 작동 전류의 10-20배의 고장 전류에 노출시킵니다. 녹을 모든 것은 지붕이 아닌 실험실에서 녹습니다.

온도 순환: 옥상 결합기 박스는 직사광선 아래에서 -40°F의 겨울 밤부터 140°F의 여름 낮까지 변동합니다. UL은 장비를 완전히 적재한 상태에서 이러한 극한을 순환합니다. 3년 동안의 열팽창 후에 느슨해지는 연결은 테스트 챔버에서 고장납니다.

환경 보호: NEMA 3R 정격은 장식용이 아닙니다. 이 박스는 수평으로 내리는 비에도 살아남고, 환기를 막는 얼음이 쌓이지 않으며, 먼지가 많은 산업 환경에 장착하더라도 버스 바에서 먼지를 제거합니다. 차고 서브패널은 NEMA 1입니다. 실내 온도에서 깨끗하고 깔끔한 실내 사용을 위해 설계되었습니다.

$240 업그레이드의 실제 비용은 재료가 아닙니다. DC 정격 차단기는 AC 차단기보다 $30 정도 더 비쌉니다. 금속 인클로저는 $50 정도 더 비쌉니다. 나머지는 무엇일까요? 최악의 조건에서 이러한 구성 요소가 안정적으로 함께 작동하도록 하는 데 소요되는 엔지니어링 시간과 이를 증명하기 위한 테스트입니다.

UL 1741을 건너뛰면 스티커만 놓치는 것이 아닙니다. 옥상에 장착된 박스가 향후 20년 동안 직면하게 될 모든 단일 고장 모드를 식별한 10,000시간의 파괴적인 테스트를 놓치는 것입니다. 이러한 고장 모드를 직접 베타 테스트하는 것입니다.

실시간으로.

지붕에서.

안전한 DIY 태양광 결합기 박스를 위한 4가지 필수 요구 사항

분명히 합시다. 자체 태양광 결합기 박스를 만드는 것은 기술적으로 가능합니다. 하지만 이러한 요구 사항을 모두 충족하는 경우에만 가치가 있습니다. 하나라도 건너뛰면 미리 만들어진 박스를 사는 것이 좋습니다.

4 Non-Negotiable Requirements for a Safe DIY Solar Combiner Box

요구 사항 1: 적절한 전압 정격의 DC 정격 구성 요소

DIY 태양광 결합기 박스 쇼핑 목록은 여기에서 시작합니다. 모든 차단기, 퓨즈, 버스 바, 터미널 블록, 박스 내부의 분리 장치는 최소 600볼트 DC의 DC 전압에 대해 명시적으로 정격이 지정되어야 합니다. 그리고 최소 600볼트 DC.

600VAC가 아닙니다. “태양광에 적합”이 아닙니다. “아마 괜찮을 것”이 아닙니다. 데이터시트에 다음이 명시되어 있어야 합니다. “600VDC” 일반 텍스트로.

스트링이 93.4V에 불과한데 왜 600V일까요? 두 가지 이유가 있습니다. 첫째, NEC 조항 690.7에서는 가장 추운 예상 온도에 따라 전압 계산이 필요합니다. 태양광 패널은 추울 때 더 높은 전압을 생성합니다. 기후대에 따라 명판 Voc보다 최대 10-15% 더 높습니다. 46.7V 패널은 1월 아침에 각각 53V에 도달할 수 있습니다. 직렬로 연결된 두 개? 스트링당 106볼트입니다.

둘째, 구름 가장자리 효과(햇빛 강도가 빠르게 변할 때) 동안의 과도 전압 스파이크와 시간이 지남에 따른 장비 열화에 대한 안전 여유가 필요합니다. 산업 표준: 최대 시스템 전압이 150VDC 미만인 경우 600VDC 정격 구성 요소를 사용하십시오. 과잉이 아닙니다. 25년의 서비스 수명을 위한 최소값입니다.

DC 정격 구성 요소 조달처:

  • DC breakers: ABB, Eaton, Mersen 및 Littelfuse와 같은 제조업체는 DC 정격 몰드 케이스 회로 차단기(MCCB)를 만듭니다. 동등한 AC 차단기에 비해 차단기당 $35-60을 지불할 것으로 예상하십시오. “UL 489 보충” DC 정격 또는 “IEC 60947-2 DC” 표시를 확인하십시오.
  • 퓨즈: Ferraz Shawmut, Mersen 및 Littelfuse는 600VDC ~ 1000VDC 정격의 PV 정격 퓨즈를 제공합니다. 표준 350W 패널에는 15A 퓨즈를 사용하십시오(NEC 690.8에 따라 Isc × 1.56으로 계산됨). 비용: 퓨즈당 $8-15, 퓨즈 홀더당 $25-40.
  • 버스 바: 최소 90°C 정격의 구리 또는 알루미늄. 많은 AC 정격 버스 바가 잘 작동하지만 재료 사양이 DC 전류 밀도(구리의 경우 1.5-2.0 A/mm²)를 처리하는지 확인하십시오.

프로 끝#1: AC 장비에 표시된 “48V”는 패널 스트링 전압이 아닌 배터리 전압을 나타냅니다. 48V 배터리 시스템에는 적절한 600VDC 정격 DC 장비가 필요한 93.4V 스트링이 있습니다.

요구 사항 #2: UL 1741-나열된 인클로저 또는 동등한 보호

DIY 태양광 결합기 박스를 제작할 때 금속 상자 자체가 생각보다 중요합니다.

옥상 설치의 경우 최소한 다음이 필요합니다. 네마 3R (방수) 또는 IP54 (먼지 및 튐 방지) 등급의 인클로저. NEMA 1 실내 패널은 적합하지 않습니다. 인클로저는 다음을 충족해야 합니다.

열 순환 처리: 옥상 온도는 매일 80-100°F 변동합니다. 인클로저에는 밀봉 상태를 유지하는 개스킷, 팽창/수축으로 인해 균열이 발생하지 않는 녹아웃, 벗겨져 전기 연결을 오염시키지 않는 페인트가 필요합니다.

적절한 환기 제공: DC 회로 차단기는 전류가 흐를 때 열을 발생시킵니다. 적절한 환기가 없으면 주변 온도가 허용 가능한 경우에도 내부 온도가 구성 요소 정격을 초과할 수 있습니다. 최대 스트링 전류보다 최소 30% 더 많은 열 부하에 대해 계산된 환기가 있는 인클로저를 찾으십시오.

적절한 접지 조항 포함: 인클로저에는 최소 #6 AWG 구리 정격의 기계식 러그(스프링 클립 아님)가 있는 전용 접지 버스 바가 필요합니다. 상자 내부의 모든 금속 표면은 접지되어야 합니다. 이는 선택 사항이 아닙니다. NEC 690.43에 명시되어 있습니다.

비용 현실 점검: 5-6개의 스트링에 적합한 크기의 적절한 NEMA 3R 인클로저(약 12″ × 16″ × 6″)는 $80-150입니다. 올바른 녹아웃, 버스 바 및 장착 하드웨어가 있는 내후성 실외 등급 인클로저? $120-200. 이는 전체 DIY 결합기 박스 비용의 50-60%입니다.

“AC 패널을 사용하고 내후성 덮개를 추가하면 된다”고 생각하고 있다면 중단하십시오. 이러한 덮개는 일시적인 사용 중에 스위치에서 비를 막도록 설계되었으며 25년 동안 24시간 내내 실외에 있는 장비에 지속적인 NEMA 3R 보호를 제공하지 않습니다.

요구 사항 #3: 아크 결함 보호(NEC 690.11 준수)

여기서 대부분의 DIY 태양광 결합기 박스 빌드는 코드 검사를 통과하지 못합니다.

NEC 690.11은 DC 회로가 다음에서 작동하는 모든 PV 시스템에 대해 아크 결함 회로 차단기(AFCI)를 의무화합니다. 80볼트 이상. 93.4V 스트링? 임계값을 17% 초과했습니다. AFCI는 협상의 여지가 없습니다.

AFCI의 실제 작동 방식: DC 회로를 통해 흐르는 전류의 전기적 특징을 모니터링하고 아크 결함의 특정 노이즈 패턴(전류가 간격을 뛰어넘을 때 나타나는 혼란스럽고 고주파 신호)을 감지합니다. 감지되면 아크가 주변 물질에 불을 붙이기 전에 즉시 회로를 차단합니다.

죽지 않는 아크를 기억하십니까? AFCI는 특히 이를 제거하도록 설계되었습니다.

두 가지 옵션:

옵션 1 – 통합 AFCI가 있는 인버터: 대부분의 최신 스트링 인버터(SMA, SolarEdge, Fronius 등)에는 UL 1741에 따라 아크 결함 감지 기능이 내장되어 있습니다. 인버터에 이 기능이 있는 경우 DIY 결합기 박스에 별도의 AFCI가 필요하지 않습니다. 인버터 사양 시트에서 “UL 1741 AFCI 준수” 또는 “NEC 690.11 아크 결함 보호”를 확인하여 이를 확인하십시오.”

옵션 2 – 독립형 AFCI 장치: 인버터에 AFCI가 포함되어 있지 않은 경우 결합기 박스 또는 6피트 이내에 나열된 아크 결함 감지기를 설치해야 합니다. 가격은 $200-400이며 추가 배선이 필요합니다. 브랜드로는 Sensata, Eaton 및 Mersen이 있습니다. 이것만으로도 DIY 결합기 박스가 기성품보다 더 비쌀 수 있습니다.

예외: DC 배선이 금속 전선관 또는 금속 피복 케이블로 연결되고 패널과 인버터 사이에서 해당 금속 레이스웨이를 벗어나지 않는 경우 AFCI를 건너뛸 수 있습니다. 그러나 현실적으로? 옥상 설치에는 MC4 커넥터가 있는 노출된 PV 와이어가 사용되므로 AFCI가 필요합니다.

Pro-Tip#2: DC 아크는 스위치를 껐을 때 사라지지 않고 물리적으로 억제될 때까지 35,000°F에서 계속 연소됩니다. AFCI는 화재가 발생하기 전에 이를 억제하는 방법입니다.

요구 사항 #4: 적절한 라벨링 및 문서화(NEC 690.7, 690.15)

코드 검사관은 의심스러운 구성 요소 선택보다 누락된 라벨로 인해 DIY 태양광 결합기 박스 설치에 더 빨리 빨간색 태그를 붙입니다.

DIY 결합기 박스에 필요한 라벨:

1. 최대 DC 전압 라벨(NEC 690.7):

최대 DC 전압: 106V

이 라벨은 인클로저 외부와 인클로저를 열지 않고도 볼 수 있는 곳에 부착해야 합니다.

2. DC 결합기 식별(NEC 690.15):

경고:

3. 도체 식별(NEC 690.31):
모든 들어오는 스트링에는 소스 위치가 라벨로 표시되어야 합니다.

  • “스트링 1 – 어레이 북쪽”
  • “스트링 2 – 어레이 북쪽”
  • “스트링 3 – 어레이 남쪽”
  • 기타.

4. 접지 전극 도체 라벨(해당하는 경우):
접지 도체가 결합기 박스에서 종료되는 경우 NEC 690.47에 따라 라벨을 부착하십시오.

실외 등급 라벨 스톡(UV 저항 잉크가 있는 3M 또는 Brady 폴리에스터 라벨)을 사용하십시오. 내후성 슬리브에 인쇄된 종이 라벨은 검사를 통과하지 못합니다. 너무 빨리 저하됩니다.

필요한 문서:

  • 스트링 구성 및 전압을 보여주는 단선도
  • DC 정격을 증명하는 구성 요소 데이터 시트
  • NEC 690.7 최대 전압을 보여주는 계산
  • NEC 690.8 전류 계산

내후성 문서 파우치에 사본을 결합기 박스 내부에 보관하십시오. 검사관이 요청할 수 있습니다.

실제 수학: $300 결합기 박스 대 대안

돈에 대해 이야기해 봅시다. 진짜 돈.

규정을 준수하는 DIY 태양광 결합기 박스 부품 목록:

  • 회로 차단기 마운트가 있는 NEMA 3R 인클로저: $120
  • DC 정격 15A 회로 차단기 5개(각 $45): $225
  • DC 정격 버스 바 및 단자: $60
  • 하드웨어, 라벨, 와이어, 커넥터: $40
  • 총계: $445

잠깐. 기성품 UL 1741 나열 결합기 박스 비용은 $320입니다. “DIY 절감액”? 조립 및 배선 시간 6-8시간에 $125를 잃고 있습니다.

그러나 이는 별도의 AFCI가 필요하지 않다고 가정합니다. 해당 $300 장치를 추가하시겠습니까? 이제 통합 AFCI가 포함된 기성품 박스의 경우 $745 대 $320입니다.

대부분의 DIY 태양광 결합기 박스 프로젝트에서는 계산이 맞지 않습니다. 기성품 박스가 비싸지는(₩800 이상) 10개 이상의 스트링을 구축하거나 시판되지 않는 맞춤형 구성이 필요한 경우가 아니라면 DIY 결합기 박스는 종종 제대로 인증된 장비를 구매하는 것보다 비쌉니다.

실제로 중요한 계산은 다음과 같습니다.

전기 화재 1건으로 인한 비용: 소방서 도착 시간에 따라 구조적 손상 ₩50,000~₩250,000.

전기 화재 후 주택 소유자 보험료 인상 비용: 3~5년 동안 20~40% 인상 = 추가 비용 ₩1,200~₩3,000.

미등재 장비 사용으로 인한 보험금 청구 거부 비용: 손해액의 100% = 화재 비용.

주택 판매 시 허가 문제로 인한 비용: 지연, 재검사, 규정 준수를 위한 잠재적 계약자 비용 = ₩2,000~₩8,000.

그 ₩240 가격 차이요? 그것은 화려한 라벨을 사는 것이 아닙니다. 그것은 모든 단일 구성 요소가 옥상에서 발생하는 정확한 고장 모드에 대해 가혹한 테스트를 거쳤다는 마음의 평화를 사는 것입니다. 그것은 귀하의 정책을 무효화하지 않는 보험 준수 장비를 사는 것입니다. 그것은 귀하의 허가를 3개월 동안 지연시키지 않는 검사관 승인 하드웨어를 사는 것입니다.

프로 끝#3: 진정한 DIY 기술은 모든 것을 직접 구축하는 방법을 알아내는 것이 아니라 어떤 부분을 줄일 수 있고 어떤 부분을 줄여야 하는지 아는 것입니다. 결합기 박스는 줄여야 합니다.

DIY가 실제로 합리적인 경우

이 기사를 “아무것도 직접 만들지 마십시오”로 오해하지 마십시오. 태양광 설치에는 합법적인 DIY 기회가 많이 있습니다.

스마트 DIY 프로젝트:

  • 랙킹 및 마운팅: 패널 마운팅 시스템을 직접 설계하고 설치할 수 있습니다. 그것은 기계적이고, 검증 가능하며, 잘못된 것을 얻더라도 당신을 죽이려고 하는 Arc That Won't Die가 없습니다.
  • 전선관 배선: 결합기 박스에서 인버터로 EMT 또는 PVC 전선관을 배선하시겠습니까? 훌륭한 DIY 프로젝트입니다. NEC 전선관 채우기 계산을 따르십시오.
  • 시스템 모니터링: 시스템을 추적하기 위해 성능 모니터링, 데이터 로깅, 심지어 IoT 통합을 추가하시겠습니까? 마음껏 하세요. 최악의 경우 일부 데이터를 잃게 됩니다.

무모한 DIY 프로젝트:

  • 결합기 박스 (논의한 바와 같이)
  • DC 차단기 결합기와 인버터 사이(동일한 문제: DC 아크 차단, 전압 정격)
  • 인버터 설치 (복잡한 전기 연결, AC/DC 통합 지점)
  • 서비스 패널 상호 연결 (대부분의 관할 구역에서 면허가 있는 전기 기술자가 필요함)

패턴은 무엇입니까? 고전압 DC를 운반하거나 주 전기 서비스에 연결하는 경우 전문가를 고용하거나 등재된 장비를 구입하십시오. 구조적, 기계적 또는 저전압 모니터링인 경우 DIY를 하십시오.

pv combiner box

결론: 저렴하게만 만들지 말고 스마트하게 만드십시오.

여기까지 오셨다면 이미 DIY 태양광 설치자의 90%보다 앞서 있습니다. 올바른 질문을 하고 있습니다.

배운 내용은 다음과 같습니다.

The Arc That Won't Die: DC 아크는 AC 아크처럼 스스로 소멸되지 않습니다. 물리적으로 억제될 때까지 35,000°F에서 연소됩니다. AC 장비는 이를 위해 설계되지 않았습니다.

48V 혼란: 배터리 전압은 스트링 전압이 아닙니다. 해당 48V 시스템에는 재활용된 AC 패널이 아닌 600VDC 정격 장비가 필요한 93.4V 스트링이 있습니다.

전압 정격 함정: AC 전압 정격은 DC로 변환되지 않습니다. 240VAC 차단기는 48VDC까지만 안전할 수 있습니다. 93.4V 스트링은 대부분의 AC 장비의 DC 기능을 초과합니다.

규정 준수 비용: 코드 준수 DIY 태양광 결합기 박스를 구축하는 데 ₩445~₩745가 소요됩니다. 기성품 UL 1741 등재 박스를 구입하시겠습니까? ₩320. 맞춤형 구성이 필요한 경우가 아니면 계산이 DIY를 지원하지 않습니다.

기술적으로 자신의 결합기 박스를 구축할 수 있습니까? 예. 올바른 구성 요소, 적절한 인클로저, AFCI 보호 및 올바른 라벨링을 사용하면 가능합니다.

해야 할까요? 아마 아닐 것입니다. DC 정격 구성 요소와 AFCI의 가격을 책정하면 비용 절감 효과가 사라집니다. 시간 투자(첫 번째 빌드에 8-10시간, 후속 빌드에 4-6시간)는 거의 한계 이익을 정당화하지 않습니다. 그리고 뭔가 잘못되면 책임—보험금 청구 거부, 허가 거부, 검사관의 빨간색 태그—가 모든 재정적 이점을 없앱니다.

진정한 DIY 움직임은 무엇입니까? 언제 구축하고 언제 구매해야 하는지 아십시오.

랙킹, 모니터링 시스템, 전선관 배선, 노력이 위험을 증가시키는 대신 실제로 돈을 늘리는 태양광 설치 부품에 DIY 에너지를 절약하십시오.

그리고 차고에 있는 ₩60 Square D 패널은 어떻습니까? 제로 크로싱이 무거운 작업을 수행하고 아크가 스스로 죽는 AC 회로에서 속한 곳에서 사용하십시오.

태양광 PV에서 가장 비싼 실수는 처음부터 ₩300가 드는 실수가 아닙니다. 그것은 오늘 ₩240를 절약하고 The Arc That Won't Die가 가연성 물질을 찾을 때 6개월 후에 ₩50,000가 드는 실수입니다.


태양광 설치를 올바르게 할 준비가 되셨습니까? 주거용 및 상업용 PV 시스템을 위해 특별히 설계된 UL 1741 등재 결합기 박스 및 DC 정격 보호 장비의 전체 라인을 확인하십시오. 우리는 이미 엔지니어링 및 테스트를 완료했습니다. DIY가 비싸 보이게 만드는 가격으로 신뢰할 수 있는 장비를 얻을 수 있습니다.

About Author
Author picture

안녕하세요,저는 조용문으로 12 년 동안의 경험을 전기 기업에서. 에 VIOX 전기,내에 포커스를 제공 높은 품질의 전기적에 맞는 솔루션의 요구를 충족하는 우리의 클라이언트입니다. 내 전문 지식에 걸쳐 있는 산업 자동화,배선 주거 및 상업적인 전기 시스템입니다.저에게 연락 [email protected] 면 어떤 질문이 있습니다.

요구 사항 알려주세요
지금 견적 요청하기