Understanding Solar Panel Connectors
A. Definition and basic function
Solar panel connectors are specialized electrical devices designed to establish secure and reliable connections between solar panels and other components of a photovoltaic (PV) system, such as inverters, charge controllers, and batteries. Their primary function is to facilitate the efficient transfer of electricity generated by solar panels, ensuring that energy flows smoothly throughout the system.
- Electrical Connectivity: Connectors link individual solar panels to form an array, allowing for the transmission of electrical current. They ensure that the energy produced by the panels can be effectively routed to inverters or battery storage systems.
- Minimizing Power Loss: High-quality connectors are designed to minimize resistance and power loss during energy transfer. This efficiency is crucial for maximizing the overall performance of the solar installation.
- Weather Resistance: Solar panel connectors are built to withstand harsh environmental conditions, including exposure to UV radiation, moisture, and extreme temperatures. This durability ensures a long-lasting and reliable connection throughout the lifespan of the solar system.
- Safety Features: Many connectors include locking mechanisms that prevent accidental disconnections, reducing the risk of electrical arcing or short circuits. This safety aspect is essential for maintaining a secure and stable PV system.
- Modularity and Scalability: Connectors allow for easy expansion of solar arrays by enabling series or parallel configurations. This modularity facilitates flexible system design and simplifies maintenance.
B. Role in photovoltaic systems
- Establish efficient electrical connections between panels and other components.
- Ensure system safety and reliability through secure locking mechanisms.
- Enable modular design and scalability for easy system expansion.
- Simplify installation process with plug-and-play functionality.
C. Key Features
- Weatherproof Design: Most solar connectors, particularly MC4 connectors, are built to withstand harsh environmental conditions, including rain, snow, and extreme temperatures. This weather resistance ensures reliable performance and longevity in outdoor applications.
- Secure Locking Mechanism: Solar panel connectors typically feature a locking design that prevents accidental disconnections. This mechanism enhances the stability and safety of the electrical connections, which is crucial for long-term operation.
- High Voltage and Current Ratings: Connectors are rated to handle high voltages (up to 1500V for newer MC4 models) and currents (typically around 20A to 30A), ensuring they can safely manage the electrical loads generated by solar panels.
- Compatibility: Many solar connectors, especially MC4 types, are designed to be universally compatible with various brands and models of solar panels. This compatibility simplifies installation and maintenance across different systems.
- Ease of Installation: The plug-and-play nature of these connectors allows for quick assembly without extensive tools, making it easier for installers to connect panels in series or parallel configurations.
D.Components of Solar Connectors
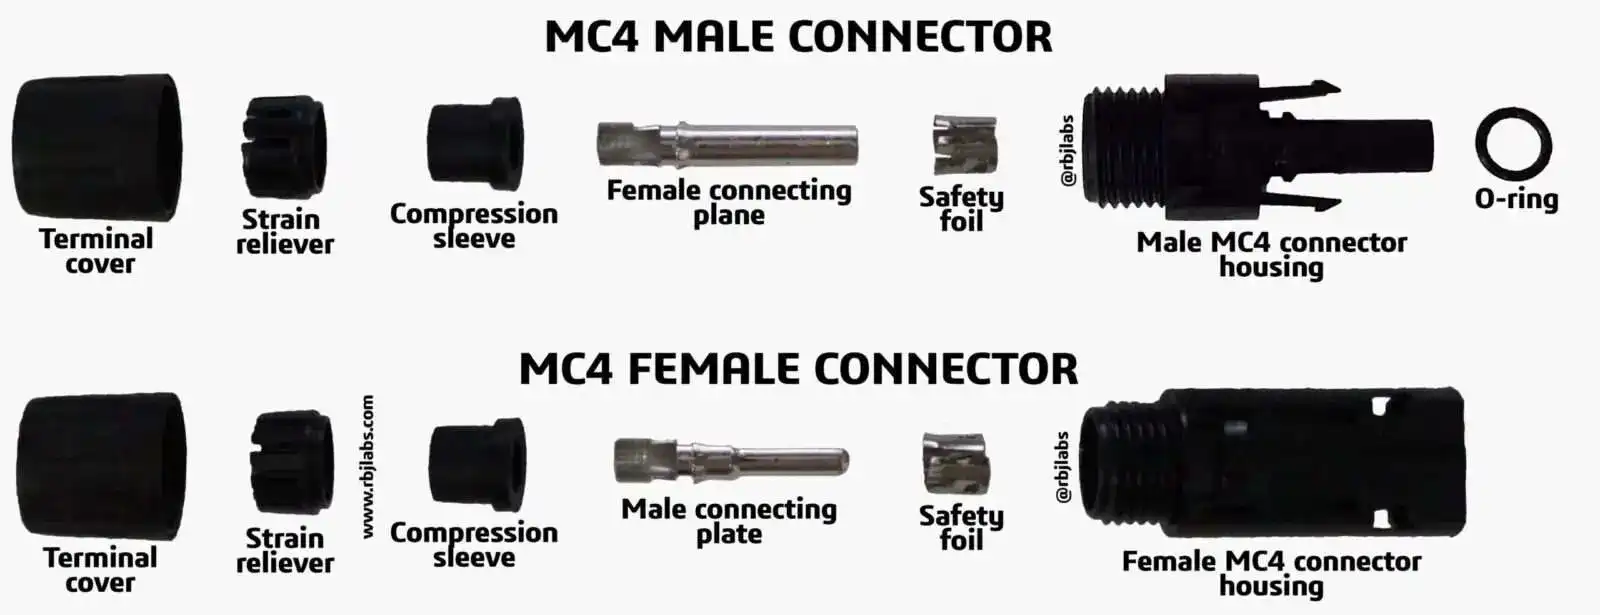
credit to https://diysolarforum.com/threads/what-cable-do-i-need.29253/
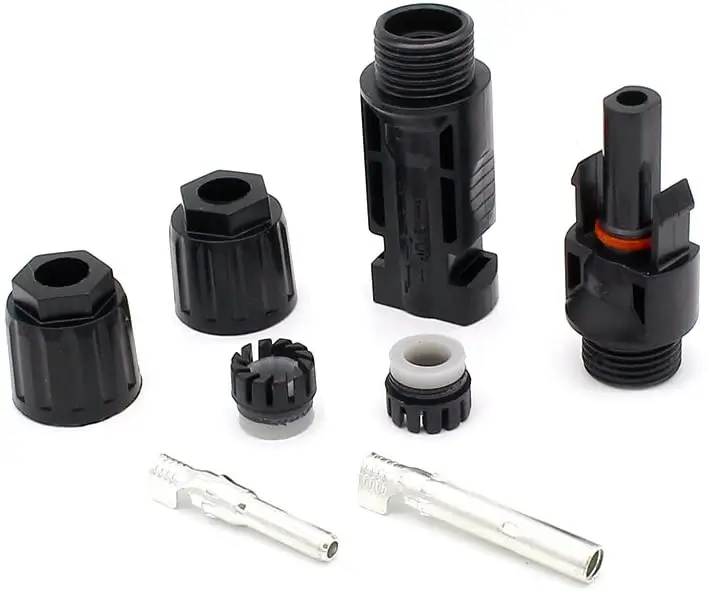
- Male and Female Connectors: Solar panel connectors typically consist of male and female parts that fit together securely. The male connector usually has a metal pin, while the female connector contains a metal socket. This design ensures a tight electrical connection.
- Housing: The housing protects the internal components from environmental factors and provides insulation. It often includes a rubber gasket that creates a watertight seal when the male and female connectors are joined.
- Contact Pins: These metal elements within the connectors establish the electrical connection between panels. They are made from conductive materials such as tin-plated copper to ensure efficient energy transfer.
- Crimping Mechanism: For some installations, connectors require crimping tools to attach wires securely to the contact pins. This process involves stripping the wire ends, crimping them onto the pins, and then assembling them into the connector housing.
- Combiner Boxes: In larger systems, combiner boxes may be used alongside connectors to consolidate multiple strings of panels into a single output for easier connection to inverters.
Types of Solar Panel Connectors
A. MC4 Connectors
MC4 connectors are designed to create a secure, weatherproof connection in solar panel systems. The male and female components ensure proper polarity and a tight fit, crucial for efficient energy transfer and system safety. Their high current and voltage ratings, along with excellent temperature and environmental protection, make them ideal for various solar installations.
Specifications
- Current Rating: 39 – 104 A
- Voltage Rating: Up to 1,000 V
- Temperature Range: Typically rated for a maximum temperature of 105ºC.
- Ingress Protection (IP) Rating: IP68, providing full protection against dust and water immersion.
Types:
- Male Connector: Features a cylindrical pin that fits into the female socket.
- Female Connector: Contains a socket designed to receive the male connector, ensuring a secure connection.
B. MC3 Connectors
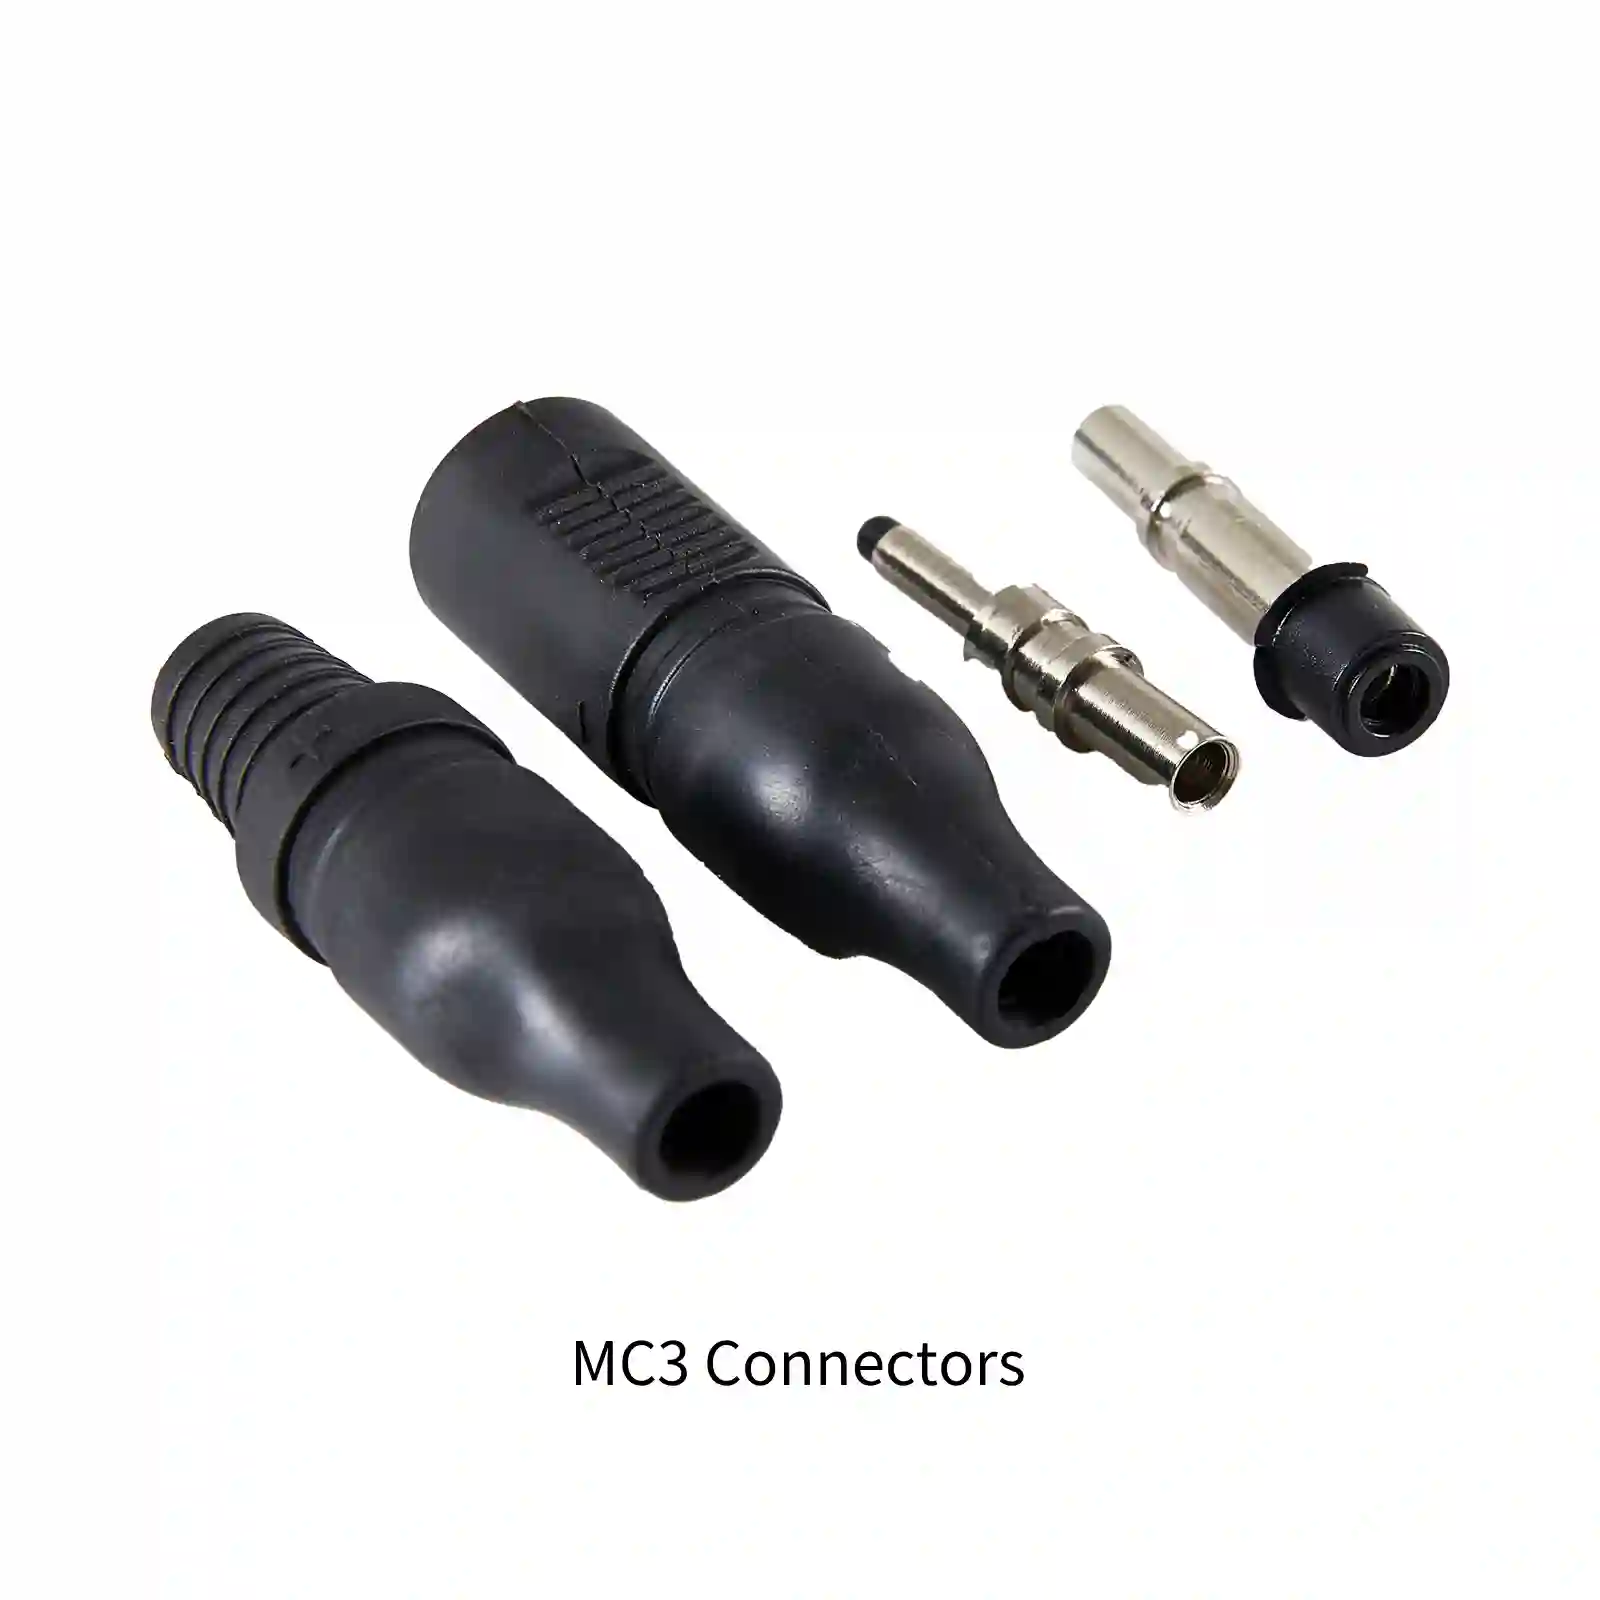
MC3 connectors are an older generation of solar connectors:
- Current Rating: 20 – 43 A
- Voltage Rating: Up to 1,000 V
- Ingress Protection (IP) Rating: IP65, which protects against dust but only offers limited water resistance.
These connectors have a snap-in locking mechanism but are less secure compared to MC4 connectors, making them less favorable for modern installations.
C. Amphenol H4 Connectors
Amphenol H4 connectors are designed as a robust alternative to MC4 connectors:
- Current Rating: 15 – 45 A
- Voltage Rating: Up to 1,500 V
- Ingress Protection (IP) Rating: IP68, ensuring high resistance to dust and water.
They feature a tool-less design for easy installation and disconnection, enhancing usability in PV systems.
D. Other Common Types
Tyco (SolarLok) Connectors
- Current Rating: 20 – 30 A
- Voltage Rating: Up to 1,500 V
- Ingress Protection (IP) Rating: IP65.
These connectors utilize a gender-neutral design allowing any two connectors to mate without needing specific male or female components.
T4 Connectors
- Current Rating: 15 – 45 A
- Voltage Rating: Up to 1,500 V
- Ingress Protection (IP) Rating: IP68.
T4 connectors are designed for ease of use with a tool-less assembly feature that simplifies installation.
Radox Connectors
- Current Rating: Up to 38 A
- Voltage Rating: Up to 1,000 V
- Ingress Protection (IP) Rating: IP68.
These connectors are known for their durability and resistance to environmental factors.
Wiring Solar Panels:Series vs Parallel Wiring
Wiring solar panels correctly is essential for optimizing the performance of photovoltaic (PV) systems. The two primary methods for connecting solar panels are series and parallel connections, each with distinct methods, benefits, and impacts on voltage and current.
A. Series Connection
1. Method and Benefits
In a series connection, solar panels are linked end-to-end. The positive terminal of one panel connects to the negative terminal of the next panel. This configuration results in a single string of panels.
Benefits:
- Higher Voltage Output: The total voltage output increases as the voltages of each panel add up, making it suitable for systems that require higher voltage.
- Simplicity: Series connections are straightforward to set up and require fewer wires than parallel configurations.
- Improved Performance in Sunny Conditions: Series connections can be more efficient in unshaded areas since the entire string operates at the same current level.
2. Impact on Voltage and Current
- Voltage: The total output voltage is the sum of the voltages of each panel. For example, if three 12V panels are connected in series, the total voltage will be 36V.
- Current: The output current remains constant and is equal to the current rating of the individual panels. Thus, if each panel produces 5A, the total current remains 5A.
B. Parallel Connection
1. Method and Benefits
In a parallel connection, all positive terminals of the solar panels are connected together, and all negative terminals are linked as well. This configuration allows multiple strings of panels to operate independently.
Benefits:
- Increased Current Output: The total current output increases as the currents from each panel add together, making it ideal for systems requiring higher current.
- Fault Tolerance: If one panel underperforms or fails, it does not significantly affect the performance of the other panels in parallel.
- Lower Voltage Levels: This configuration is safer for low-voltage applications and simplifies battery charging setups.
2. Impact on Voltage and Current
- Voltage: The output voltage remains constant and is equal to the voltage of a single panel. For instance, if three 12V panels are connected in parallel, the total voltage will still be 12V.
- Current: The total output current is the sum of the currents from each panel. For example, if three panels produce 5A each, the total current will be 15A.
C. Comparison of Series vs Parallel Wiring
| Feature | Series Connection | Parallel Connection |
|---|---|---|
| Voltage Output | Increases (sum of all panel voltages) | Constant (equal to one panel voltage) |
| Current Output | Constant (equal to one panel current) | Increases (sum of all panel currents) |
| Configuration Complexity | Simpler wiring setup | More wiring required |
| Impact of Panel Failure | Affects entire string if one panel fails | Other panels continue to function |
| Ideal Use Case | High voltage applications | Low voltage applications or mixed light conditions |
MC4 Connectors in Detail
A. Design Features
MC4 connectors are engineered to meet the demanding requirements of solar energy systems. Key design features include:
- Weatherproof Construction: MC4 connectors are built to withstand extreme environmental conditions, including rain, snow, and high temperatures. They feature a high-quality rubber seal that provides a watertight connection, protecting the electrical contacts from moisture and corrosion.
- Durable Materials: The housings of MC4 connectors are typically made from UV-resistant and flame-retardant materials such as PPO (Polyphenylene Oxide) or PA (Polyamide), ensuring longevity and performance under harsh conditions.
- Polarized Design: The connectors are polarized, meaning they can only be connected in the correct orientation. This feature helps prevent reverse polarity connections, which could damage solar panels or inverters.
- High Voltage and Current Ratings: MC4 connectors are rated for voltages up to 1,500 V DC and currents up to 50 A, making them suitable for a wide range of solar applications.
B. Locking Mechanism and Safety
MC4 connectors incorporate a secure locking mechanism designed to prevent accidental disconnections:
- Snap-In Locking System: The snap-lock mechanism requires a tool to disconnect the connectors, ensuring they remain securely connected even under mechanical stress or harsh environmental conditions. This feature is crucial for maintaining the integrity of electrical connections in solar installations.
- Safety Compliance: MC4 connectors comply with international safety standards such as UL, IEC, and TUV. These certifications ensure that they meet stringent safety requirements for use in solar PV systems.
- Low Contact Resistance: The design minimizes electrical resistance, which helps reduce energy loss across connections. This efficiency is vital for maximizing the overall performance of solar energy systems.
C. MC4 Disconnect Tools
To safely disconnect MC4 connectors without damaging them, specialized tools are used:
- MC4 Disconnect Tool: This tool is specifically designed to release the locking mechanism of MC4 connectors. It allows users to safely disconnect the male and female components without applying excessive force that could lead to damage.
- Ease of Use: The disconnect tool simplifies the process of maintaining or reconfiguring solar installations by allowing quick disconnections when necessary. This feature is particularly beneficial during maintenance or troubleshooting.
Additional Equipment for Wiring
A. MC4 Multibranch Connectors
1. Purpose and Function
MC4 multibranch connectors are designed to connect multiple solar panel strings to a single output. Their primary purpose is to simplify the wiring process by allowing several panels to be combined into one connection point leading to the inverter or combiner box. This reduces the number of cables required and organizes the wiring layout, making installations cleaner and more manageable.
2. Types (Male and Female Outputs)
MC4 multibranch connectors typically come in two configurations:
- Male Outputs: These connectors have male pins that connect to female connectors from solar panels or other branches.
- Female Outputs: These connectors feature female sockets designed to receive male pins from other connectors or solar panels.
These configurations allow for flexible connections, enabling installers to create customized setups based on the specific needs of the solar array.
B. PV Combiner Boxes
1. When to Use Combiner Boxes
PV combiner boxes are essential in larger solar installations where multiple strings of solar panels need to be connected efficiently. They are particularly useful when:
- The system includes many solar panels (typically more than three strings).
- There is a need for centralizing connections to reduce wiring complexity.
- Enhanced safety measures are required, such as circuit protection and monitoring capabilities.
Combiner boxes aggregate the current from several strings into a single output that can be easily connected to an inverter, streamlining the overall system design.
2. Advantages for Larger Systems
The use of PV combiner boxes offers several advantages for larger solar power systems:
- Reduced Complexity: By consolidating multiple panel outputs into one box, combiner boxes minimize the number of wires running to the inverter, simplifying installation and reducing potential points of failure.
- Improved Safety: Combiner boxes often include protective devices like fuses and circuit breakers that safeguard against overcurrent and short circuits, enhancing overall system safety.
- Easier Maintenance: With organized wiring and accessible components, maintenance tasks become simpler, allowing technicians to quickly check connections and troubleshoot issues.
- Scalability: PV combiner boxes facilitate future expansions by allowing additional strings to be integrated without redesigning the entire system.
Installation Best Practices
A. Tools Required
To install solar panels correctly, you’ll need the following tools:
- Drill: For creating holes in the mounting surface.
- Screwdrivers: For securing mounts and panels.
- Wrenches: To tighten bolts and nuts.
- Wire Strippers: For preparing electrical wires.
- Crimping Tool: To attach connectors to wires securely.
- Level: To ensure that panels are installed evenly.
- Safety Gear: Including gloves, goggles, and a hard hat.
- Ladder or Scaffolding: For accessing rooftops safely.
- MC4 Disconnect Tool: For safely connecting and disconnecting MC4 connectors.
B. Step-by-Step Installation Guide
- Planning and Permits:
- Research local regulations and obtain necessary permits before installation.
- Site Assessment:
- Evaluate the installation site for sunlight exposure, shading from trees or buildings, and roof integrity.
- Mounting System Installation:
- Securely install the mounting brackets on the roof or ground according to manufacturer specifications.
- Panel Placement:
- Position solar panels on the mounting system, ensuring they are oriented for optimal sunlight exposure.
- Electrical Connections:
- Use wire strippers to prepare the wires from each panel. Connect panels in series or parallel as needed using MC4 connectors.
- Grounding:
- Ensure proper grounding of the system to prevent electrical faults.
- Inverter Connection:
- Connect the output from the solar panels to the inverter, following all electrical codes and safety standards.
- Testing the System:
- Once everything is connected, test the system to ensure it operates correctly before finalizing installation.
- Final Inspection:
- Inspect all connections, mounts, and wiring for security and compliance with safety standards.
C. Common Mistakes to Avoid
- Inadequate Research and Planning:
- Failing to understand system requirements can lead to incorrect sizing or placement of solar panels.
- Incorrect Placement and Positioning:
- Installing panels in shaded areas or at improper angles can significantly reduce energy production.
- Neglecting Electrical Safety:
- Not following electrical codes can create safety hazards; always use a licensed electrician if unsure.
- Overtightening Connections:
- Overtightening bolts can damage panels; ensure they are snug but not excessively tight.
- Ignoring Maintenance Planning:
- Failing to plan for regular maintenance can lead to performance issues over time.
D. Proper Sizing of Conductors
Proper conductor sizing is essential for ensuring safe and efficient operation of a solar panel system:
- Calculate Current Requirements:
- Determine the total current output based on the configuration (series or parallel) of your solar panels.
- Use Appropriate Wire Gauge:
- Refer to the American Wire Gauge (AWG) chart to select wire sizes that can handle the maximum current without overheating.
- Consider Voltage Drop:
- For longer runs, account for voltage drop by using larger gauge wire to minimize energy loss over distance.
- Follow Local Codes:
- Ensure that conductor sizing complies with local electrical codes and standards for solar installations.
Cost Analysis
1. Initial Investment:
- Cost of Connectors: MC4 connectors are widely regarded as cost-effective solutions for solar panel installations, typically priced between \$0.50 to \$2.00 per connector depending on the manufacturer and quantity purchased. Other connector types, such as MC3 or Amphenol H4 connectors, may vary in price but generally fall within a similar range.
- Installation Costs: The installation of solar connectors usually requires minimal labor costs due to their user-friendly design, which allows for quick assembly and disassembly using standard tools. This ease of installation can reduce overall labor expenses compared to more complex wiring systems.
2. Long-Term Savings:
- Durability and Maintenance: MC4 connectors are designed to withstand harsh environmental conditions, ensuring a long service life with minimal maintenance requirements. Their durability translates into fewer replacements over time, leading to cost savings.
- Energy Efficiency: High-quality connectors minimize energy loss due to low contact resistance, which can enhance the overall efficiency of the solar PV system. This efficiency contributes to increased energy production and potential savings on electricity bills over the system’s lifespan.
- Reduced Downtime: Reliable connectors reduce the likelihood of system failures or downtime, ensuring consistent energy generation and maximizing return on investment.
Prominent Manufacturers of Solar Panel Connectors
The most prominent manufacturers of solar panel connectors include:
1. Multi-Contact (MC) / Stäubli
Inventor of the industry-standard MC4 connector
Known for reliability, compatibility, and durability
MC4 connectors feature a plug-and-socket design for quick connections
Website: www.staubli.com
2. Amphenol
Manufactures the Helios H4 connector, designed for high current-carrying capacity and robust construction
Helios H4 connectors offer compatibility with MC4 connectors
Also produces the T4 connector with a tool-less design for easy installation and disconnection
Website: www.amphenol.com
3. Tyco Electronics (TE Connectivity)
Designs solar connectors under the SolarLok brand
SolarLok PV4 connector is UL and TÜV certified, complying with NEC regulations
Features a gender-neutral design allowing any two connectors to mate without needing specific male or female components
Website: www.te.com
4. HUBER+SUHNER
Manufactures the Radox connector specifically designed for demanding solar applications
Offers high mechanical and electrical durability for long-term reliability in challenging installations
Radox connectors provide secure connections in harsh environments
Website: www.hubersuhner.com
Conclusion
Solar panel connectors play a crucial role in the efficiency, safety, and longevity of photovoltaic systems. As the solar industry continues to evolve, these components will likely see further improvements in design, durability, and performance. Understanding the various types of connectors, their proper installation, and maintenance is essential for anyone involved in solar energy projects, from homeowners to large-scale solar farm operators.
Key takeaways from this guide include:
- The importance of choosing the right connector type for your specific solar installation needs
- The critical role of proper installation and maintenance in ensuring system efficiency and safety
- The ongoing developments in connector technology that promise to enhance solar energy systems’ performance and reliability
- The significance of considering environmental factors and long-term cost implications when selecting connectors
As solar energy continues to play an increasingly important role in our transition to sustainable power sources, the seemingly small but crucial components like solar panel connectors will remain at the forefront of industry innovation and best practices.
