กล่องรวมสายโซลาร์เซลล์ DIY: ทำไมการออกแบบโฮมเมดส่วนใหญ่จึงเป็นอันตรายจากไฟไหม้ (และสิ่งที่คุณต้องการจริงๆ)

You've got 10 REC 350W solar panels ready to mount. Five strings of two panels each. Each string pumping out 93.4 volts DC at 9 amps. You've researched DIY solar combiner box designs online, and you've done the math—everything checks out.Then you price out a proper solar combiner box. $300. Maybe $400 if you want the one with integrated monitoring. You look at the Square D subpanel sitting in your garage—the one you paid $60 for last year. Same metal box. Same bus bars. Same circuit breakers. Why exactly are you supposed to pay 5× more for what looks like the same thing?Here's why: Because that $240 price gap is the difference between a system that works for 20 years and one that catches fire in 6 months.The Arc That Won't Die: Why DC Destroys AC EquipmentThe moment you flip an AC breaker open under load, an electrical arc forms between the separating contacts. It's plasma—ionized gas carrying thousands of amps through what used to be air, generating temperatures that hit 35,000°F, which for reference is four times hotter than the surface of the sun.But here's the thing about AC arcs: they die on their own.Sixty times per second, standard AC power crosses through zero volts as the current alternates direction. At that exact moment—lasting just milliseconds—the arc loses its energy source and extinguishes. Contacts keep moving apart. Circuit opens. Done.DC doesn't do this.When you interrupt 93.4 volts DC, that arc lights up and stays lit for as long as the contacts are close enough to sustain it. There's no zero crossing. No natural interruption. Just continuous, unrelenting current trying to bridge that gap with a river of plasma that melts metal, ignites insulation, and keeps burning until the contacts have physically separated far enough—typically 3-4 times farther than AC equipment is designed for.This is "The Arc That Won't Die," and it's why every component inside a real DC-rated combiner box looks different from AC equipment. The contact spacing is wider. The arc chutes (those zigzag metal plates that stretch and cool the arc) are longer. Some DC breakers even use magnetic coils to physically blow the arc out, like extinguishing a candle.Your $60 AC subpanel has none of this.Its breakers are designed assuming the arc will naturally extinguish within 8 milliseconds. Put 93 volts DC through them, and that assumption becomes a liability. The contacts try to open, the arc forms, and instead of dying at the zero-crossing, it just... continues. The breaker's arc chutes aren't long enough. The contact separation isn't wide enough. The materials aren't rated for sustained DC arcing.Eventually, one of two things happens: the contacts weld together (permanently closing the circuit even when you think it's "off"), or the breaker's internal components melt and fail catastrophically. Neither outcome involves your solar system shutting down safely when you need it to.The 48V Confusion: Your Battery Voltage ≠ Your String VoltageThis is where most DIY solar combiner box plans go sideways.You see "48V system" in your planning documents. You find an AC subpanel rated for "48 volts." Perfect match, right?Wrong on three counts.First: That 48V battery rating is the nominal voltage—the average operating point. Your 48V battery actually operates between 40V (discharged) and 58V (charging). Not relevant for combiner box sizing, but important to know the numbers move around.Second: Your solar strings don't care what voltage your batteries run at. Each REC 350W panel has an open-circuit voltage (Voc) of 46.7V. Two panels in series? That's 93.4 volts—nearly double your battery voltage—and that's the number your DIY combiner box has to handle. You're not combining 48V; you're combining five separate 93.4V strings into one DC output circuit.Third—and this is The Voltage Rating Trap: When an AC-rated panel says "48 volts," it means 48 volts AC. If it has any DC rating at all (most don't), it's buried in the fine print and dramatically lower. A breaker rated for 240VAC might only be safe to 48VDC. A panel rated for 480VAC? Maybe 60-80VDC if you're lucky.Why the massive difference? Back to The Arc That Won't Die. AC voltage ratings assume the arc extinguishes naturally. DC voltage ratings assume the arc fights back and tries to sustain itself across wider gaps. The higher the DC voltage, the wider the gap it can jump, and the more robust the interrupting mechanism needs to be.So that Square D panel "rated for 48V"? Even if that's a DC rating (check the datasheet—I'll wait), you're trying to push 93.4V through it. You're operating at 195% of its design voltage. That's not a safety margin; that's a countdown timer.What $240 Actually Buys You: Inside UL 1741 Certification"It's just a UL sticker," you might think. "I can skip that for a DIY setup."But UL 1741—the standard for solar combiner boxes and interconnection equipment—isn't checking whether your box has rounded corners and a nice paint job. It's testing whether your equipment survives the exact failure modes that happen in real-world PV systems.Here's what a combiner box goes through to earn that UL 1741 listing:DC arc fault testing: Can the breakers interrupt an arc at full string voltage under maximum current? They test this hundreds of times. Your AC panel's breakers? Never tested for DC arcing. Zero times.Short-circuit current testing: What happens when two strings accidentally short together, dumping 90 amps through a bus bar rated for 20? The test exposes every connection point to fault currents 10-20× normal operating current. Everything that's going to melt, melts in the lab instead of on your roof.Temperature cycling: Rooftop combiner boxes swing from -40°F winter nights to 140°F summer days under direct sun. UL cycles the equipment through these extremes while fully loaded. Connections that would loosen after three years of thermal expansion? They fail in the test chamber.Environmental protection: That NEMA 3R rating isn't decorative. It means the box survives horizontal rain, doesn't accumulate ice that blocks ventilation, and keeps dust off the bus bars even when mounted in a dusty industrial environment. Your garage subpanel is NEMA 1—designed for nice, clean indoor use at room temperature.The real cost of that $240 upgrade isn't the materials. A DC-rated breaker costs maybe $30 instead of $12 for an AC breaker. The metal enclosure costs another $50. The rest? It's the engineering hours spent making sure those components work together reliably under worst-case conditions, and the testing to prove it.When you skip UL 1741, you're not just missing a sticker. You're missing 10,000 hours of destructive testing that identified every single failure mode your roof-mounted box is going to face over the next 20 years. You're beta-testing those failure modes yourself.In real-time.On your roof.4 Non-Negotiable Requirements for a Safe DIY Solar Combiner BoxLet's be clear: building your own solar combiner box is technically possible. But it's only worth doing if you meet every single one of these requirements. Skip even one, and you'd be better off buying the pre-made box.Requirement #1: DC-Rated Components with Proper Voltage RatingsYour shopping list for a DIY solar combiner box starts here: every breaker, fuse, bus bar, terminal block, and disconnect inside that box must be explicitly rated for DC voltage and for at least 600 volts DC.Not 600VAC. Not "suitable for solar." Not "probably fine." The datasheet must state: "600VDC" in plain text.Why 600V when your strings are only 93.4V? Two reasons. First, NEC Article 690.7 requires voltage calculations based on the coldest expected temperature in your location. Solar panels produce higher voltage when cold—up to 10-15% higher than nameplate Voc depending on your climate zone. Your 46.7V panels might hit 53V each on a January morning. Two in series? 106 volts per string.Second, you need safety margin for transient voltage spikes during cloud-edge effects (when sunlight intensity changes rapidly) and for equipment degradation over time. Industry standard: if your maximum system voltage is under 150VDC, use 600VDC-rated components. It's not overkill; it's the minimum for 25-year service life.Where to source DC-rated components:DC breakers: Manufacturers like ABB, Eaton, Mersen, and Littelfuse make DC-rated molded case circuit breakers (MCCBs). Expect to pay $35-60 per breaker vs $12-18 for equivalent AC breakers. Check for "UL 489 supplement" DC rating or "IEC 60947-2 DC" marking.Fuses: Ferraz Shawmut, Mersen, and Littelfuse offer PV-rated fuses with 600VDC to 1000VDC ratings. Use 15A fuses for standard 350W panels (calculated as Isc × 1.56 per NEC 690.8). Cost: $8-15 per fuse plus $25-40 per fuse holder.Bus bars: Copper or aluminum rated for 90°C minimum. Many AC-rated bus bars work fine, but verify the material spec handles DC current density (1.5-2.0 A/mm² for copper).Pro-Tip #1: That "48V" marking on AC equipment? It refers to your battery voltage, not your panel string voltage. Your 48V battery system has 93.4V strings that need proper 600VDC-rated DC equipment.Requirement #2: UL 1741-Listed Enclosure or Equivalent ProtectionThe metal box itself matters more than you think when building a DIY solar combiner box.For rooftop installation, you need at minimum a NEMA 3R (rain-tight) or IP54 (dust and splash protected) rated enclosure. NEMA 1 indoor panels are not suitable. The enclosure must:Handle thermal cycling: Rooftop temperatures swing 80-100°F daily. The enclosure needs gaskets that maintain their seal, knockouts that don't crack from expansion/contraction, and paint that doesn't flake off and contaminate electrical connections.Provide adequate ventilation: DC breakers generate heat when carrying current. Without proper ventilation, internal temperatures can exceed component ratings even when the ambient temperature is acceptable. Look for enclosures with ventilation calculated for at least 30% more thermal load than your maximum string current.Include proper grounding provisions: Your enclosure needs dedicated grounding bus bars with mechanical lugs (not spring clips) rated for #6 AWG copper minimum. Every metal surface inside the box must be bonded to ground. This isn't optional—NEC 690.43 requires it.Cost reality check: A proper NEMA 3R enclosure sized for 5-6 strings (approximately 12" × 16" × 6") runs $80-150. A weatherproof outdoor-rated enclosure with the right knockouts, bus bars, and mounting hardware? $120-200. That's 50-60% of your total DIY combiner box cost right there.If you're thinking "I'll just use the AC panel and add a weatherproof cover," stop. Those covers are designed to keep rain off the switches during momentary use—not provide continuous NEMA 3R protection for equipment that lives outdoors 24/7 for 25 years.Requirement #3: Arc Fault Protection (NEC 690.11 Compliance)Here's where most DIY solar combiner box builds fail code inspection.NEC 690.11 mandates arc fault circuit interrupters (AFCI) for any PV system with DC circuits operating at 80 volts or higher. Your 93.4V strings? You're 17% over the threshold. AFCI is non-negotiable.What AFCI actually does: It monitors the electrical signature of current flowing through the DC circuits and detects the specific noise pattern of an arc fault—the chaotic, high-frequency signal that appears when current jumps across a gap. When detected, it immediately interrupts the circuit before the arc can ignite nearby materials.Remember The Arc That Won't Die? AFCI is specifically designed to kill it.Your two options:Option 1 - Inverter with integrated AFCI: Most modern string inverters (SMA, SolarEdge, Fronius, etc.) have built-in arc fault detection per UL 1741. If your inverter has this, you don't need separate AFCI in your DIY combiner box. Verify this by checking your inverter's spec sheet for "UL 1741 AFCI compliant" or "NEC 690.11 arc fault protection."Option 2 - Standalone AFCI device: If your inverter doesn't include AFCI, you need a listed arc fault detector installed in your combiner box or within 6 feet of it. These cost $200-400 and require additional wiring. Brands include Sensata, Eaton, and Mersen. This alone might make your DIY combiner box more expensive than buying a pre-made one.Exception: If your DC wiring runs in metal conduit or metal-clad cable, and never exits that metal raceway between the panels and the inverter, you can skip AFCI. But realistically? Rooftop installations use exposed PV wire with MC4 connectors, which means AFCI is required.Pro-Tip #2: DC arcs don't die when you flip the switch—they keep burning at 35,000°F until physically suppressed. AFCI is how you suppress them before they start fires.Requirement #4: Proper Labeling and Documentation (NEC 690.7, 690.15)Code inspectors will red-tag your DIY solar combiner box installation for missing labels faster than for questionable component choices.Required labels on your DIY combiner box:1. Maximum DC voltage label (NEC 690.7):MAXIMUM DC VOLTAGE: 106V(Based on 2× 46.7V panels at -10°C ambient)COMPLIES WITH NEC 690.7(D)This label must be placed on the combiner box exterior and visible without opening the enclosure.2. DC combiner identification (NEC 690.15):WARNING:DC COMBINER BOXMULTIPLE DC VOLTAGE SOURCESDO NOT DISCONNECT UNDER LOAD3. Conductor identification (NEC 690.31):Every incoming string must be labeled with its source location:"STRING 1 - ARRAY NORTH""STRING 2 - ARRAY NORTH""STRING 3 - ARRAY SOUTH"etc.4. Grounding electrode conductor label (if applicable):If your grounding conductor terminates in the combiner box, label it per NEC 690.47.Use outdoor-rated label stock (3M or Brady polyester labels with UV-resistant ink). Printed paper labels in weatherproof sleeves won't pass inspection—they degrade too quickly.Documentation you need:One-line diagram showing string configuration and voltagesComponent datasheets proving DC ratingsCalculation showing NEC 690.7 max voltageNEC 690.8 current calculationsKeep copies inside the combiner box in a weatherproof document pouch. Inspectors may request them.The Real Math: $300 Combiner Box vs. The AlternativeLet's talk money. Real money.Your compliant DIY solar combiner box parts list:NEMA 3R enclosure with breaker mounts: $120Five DC-rated 15A breakers at $45 each: $225DC-rated bus bars and terminals: $60Hardware, labels, wire, connectors: $40Total: $445Wait. The pre-made UL 1741-listed combiner box costs $320. Your "DIY savings"? You're losing $125 plus 6-8 hours of assembly and wiring time.But that's assuming you don't need separate AFCI. Add that $300 device? Now you're at $745 vs. $320 for the pre-made box that includes integrated AFCI.The math doesn't work for most DIY solar combiner box projects. Unless you're building for 10+ strings where pre-made boxes get expensive (over $800), or you need a custom configuration that's not available off-the-shelf, DIY combiner boxes are often more expensive than buying properly certified equipment.Here's the math that really matters:Cost of one electrical fire: $50,000-$250,000 in structural damage, depending on when the fire department arrives.Cost of homeowner's insurance premium increase after an electrical fire: 20-40% increase for 3-5 years = $1,200-$3,000 additional cost.Cost of insurance claim denial because you used non-listed equipment: 100% of the damages = whatever the fire costs.Cost of permitting issues when you try to sell your house: Delays, re-inspections, potential contractor costs to bring to code = $2,000-$8,000.That $240 price difference? It's not buying a fancy label. It's buying peace of mind that every single component was torture-tested for the exact failure modes that happen on rooftops. It's buying insurance-compliant equipment that won't void your policy. It's buying inspector-approved hardware that won't delay your permit by three months.Pro-Tip #3: The real DIY skill isn't figuring out how to build everything yourself—it's knowing which corners you can cut and which ones cut back. Combiner boxes cut back.When DIY Actually Makes SenseDon't mistake this article for "never build anything yourself." Solar installations have plenty of legitimate DIY opportunities:Smart DIY projects:Racking and mounting: You can absolutely design and install your own panel mounting system. It's mechanical, it's verifiable, and there's no Arc That Won't Die trying to kill you if you get something wrong.Conduit runs: Running EMT or PVC conduit from your combiner box to your inverter? Great DIY project. Just follow NEC conduit fill calculations.System monitoring: Adding performance monitoring, data logging, even IoT integrations to track your system? Go wild. Worst case is you lose some data.Reckless DIY projects:Combiner boxes (as we've discussed)DC disconnects between combiner and inverter (same issues: DC arc interruption, voltage ratings)Inverter installation (complex electrical connections, AC/DC integration points)Service panel interconnections (requires licensed electrician in most jurisdictions)The pattern? If it's carrying high-voltage DC or connecting to your main electrical service, hire professionals or buy listed equipment. If it's structural, mechanical, or low-voltage monitoring, DIY away.The Bottom Line: Build Smart, Not Just CheapIf you made it this far, you're already ahead of 90% of DIY solar installers. You're asking the right questions.Here's what you've learned:The Arc That Won't Die: DC arcs don't self-extinguish like AC arcs. They burn at 35,000°F until physically suppressed. AC equipment isn't designed for this.The 48V Confusion: Your battery voltage isn't your string voltage. That 48V system has 93.4V strings that need 600VDC-rated equipment, not repurposed AC panels.The Voltage Rating Trap: AC voltage ratings don't translate to DC. A 240VAC breaker might only be safe to 48VDC. Your 93.4V strings exceed most AC equipment's DC capability.The Compliance Cost: Building a code-compliant DIY solar combiner box costs $445-$745. Buying a pre-made UL 1741-listed box? $320. The math doesn't support DIY unless you need custom configurations.Can you technically build your own combiner box? Yes. With the right components, proper enclosures, AFCI protection, and correct labeling, it's possible.Should you? Probably not. The cost savings evaporate once you price out DC-rated components and AFCI. The time investment (8-10 hours for first build, 4-6 for subsequent ones) rarely justifies the marginal savings. And the liability if something goes wrong—that insurance claim denial, that permit rejection, that inspector's red tag—wipes out any financial benefit.The real DIY move? Know when to build and when to buy.Save your DIY energy for the racking, the monitoring systems, the conduit runs, the parts of solar installations where your effort actually multiplies your money instead of just increasing your risk.And that $60 Square D panel in your garage? Use it where it belongs—on an AC circuit, where the zero-crossing does the heavy lifting and arcs die on their own like they're supposed to.Because in solar PV, the most expensive mistake isn't the one that costs you $300 up front. It's the one that saves you $240 today and costs you $50,000 six months from now when The Arc That Won't Die finds something flammable.Ready to do your solar installation right? Check out our complete line of UL 1741-listed combiner boxes and DC-rated protection equipment designed specifically for residential and commercial PV systems. We've already done the engineering and testing—you get reliable equipment at prices that make DIY look expensive.

คุณมีแผงโซลาร์เซลล์ REC 350W จำนวน 10 แผงพร้อมติดตั้ง แบ่งเป็น 5 สตริง สตริงละ 2 แผง แต่ละสตริงจ่ายไฟ 93.4 โวลต์ DC ที่ 9 แอมป์ คุณได้ค้นคว้าข้อมูลเกี่ยวกับการออกแบบกล่องรวมสายไฟโซลาร์เซลล์ DIY ทางออนไลน์ และคำนวณแล้ว ทุกอย่างเรียบร้อยดี.

จากนั้นคุณก็ดูราคากล่องรวมสายไฟโซลาร์เซลล์ที่เหมาะสม $300 หรืออาจจะเป็น $400 หากคุณต้องการรุ่นที่มีระบบตรวจสอบในตัว คุณมองไปที่แผงย่อย Square D ที่วางอยู่ในโรงรถของคุณ ซึ่งคุณจ่ายเงินไป $60 เมื่อปีที่แล้ว กล่องโลหะแบบเดียวกัน บัสบาร์แบบเดียวกัน เซอร์กิตเบรกเกอร์แบบเดียวกัน ทำไมคุณถึงต้องจ่ายเงินมากกว่าถึง 5 เท่าสำหรับสิ่งที่ดูเหมือนกันทุกประการ

นี่คือเหตุผล: เพราะช่องว่างราคา $240 นั้นคือความแตกต่างระหว่างระบบที่ใช้งานได้ 20 ปี กับระบบที่เกิดไฟไหม้ใน 6 เดือน.

อาร์คที่ไม่ยอมดับ: ทำไม DC ถึงทำลายอุปกรณ์ AC

The Arc That Won't Die: AC vs. DC Interruption

ในขณะที่คุณสับ เบรกเกอร์ AC เปิดวงจรภายใต้โหลด จะเกิดอาร์คไฟฟ้าระหว่างหน้าสัมผัสที่แยกจากกัน มันคือพลาสมา ก๊าซแตกตัวเป็นไอออนที่นำกระแสไฟหลายพันแอมป์ผ่านสิ่งที่เคยเป็นอากาศ สร้างอุณหภูมิสูงถึง 35,000°F ซึ่งเมื่อเทียบแล้วร้อนกว่าพื้นผิวของดวงอาทิตย์ถึงสี่เท่า.

แต่สิ่งสำคัญเกี่ยวกับอาร์ค AC คือ: มันจะดับเอง.

หกสิบครั้งต่อวินาที ไฟ AC มาตรฐานจะตัดผ่านศูนย์โวลต์เมื่อกระแสสลับทิศทาง ในช่วงเวลานั้นเอง ซึ่งกินเวลาเพียงมิลลิวินาที อาร์คจะสูญเสียแหล่งพลังงานและดับลง หน้าสัมผัสยังคงเคลื่อนที่ออกจากกัน วงจรเปิด เสร็จสิ้น.

DC ไม่ได้เป็นแบบนี้.

เมื่อคุณขัดขวางไฟ 93.4 โวลต์ DC อาร์คจะสว่างขึ้นและติดอยู่ตราบเท่าที่หน้าสัมผัสอยู่ใกล้กันพอที่จะคงอยู่ได้ ไม่มีการตัดผ่านศูนย์ ไม่มีการขัดจังหวะตามธรรมชาติ มีเพียงกระแสไฟต่อเนื่องที่ไม่หยุดหย่อนที่พยายามเชื่อมช่องว่างนั้นด้วยแม่น้ำพลาสมาที่หลอมโลหะ จุดชนวนฉนวน และเผาไหม้ต่อไปจนกว่าหน้าสัมผัสจะแยกออกจากกันทางกายภาพมากพอ ซึ่งโดยทั่วไปจะไกลกว่าอุปกรณ์ AC ที่ออกแบบไว้ 3-4 เท่า.

นี่คือ “อาร์คที่ไม่ยอมดับ” และเป็นเหตุผลว่าทำไมส่วนประกอบทุกชิ้นภายในกล่องรวมสายไฟที่ได้รับการจัดอันดับ DC ที่แท้จริงจึงดูแตกต่างจากอุปกรณ์ AC ระยะห่างของหน้าสัมผัสกว้างขึ้น รางอาร์ค (แผ่นโลหะซิกแซกที่ยืดและทำให้อาร์คเย็นลง) ยาวขึ้น เบรกเกอร์ DC บางตัวยังใช้ขดลวดแม่เหล็กเพื่อเป่าอาร์คออก เหมือนกับการดับเทียน.

แผงย่อย AC $60 ของคุณไม่มีสิ่งเหล่านี้.

เบรกเกอร์ได้รับการออกแบบโดยสมมติว่าอาร์คจะดับเองตามธรรมชาติภายใน 8 มิลลิวินาที ใส่ไฟ 93 โวลต์ DC ผ่านเข้าไป และสมมติฐานนั้นจะกลายเป็นภาระ หน้าสัมผัสพยายามเปิด อาร์คก่อตัวขึ้น และแทนที่จะดับที่จุดตัดศูนย์ มันก็แค่... ดำเนินต่อไป รางอาร์คของเบรกเกอร์ไม่ยาวพอ ระยะห่างของหน้าสัมผัสไม่กว้างพอ วัสดุไม่ได้รับการจัดอันดับสำหรับการอาร์ค DC อย่างต่อเนื่อง.

ในที่สุด สิ่งใดสิ่งหนึ่งในสองสิ่งนี้จะเกิดขึ้น: หน้าสัมผัสเชื่อมติดกัน (ปิดวงจรอย่างถาวรแม้ว่าคุณจะคิดว่ามัน “ปิด”) หรือส่วนประกอบภายในของเบรกเกอร์หลอมละลายและล้มเหลวอย่างร้ายแรง ไม่มีผลลัพธ์ใดที่เกี่ยวข้องกับระบบสุริยะของคุณที่ปิดตัวลงอย่างปลอดภัยเมื่อคุณต้องการ.

ความสับสน 48V: แรงดันไฟฟ้าแบตเตอรี่ของคุณ ≠ แรงดันไฟฟ้าสตริงของคุณ

The Voltage Rating Trap: AC vs. DC Ratings.

นี่คือจุดที่แผนการกล่องรวมสายไฟโซลาร์เซลล์ DIY ส่วนใหญ่ผิดพลาด.

คุณเห็น “ระบบ 48V” ในเอกสารการวางแผนของคุณ คุณพบแผงย่อย AC ที่ได้รับการจัดอันดับ “48 โวลต์” ตรงกันอย่างสมบูรณ์แบบ ใช่ไหม

ผิดทั้งสามประการ.

อันดับแรก: พิกัดแบตเตอรี่ 48V นั้นคือ ค่าปกติ แรงดันไฟฟ้า จุดปฏิบัติการเฉลี่ย แบตเตอรี่ 48V ของคุณทำงานจริงระหว่าง 40V (คายประจุ) ถึง 58V (กำลังชาร์จ) ไม่เกี่ยวข้องกับการปรับขนาดกล่องรวมสายไฟ แต่สำคัญที่ต้องทราบว่าตัวเลขมีการเปลี่ยนแปลง.

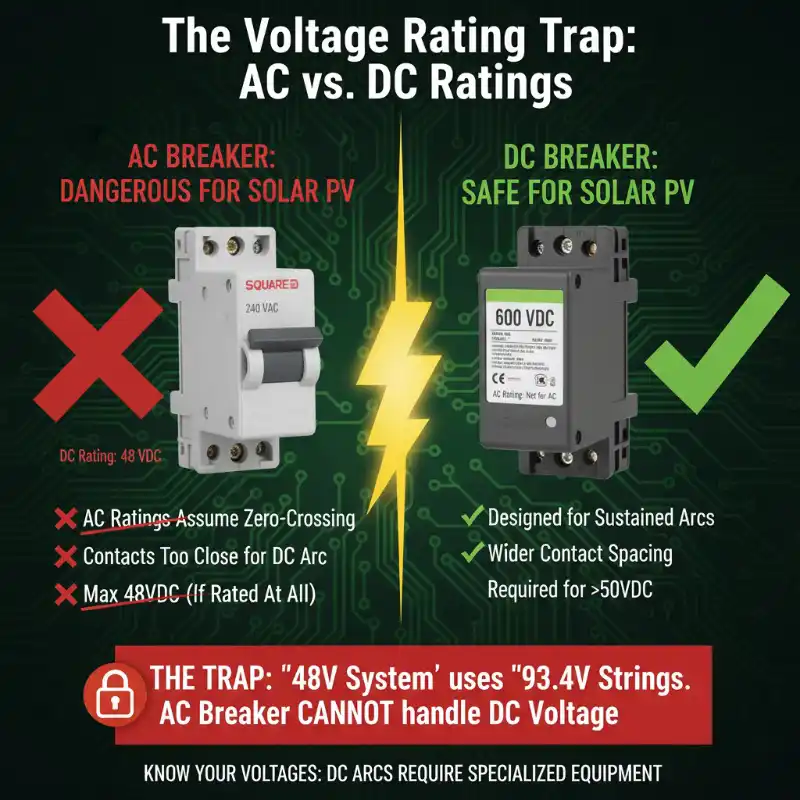
ประการที่สอง: สตริงโซลาร์เซลล์ของคุณไม่สนใจว่าแบตเตอรี่ของคุณทำงานที่แรงดันไฟฟ้าเท่าใด แผง REC 350W แต่ละแผงมีแรงดันไฟฟ้าวงจรเปิด (Voc) ที่ 46.7V สองแผงต่ออนุกรม? นั่นคือ 93.4 โวลต์ เกือบสองเท่าของแรงดันไฟฟ้าแบตเตอรี่ของคุณ และนั่นคือตัวเลขที่กล่องรวมสายไฟ DIY ของคุณต้องจัดการ คุณไม่ได้รวม 48V คุณกำลังรวมห้าสตริง 93.4V แยกกันเป็นวงจรเอาต์พุต DC เดียว.

ประการที่สาม และนี่คือกับดักการจัดอันดับแรงดันไฟฟ้า: เมื่อแผงที่ได้รับการจัดอันดับ AC ระบุว่า “48 โวลต์” หมายถึง 48 โวลต์ แอร์. หากมีพิกัด DC ใดๆ เลย (ส่วนใหญ่ไม่มี) จะถูกฝังอยู่ในตัวอักษรขนาดเล็กและต่ำกว่ามาก เบรกเกอร์ที่ได้รับการจัดอันดับสำหรับ 240VAC อาจปลอดภัยสำหรับ 48VDC เท่านั้น แผงที่ได้รับการจัดอันดับสำหรับ 480VAC? อาจจะ 60-80VDC หากคุณโชคดี.

ทำไมถึงมีความแตกต่างมากมาย? กลับไปที่อาร์คที่ไม่ยอมดับ พิกัดแรงดันไฟฟ้า AC สันนิษฐานว่าอาร์คจะดับเองตามธรรมชาติ พิกัดแรงดันไฟฟ้า DC สันนิษฐานว่าอาร์คจะตอบโต้และพยายามรักษาตัวเองข้ามช่องว่างที่กว้างขึ้น ยิ่งแรงดันไฟฟ้า DC สูงเท่าใด ช่องว่างที่สามารถกระโดดได้ก็จะยิ่งกว้างขึ้น และกลไกการขัดจังหวะก็ยิ่งต้องแข็งแกร่งมากขึ้นเท่านั้น.

ดังนั้นแผง Square D ที่ “ได้รับการจัดอันดับสำหรับ 48V” นั้น? แม้ว่าจะเป็นพิกัด DC (ตรวจสอบเอกสารข้อมูล ฉันจะรอ) คุณกำลังพยายามดัน 93.4V ผ่านเข้าไป คุณกำลังทำงานที่ 195% ของแรงดันไฟฟ้าที่ออกแบบไว้ นั่นไม่ใช่ส่วนต่างด้านความปลอดภัย นั่นคือตัวจับเวลาถอยหลัง.

สิ่งที่ $240 ซื้อให้คุณจริงๆ: ภายในใบรับรอง UL 1741

UL 1741- What Certification Actually Buys You.webp

“มันเป็นแค่สติกเกอร์ UL” คุณอาจคิด “ฉันสามารถข้ามสิ่งนั้นไปได้สำหรับการตั้งค่า DIY”

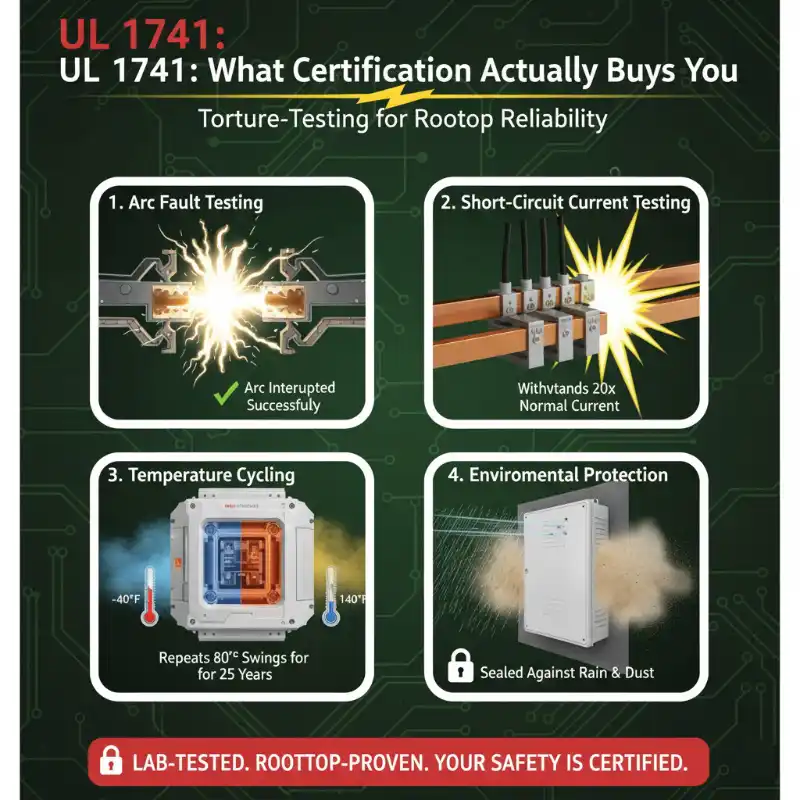
แต่ UL 1741 ซึ่งเป็นมาตรฐานสำหรับกล่องรวมสายไฟโซลาร์เซลล์และอุปกรณ์เชื่อมต่อ ไม่ได้ตรวจสอบว่ากล่องของคุณมีมุมโค้งมนและงานสีที่ดีหรือไม่ แต่กำลังทดสอบว่าอุปกรณ์ของคุณรอดพ้นจากโหมดความล้มเหลวที่เกิดขึ้นจริงในระบบ PV ในโลกแห่งความเป็นจริงหรือไม่.

นี่คือสิ่งที่กล่องรวมสายไฟต้องผ่านเพื่อให้ได้รับการขึ้นทะเบียน UL 1741:

การทดสอบข้อผิดพลาดของอาร์ค DC: เบรกเกอร์สามารถขัดขวางอาร์คที่แรงดันไฟฟ้าสตริงเต็มที่กระแสสูงสุดได้หรือไม่ พวกเขาทดสอบสิ่งนี้หลายร้อยครั้ง เบรกเกอร์ของแผง AC ของคุณ? ไม่เคยทดสอบการอาร์ค DC เลย สักครั้งเดียว.

การทดสอบกระแสไฟฟ้าลัดวงจร: จะเกิดอะไรขึ้นเมื่อสองสตริงลัดวงจรโดยไม่ได้ตั้งใจ ทำให้กระแสไฟ 90 แอมป์ไหลผ่านบัสบาร์ที่ได้รับการจัดอันดับสำหรับ 20 แอมป์ การทดสอบจะเปิดเผยจุดเชื่อมต่อทุกจุดต่อกระแสไฟผิดพลาด 10-20 เท่าของกระแสไฟที่ใช้งานปกติ ทุกสิ่งที่กำลังจะละลาย จะละลายในห้องปฏิบัติการแทนที่จะอยู่บนหลังคาของคุณ.

การหมุนเวียนอุณหภูมิ: กล่องรวมสายไฟบนหลังคาแกว่งจากคืนฤดูหนาว -40°F เป็นวันฤดูร้อน 140°F ภายใต้แสงแดดโดยตรง UL จะหมุนเวียนอุปกรณ์ผ่านสภาวะสุดขั้วเหล่านี้ในขณะที่โหลดเต็มที่ การเชื่อมต่อที่จะคลายออกหลังจากสามปีของการขยายตัวทางความร้อน? พวกเขาล้มเหลวในห้องทดสอบ.

การปกป้องสิ่งแวดล้อม: พิกัด NEMA 3R นั้นไม่ใช่ของประดับตกแต่ง หมายความว่ากล่องรอดพ้นจากฝนในแนวนอน ไม่สะสมน้ำแข็งที่ขวางการระบายอากาศ และป้องกันฝุ่นออกจากบัสบาร์แม้ว่าจะติดตั้งในสภาพแวดล้อมทางอุตสาหกรรมที่มีฝุ่นมาก แผงย่อยโรงรถของคุณคือ NEMA 1 ออกแบบมาสำหรับการใช้งานในร่มที่สะอาดและสวยงามที่อุณหภูมิห้อง.

ต้นทุนที่แท้จริงของการอัปเกรด $240 นั้นไม่ใช่แค่ค่าวัสดุ เบรกเกอร์ที่ได้รับการจัดอันดับ DC อาจมีราคา $30 แทนที่จะเป็น $12 สำหรับเบรกเกอร์ AC กล่องโลหะมีราคาอีก $50 ที่เหลือ? เป็นชั่วโมงการทำงานด้านวิศวกรรมที่ใช้เพื่อให้แน่ใจว่าส่วนประกอบเหล่านั้นทำงานร่วมกันได้อย่างน่าเชื่อถือภายใต้สภาวะที่เลวร้ายที่สุด และการทดสอบเพื่อพิสูจน์.

เมื่อคุณข้าม UL 1741 คุณไม่ได้แค่พลาดสติกเกอร์ คุณกำลังพลาดการทดสอบทำลายล้าง 10,000 ชั่วโมงที่ระบุโหมดความล้มเหลวทุกรูปแบบที่กล่องที่ติดตั้งบนหลังคาของคุณจะต้องเผชิญในช่วง 20 ปีข้างหน้า คุณกำลังทดสอบโหมดความล้มเหลวเหล่านั้นด้วยตัวคุณเอง.

ในเวลาจริง.

บนหลังคาของคุณ.

4 ข้อกำหนดที่ไม่สามารถต่อรองได้สำหรับกล่องรวมสายไฟโซลาร์เซลล์ DIY ที่ปลอดภัย

ให้ชัดเจน: การสร้างกล่องรวมสายไฟโซลาร์เซลล์ของคุณเองเป็นไปได้ในทางเทคนิค แต่คุ้มค่าที่จะทำก็ต่อเมื่อคุณปฏิบัติตามข้อกำหนดเหล่านี้ทุกข้อ ข้ามไปแม้แต่ข้อเดียว คุณควรซื้อกล่องสำเร็จรูปจะดีกว่า.

4 Non-Negotiable Requirements for a Safe DIY Solar Combiner Box

ข้อกำหนดที่ #1: ส่วนประกอบที่ได้รับการจัดอันดับ DC พร้อมพิกัดแรงดันไฟฟ้าที่เหมาะสม

รายการซื้อของของคุณสำหรับกล่องรวมสายไฟโซลาร์เซลล์ DIY เริ่มต้นที่นี่: เบรกเกอร์ทุกตัว, ฟิวส์, บัสบาร์, เทอร์มินัลบล็อค, และตัวตัดการเชื่อมต่อภายในกล่องนั้นต้องได้รับการจัดอันดับอย่างชัดเจนสำหรับแรงดันไฟฟ้า DC แล้ว สำหรับอย่างน้อย 600 โวลต์ DC.

ไม่ใช่ 600VAC ไม่ใช่ “เหมาะสำหรับโซลาร์เซลล์” ไม่ใช่ “อาจจะใช้ได้” เอกสารข้อมูลต้องระบุ: “600VDC” ในข้อความธรรมดา.

ทำไมต้อง 600V ในเมื่อสตริงของคุณมีเพียง 93.4V? สองเหตุผล ประการแรก NEC Article 690.7 กำหนดให้มีการคำนวณแรงดันไฟฟ้าตาม อุณหภูมิที่คาดว่าจะเย็นที่สุด ในสถานที่ของคุณ แผงโซลาร์เซลล์ผลิตแรงดันไฟฟ้าที่สูงขึ้นเมื่อเย็น สูงกว่า Voc ของแผ่นป้ายชื่อถึง 10-15% ขึ้นอยู่กับเขตภูมิอากาศของคุณ แผง 46.7V ของคุณอาจสูงถึง 53V แต่ละแผงในเช้าเดือนมกราคม สองแผงต่ออนุกรม? 106 โวลต์ต่อสตริง.

ประการที่สอง คุณต้องมีส่วนต่างด้านความปลอดภัยสำหรับแรงดันไฟฟ้ากระชากชั่วคราวระหว่างเอฟเฟกต์ขอบเมฆ (เมื่อความเข้มของแสงแดดเปลี่ยนแปลงอย่างรวดเร็ว) และสำหรับการเสื่อมสภาพของอุปกรณ์เมื่อเวลาผ่านไป มาตรฐานอุตสาหกรรม: หากแรงดันไฟฟ้าระบบสูงสุดของคุณต่ำกว่า 150VDC ให้ใช้ส่วนประกอบที่ได้รับการจัดอันดับ 600VDC ไม่ใช่เรื่องเกินความจำเป็น เป็นค่าต่ำสุดสำหรับอายุการใช้งาน 25 ปี.

แหล่งที่มาของส่วนประกอบที่ได้รับการจัดอันดับ DC:

  • เบรกเกอร์ DC: ผู้ผลิตเช่น ABB, Eaton, Mersen และ Littelfuse ทำเบรกเกอร์วงจรเคสแบบหล่อ (MCCB) ที่ได้รับการจัดอันดับ DC คาดว่าจะจ่าย $35-60 ต่อเบรกเกอร์ เทียบกับ $12-18 สำหรับเบรกเกอร์ AC ที่เทียบเท่า ตรวจสอบการจัดอันดับ DC “UL 489 supplement” หรือเครื่องหมาย “IEC 60947-2 DC”.
  • ฟิวส์: Ferraz Shawmut, Mersen และ Littelfuse นำเสนอฟิวส์ที่ได้รับการจัดอันดับ PV ที่มีการจัดอันดับ 600VDC ถึง 1000VDC ใช้ฟิวส์ 15A สำหรับแผง 350W มาตรฐาน (คำนวณเป็น Isc × 1.56 ต่อ NEC 690.8) ราคา: $8-15 ต่อฟิวส์ บวก $25-40 ต่อที่ใส่ฟิวส์.
  • บัสบาร์: ทองแดงหรืออลูมิเนียมที่ได้รับการจัดอันดับสำหรับ 90°C ขั้นต่ำ บัสบาร์ที่ได้รับการจัดอันดับ AC จำนวนมากทำงานได้ดี แต่ตรวจสอบว่าข้อมูลจำเพาะของวัสดุจัดการความหนาแน่นกระแส DC (1.5-2.0 A/mm² สำหรับทองแดง).

มืออาชีพ-บ#1: เครื่องหมาย “48V” บนอุปกรณ์ AC นั้นหมายถึงแรงดันไฟฟ้าแบตเตอรี่ของคุณ ไม่ใช่แรงดันไฟฟ้าสตริงของแผง ระบบแบตเตอรี่ 48V ของคุณมีสตริง 93.4V ที่ต้องการอุปกรณ์ DC ที่ได้รับการจัดอันดับ 600VDC ที่เหมาะสม.

ข้อกำหนด #2: UL 1741-กล่องหุ้มที่ได้รับการรับรองหรือมีการป้องกันเทียบเท่า

ตัวกล่องโลหะมีความสำคัญมากกว่าที่คุณคิดเมื่อสร้างกล่องรวมสายไฟโซลาร์เซลล์แบบ DIY.

สำหรับการติดตั้งบนหลังคา คุณต้องมีอย่างน้อย NEMA 3R (กันฝน) หรือ IP54 (ป้องกันฝุ่นและละอองน้ำ) กล่องหุ้มที่ได้รับการจัดอันดับ แผงภายในอาคาร NEMA 1 ไม่เหมาะสม กล่องหุ้มต้อง:

รองรับการเปลี่ยนแปลงอุณหภูมิ: อุณหภูมิบนหลังคาเปลี่ยนแปลง 80-100°F ทุกวัน กล่องหุ้มต้องมีปะเก็นที่คงสภาพการซีล, ช่องเคาะที่ไม่แตกจากการขยาย/หดตัว และสีที่ไม่หลุดลอกและปนเปื้อนการเชื่อมต่อทางไฟฟ้า.

ให้การระบายอากาศที่เพียงพอ: เบรกเกอร์ DC สร้างความร้อนเมื่อมีกระแสไฟฟ้าไหลผ่าน หากไม่มีการระบายอากาศที่เหมาะสม อุณหภูมิภายในอาจเกินพิกัดของส่วนประกอบ แม้ว่าอุณหภูมิแวดล้อมจะเป็นที่ยอมรับได้ มองหากล่องหุ้มที่มีการระบายอากาศที่คำนวณไว้สำหรับโหลดความร้อนมากกว่ากระแสสตริงสูงสุดของคุณอย่างน้อย 30%.

มีข้อกำหนดการต่อสายดินที่เหมาะสม: กล่องหุ้มของคุณต้องมีบัสบาร์กราวด์โดยเฉพาะพร้อมหูลากทางกล (ไม่ใช่คลิปสปริง) ที่ได้รับการจัดอันดับสำหรับทองแดงขนาด #6 AWG ขั้นต่ำ ทุกพื้นผิวโลหะภายในกล่องต้องเชื่อมต่อกับกราวด์ นี่ไม่ใช่ทางเลือก—NEC 690.43 กำหนดไว้.

ตรวจสอบความเป็นจริงของต้นทุน: กล่องหุ้ม NEMA 3R ที่เหมาะสมซึ่งมีขนาดสำหรับ 5-6 สตริง (ประมาณ 12″ × 16″ × 6″) มีราคา $80-150 กล่องหุ้มที่ทนต่อสภาพอากาศกลางแจ้งพร้อมช่องเคาะ บัสบาร์ และฮาร์ดแวร์สำหรับติดตั้งที่เหมาะสม? $120-200 นั่นคือ 50-60% ของต้นทุนกล่องรวมสายไฟ DIY ทั้งหมดของคุณ.

หากคุณกำลังคิดว่า “ฉันจะใช้แผง AC และเพิ่มฝาครอบกันสภาพอากาศ” หยุดความคิดนั้น ฝาครอบเหล่านั้นออกแบบมาเพื่อป้องกันฝนจากสวิตช์ระหว่างการใช้งานชั่วขณะ—ไม่ใช่เพื่อให้การป้องกัน NEMA 3R อย่างต่อเนื่องสำหรับอุปกรณ์ที่อยู่กลางแจ้งตลอด 24 ชั่วโมงทุกวันเป็นเวลา 25 ปี.

ข้อกำหนด #3: การป้องกัน Arc Fault (การปฏิบัติตาม NEC 690.11)

นี่คือจุดที่การสร้างกล่องรวมสายไฟโซลาร์เซลล์แบบ DIY ส่วนใหญ่ไม่ผ่านการตรวจสอบตามข้อกำหนด.

NEC 690.11 กำหนดให้ต้องมีอุปกรณ์ตัดวงจรไฟฟ้าขัดข้องจากอาร์ค (AFCI) สำหรับระบบ PV ใดๆ ที่มีวงจร DC ทำงานที่ 80 โวลต์หรือสูงกว่า. สตริง 93.4V ของคุณ? คุณเกินเกณฑ์ 17% AFCI เป็นสิ่งที่ไม่สามารถต่อรองได้.

AFCI ทำอะไรจริงๆ: มันตรวจสอบลักษณะทางไฟฟ้าของกระแสที่ไหลผ่านวงจร DC และตรวจจับรูปแบบสัญญาณรบกวนเฉพาะของการเกิดอาร์ค—สัญญาณความถี่สูงที่วุ่นวายซึ่งปรากฏขึ้นเมื่อกระแสไฟฟ้ากระโดดข้ามช่องว่าง เมื่อตรวจพบ มันจะขัดจังหวะวงจรทันทีก่อนที่อาร์คจะจุดติดวัสดุใกล้เคียง.

จำ The Arc That Won’t Die ได้ไหม? AFCI ได้รับการออกแบบมาโดยเฉพาะเพื่อกำจัดมัน.

สองตัวเลือกของคุณ:

ตัวเลือกที่ 1 – อินเวอร์เตอร์ที่มี AFCI ในตัว: อินเวอร์เตอร์สตริงที่ทันสมัยส่วนใหญ่ (SMA, SolarEdge, Fronius ฯลฯ) มีการตรวจจับอาร์คในตัวตาม UL 1741 หากอินเวอร์เตอร์ของคุณมีสิ่งนี้ คุณไม่จำเป็นต้องมี AFCI แยกต่างหากในกล่องรวมสายไฟ DIY ของคุณ ตรวจสอบสิ่งนี้โดยตรวจสอบแผ่นข้อมูลจำเพาะของอินเวอร์เตอร์ของคุณสำหรับ “UL 1741 AFCI compliant” หรือ “NEC 690.11 arc fault protection”

ตัวเลือกที่ 2 – อุปกรณ์ AFCI แบบสแตนด์อโลน: หากอินเวอร์เตอร์ของคุณไม่มี AFCI คุณต้องติดตั้งเครื่องตรวจจับอาร์คที่ได้รับการรับรองในกล่องรวมสายไฟของคุณหรือภายใน 6 ฟุตจากกล่องรวมสายไฟ มีราคา $200-400 และต้องมีการเดินสายเพิ่มเติม แบรนด์ต่างๆ ได้แก่ Sensata, Eaton และ Mersen สิ่งนี้เพียงอย่างเดียวอาจทำให้กล่องรวมสายไฟ DIY ของคุณมีราคาแพงกว่าการซื้อแบบสำเร็จรูป.

ยกเว้น: หากการเดินสาย DC ของคุณอยู่ในท่อโลหะหรือสายเคเบิลหุ้มโลหะ และไม่เคยออกจากรางโลหะนั้นระหว่างแผงและอินเวอร์เตอร์ คุณสามารถข้าม AFCI ได้ แต่ในความเป็นจริง? การติดตั้งบนหลังคาใช้สาย PV ที่เปิดโล่งพร้อมขั้วต่อ MC4 ซึ่งหมายความว่าต้องมี AFCI.

มืออาชีพ-บ#2: อาร์ค DC ไม่ดับเมื่อคุณสับสวิตช์—มันจะยังคงไหม้ที่ 35,000°F จนกว่าจะถูกระงับทางกายภาพ AFCI คือวิธีที่คุณระงับพวกมันก่อนที่พวกมันจะเริ่มก่อให้เกิดไฟไหม้.

ข้อกำหนด #4: การติดฉลากและเอกสารที่เหมาะสม (NEC 690.7, 690.15)

ผู้ตรวจสอบรหัสจะติดป้ายแดงการติดตั้งกล่องรวมสายไฟโซลาร์เซลล์แบบ DIY ของคุณเนื่องจากฉลากหายไปเร็วกว่าการเลือกส่วนประกอบที่น่าสงสัย.

ฉลากที่จำเป็นบนกล่องรวมสายไฟ DIY ของคุณ:

1. ฉลากแรงดันไฟฟ้า DC สูงสุด (NEC 690.7):

แรงดันไฟฟ้า DC สูงสุด: 106V

ฉลากนี้ต้องติดไว้ที่ด้านนอกของกล่องรวมสายไฟและมองเห็นได้โดยไม่ต้องเปิดกล่องหุ้ม.

2. การระบุกล่องรวมสายไฟ DC (NEC 690.15):

คำเตือน:

3. การระบุตัวนำ (NEC 690.31):
ทุกสตริงที่เข้ามาต้องมีป้ายกำกับระบุตำแหน่งที่มา:

  • “สตริง 1 – อาร์เรย์เหนือ”
  • “สตริง 2 – อาร์เรย์เหนือ”
  • “สตริง 3 – อาร์เรย์ใต้”
  • ฯลฯ.

4. ฉลากตัวนำอิเล็กโทรดกราวด์ (ถ้ามี):
หากตัวนำกราวด์ของคุณสิ้นสุดในกล่องรวมสายไฟ ให้ติดป้ายกำกับตาม NEC 690.47.

ใช้สต็อกฉลากที่ทนทานต่อสภาพอากาศกลางแจ้ง (ฉลากโพลีเอสเตอร์ 3M หรือ Brady ที่มีหมึกทนต่อรังสียูวี) ฉลากกระดาษพิมพ์ในปลอกกันสภาพอากาศจะไม่ผ่านการตรวจสอบ—มันเสื่อมสภาพเร็วเกินไป.

เอกสารที่คุณต้องการ:

  • แผนภาพเส้นเดียวที่แสดงการกำหนดค่าสตริงและแรงดันไฟฟ้า
  • แผ่นข้อมูลส่วนประกอบที่พิสูจน์พิกัด DC
  • การคำนวณที่แสดงแรงดันไฟฟ้าสูงสุด NEC 690.7
  • การคำนวณกระแสไฟฟ้า NEC 690.8

เก็บสำเนาไว้ในกล่องรวมสายไฟในซองเอกสารที่ทนทานต่อสภาพอากาศ ผู้ตรวจสอบอาจร้องขอ.

คณิตศาสตร์ที่แท้จริง: กล่องรวมสายไฟ $300 เทียบกับทางเลือกอื่น

มาคุยกันเรื่องเงิน เงินจริงๆ.

รายการชิ้นส่วนกล่องรวมสายไฟโซลาร์เซลล์ DIY ที่เป็นไปตามข้อกำหนดของคุณ:

  • กล่องหุ้ม NEMA 3R พร้อมที่ยึดเบรกเกอร์: $120
  • เบรกเกอร์ 15A ที่ได้รับการจัดอันดับ DC ห้าตัวที่ราคา $45 แต่ละตัว: $225
  • บัสบาร์และขั้วต่อที่ได้รับการจัดอันดับ DC: $60
  • ฮาร์ดแวร์ ฉลาก สายไฟ ขั้วต่อ: $40
  • รวม: $445

เดี๋ยวก่อน กล่องรวมสายไฟที่ได้รับการรับรอง UL 1741 สำเร็จรูปมีราคา $320 “การประหยัด DIY” ของคุณ? คุณกำลังสูญเสีย $125 บวกเวลาประกอบและเดินสาย 6-8 ชั่วโมง.

แต่นั่นคือสมมติว่าคุณไม่จำเป็นต้องมี AFCI แยกต่างหาก เพิ่มอุปกรณ์ $300 นั้น? ตอนนี้คุณอยู่ที่ $745 เทียบกับ $320 สำหรับกล่องสำเร็จรูปที่มี AFCI ในตัว.

คณิตศาสตร์ใช้ไม่ได้ผลสำหรับโครงการกล่องรวมสายไฟโซลาร์เซลล์ DIY ส่วนใหญ่ เว้นแต่คุณจะสร้างสำหรับ 10+ สตริงที่กล่องสำเร็จรูปมีราคาแพง (มากกว่า $800) หรือคุณต้องการการกำหนดค่าที่กำหนดเองซึ่งไม่มีจำหน่ายสำเร็จรูป กล่องรวมสายไฟ DIY มักจะ มากกว่า แพงกว่าการซื้ออุปกรณ์ที่ได้รับการรับรองอย่างถูกต้อง.

นี่คือคณิตศาสตร์ที่สำคัญจริงๆ:

ค่าใช้จ่ายของไฟไหม้จากไฟฟ้าหนึ่งครั้ง: 50,000-250,000 บาท ในความเสียหายโครงสร้าง ขึ้นอยู่กับว่าหน่วยดับเพลิงมาถึงเมื่อใด.

ค่าใช้จ่ายของการเพิ่มเบี้ยประกันภัยบ้านหลังจากไฟไหม้จากไฟฟ้า: เพิ่มขึ้น 20-40% เป็นเวลา 3-5 ปี = ค่าใช้จ่ายเพิ่มเติม 1,200-3,000 บาท.

ค่าใช้จ่ายของการปฏิเสธการเคลมประกันเนื่องจากคุณใช้อุปกรณ์ที่ไม่ได้ระบุไว้: 100% ของความเสียหาย = ค่าใช้จ่ายใดๆ ก็ตามที่เกิดจากไฟไหม้.

ค่าใช้จ่ายของปัญหาการขออนุญาตเมื่อคุณพยายามขายบ้านของคุณ: ความล่าช้า การตรวจสอบซ้ำ ค่าใช้จ่ายของผู้รับเหมาที่อาจเกิดขึ้นเพื่อให้เป็นไปตามข้อกำหนด = 2,000-8,000 บาท.

ส่วนต่างราคา 240 บาทนั้น? ไม่ใช่การซื้อฉลากแฟนซี แต่เป็นการซื้อความสบายใจที่ส่วนประกอบทุกชิ้นได้รับการทดสอบอย่างทรมานสำหรับโหมดความล้มเหลวที่เกิดขึ้นบนหลังคา เป็นการซื้ออุปกรณ์ที่สอดคล้องกับประกันภัยซึ่งจะไม่ทำให้กรมธรรม์ของคุณเป็นโมฆะ เป็นการซื้อฮาร์ดแวร์ที่ได้รับการอนุมัติจากผู้ตรวจสอบซึ่งจะไม่ทำให้การขออนุญาตของคุณล่าช้าไปสามเดือน.

มืออาชีพ-บ#3: ทักษะ DIY ที่แท้จริงไม่ใช่การคิดหาวิธีสร้างทุกสิ่งด้วยตัวเอง แต่เป็นการรู้ว่าคุณสามารถลดมุมใดได้บ้างและมุมใดที่ลดกลับ กล่อง Combiner ลดกลับ.

เมื่อ DIY สมเหตุสมผลจริงๆ

อย่าเข้าใจผิดว่าบทความนี้คือ “อย่าสร้างอะไรด้วยตัวเอง” การติดตั้งพลังงานแสงอาทิตย์มีโอกาส DIY ที่ถูกต้องตามกฎหมายมากมาย:

โครงการ DIY ที่ชาญฉลาด:

  • การติดตั้งและติดตั้ง: คุณสามารถออกแบบและติดตั้งระบบติดตั้งแผงของคุณเองได้อย่างแน่นอน เป็นระบบกลไก ตรวจสอบได้ และไม่มี Arc That Won't Die พยายามฆ่าคุณหากคุณทำผิดพลาด.
  • การเดินท่อร้อยสายไฟ: การเดินท่อร้อยสาย EMT หรือ PVC จากกล่อง combiner ของคุณไปยังอินเวอร์เตอร์? โครงการ DIY ที่ยอดเยี่ยม เพียงทำตามการคำนวณการเติมท่อร้อยสาย NEC.
  • การตรวจสอบระบบ: การเพิ่มการตรวจสอบประสิทธิภาพ การบันทึกข้อมูล แม้แต่การรวม IoT เพื่อติดตามระบบของคุณ? ทำได้อย่างเต็มที่ กรณีที่เลวร้ายที่สุดคือคุณสูญเสียข้อมูลบางส่วน.

โครงการ DIY ที่ประมาท:

  • กล่อง Combiner (ตามที่เราได้กล่าวถึง)
  • ตัวตัดการเชื่อมต่อ DC ระหว่าง Combiner และอินเวอร์เตอร์ (ปัญหาเดียวกัน: การขัดจังหวะส่วนโค้ง DC, พิกัดแรงดันไฟฟ้า)
  • การติดตั้งอินเวอร์เตอร์ (การเชื่อมต่อไฟฟ้าที่ซับซ้อน จุดเชื่อมต่อ AC/DC)
  • การเชื่อมต่อแผงบริการ (ต้องใช้ช่างไฟฟ้าที่มีใบอนุญาตในเขตอำนาจศาลส่วนใหญ่)

รูปแบบ? หากมีการนำไฟฟ้า DC แรงดันสูงหรือเชื่อมต่อกับบริการไฟฟ้าหลักของคุณ ให้จ้างผู้เชี่ยวชาญหรือซื้ออุปกรณ์ที่ระบุไว้ หากเป็นการตรวจสอบโครงสร้าง กลไก หรือแรงดันไฟฟ้าต่ำ ให้ทำ DIY ได้เลย.

pv combiner box

บรรทัดล่าง: สร้างอย่างชาญฉลาด ไม่ใช่แค่ราคาถูก

หากคุณทำได้ถึงจุดนี้ คุณก็อยู่เหนือผู้ติดตั้งพลังงานแสงอาทิตย์ DIY 90% แล้ว คุณกำลังถามคำถามที่ถูกต้อง.

นี่คือสิ่งที่คุณได้เรียนรู้:

The Arc That Won't Die: ส่วนโค้ง DC ไม่ดับเองเหมือนส่วนโค้ง AC พวกมันเผาไหม้ที่ 35,000°F จนกว่าจะถูกระงับทางกายภาพ อุปกรณ์ AC ไม่ได้ออกแบบมาสำหรับสิ่งนี้.

ความสับสน 48V: แรงดันไฟฟ้าของแบตเตอรี่ของคุณไม่ใช่แรงดันไฟฟ้าของสตริงของคุณ ระบบ 48V นั้นมีสตริง 93.4V ที่ต้องการอุปกรณ์ที่ได้รับการจัดอันดับ 600VDC ไม่ใช่แผง AC ที่ปรับปรุงใหม่.

กับดักพิกัดแรงดันไฟฟ้า: พิกัดแรงดันไฟฟ้า AC ไม่ได้แปลเป็น DC เบรกเกอร์ 240VAC อาจปลอดภัยเพียง 48VDC สตริง 93.4V ของคุณเกินความสามารถ DC ของอุปกรณ์ AC ส่วนใหญ่.

ค่าใช้จ่ายในการปฏิบัติตามข้อกำหนด: การสร้างกล่อง Combiner พลังงานแสงอาทิตย์ DIY ที่เป็นไปตามข้อกำหนดของรหัสมีค่าใช้จ่าย 445-745 บาท การซื้อกล่องที่ระบุไว้ใน UL 1741 ที่ทำไว้ล่วงหน้า? 320 บาท คณิตศาสตร์ไม่รองรับ DIY เว้นแต่คุณต้องการการกำหนดค่าที่กำหนดเอง.

คุณสามารถสร้างกล่อง Combiner ของคุณเองได้หรือไม่? ได้ ด้วยส่วนประกอบที่เหมาะสม กล่องหุ้มที่เหมาะสม การป้องกัน AFCI และการติดฉลากที่ถูกต้อง ก็เป็นไปได้.

คุณควรทำหรือไม่? อาจจะไม่ การประหยัดต้นทุนจะหายไปเมื่อคุณกำหนดราคาสำหรับส่วนประกอบที่ได้รับการจัดอันดับ DC และ AFCI การลงทุนด้านเวลา (8-10 ชั่วโมงสำหรับการสร้างครั้งแรก 4-6 ชั่วโมงสำหรับครั้งต่อๆ ไป) แทบจะไม่สมเหตุสมผลกับการประหยัดเล็กน้อย และความรับผิดหากมีสิ่งผิดพลาดเกิดขึ้น การปฏิเสธการเคลมประกัน การปฏิเสธการอนุญาต แท็กสีแดงของผู้ตรวจสอบ จะลบล้างผลประโยชน์ทางการเงินใดๆ.

การเคลื่อนไหว DIY ที่แท้จริง? รู้ว่าเมื่อใดควรสร้างและเมื่อใดควรซื้อ.

ประหยัดพลังงาน DIY ของคุณสำหรับการติดตั้ง การตรวจสอบระบบ การเดินท่อร้อยสายไฟ ส่วนต่างๆ ของการติดตั้งพลังงานแสงอาทิตย์ที่ความพยายามของคุณเพิ่มเงินของคุณจริงๆ แทนที่จะเพิ่มความเสี่ยงของคุณ.

และแผง Square D ขนาด 60 บาทในโรงรถของคุณ? ใช้ในที่ที่ควรอยู่ ในวงจร AC ที่การข้ามศูนย์ทำงานหนักและส่วนโค้งจะตายไปเองตามที่ควรจะเป็น.

เพราะในการผลิตไฟฟ้าโซลาร์เซลล์ ข้อผิดพลาดที่แพงที่สุดไม่ใช่ข้อผิดพลาดที่ทำให้คุณเสียเงิน 300 บาทตั้งแต่แรก เป็นข้อผิดพลาดที่ช่วยให้คุณประหยัดเงิน 240 บาทในวันนี้และทำให้คุณเสียเงิน 50,000 บาทในอีกหกเดือนข้างหน้าเมื่อ The Arc That Won't Die พบสิ่งที่ติดไฟได้.


พร้อมที่จะทำการติดตั้งพลังงานแสงอาทิตย์ของคุณอย่างถูกต้องหรือไม่? ตรวจสอบกลุ่มผลิตภัณฑ์กล่อง Combiner ที่ระบุไว้ใน UL 1741 และอุปกรณ์ป้องกันที่ได้รับการจัดอันดับ DC ที่ออกแบบมาโดยเฉพาะสำหรับระบบ PV ที่อยู่อาศัยและเชิงพาณิชย์ เราได้ทำการวิศวกรรมและการทดสอบแล้ว คุณจะได้รับอุปกรณ์ที่เชื่อถือได้ในราคาที่ทำให้ DIY ดูแพง.

About Author
Author picture

สวัสดีครับผมโจเป็นอุทิศตนเป็นมืออาชีพกับ 12 ปีประสบการณ์ในกระแสไฟฟ้าอุตสาหกรรม ตอน VIOX ไฟฟ้าของฉันสนใจคือส่งสูงคุณภาพเพราะไฟฟ้าลัดวงจนน้ำแห่ง tailored ที่ได้พบความต้องการของลูกค้าของเรา ความชำนาญของผม spans อรองอุตสาหกรรมปลั๊กอินอัตโนมัติ,เขตที่อยู่อาศัย\n ทางตันอีกทางหนึ่งเท่านั้นเองและโฆษณาเพราะไฟฟ้าลัดวงจระบบป้องติดต่อฉัน [email protected] ถ้านายมีคำถาม

บอกข้อกำหนดของคุณ
ขอใบเสนอราคาทันที