Circuit breaker တစ်ခုကို အစားထိုးလဲလှယ်ခြင်းသည် အစားထိုးလဲလှယ်မှုသည် တိုက်ရိုက်ဖြစ်ပြီး၊ breaker အမျိုးအစားကို ရှင်းလင်းစွာဖော်ထုတ်နိုင်ကာ၊ လုပ်ဆောင်သူသည် လျှပ်စစ်ဘေးကင်းရေးလုပ်ထုံးလုပ်နည်းများကို နားလည်မှသာ ကြိုးစားသင့်သည့်အလုပ်ဖြစ်သည်။ အခြေခံလုပ်ငန်းစဉ်သည် သီအိုရီအရ ရိုးရှင်းပါသည်- ပါဝါကို ဖြတ်တောက်ပါ၊ ဘောင်အဖုံးကို ဖယ်ရှားပါ၊ ချို့ယွင်းနေသော breaker မှ ဖြတ်တောက်ထားသော conductor ကို ဖြုတ်ပါ၊ breaker ကို ဖယ်ရှားပါ၊ မှန်ကန်သော အစားထိုးလဲလှယ်မှုကို တပ်ဆင်ပါ၊ conductor ကို ပြန်လည်ချိတ်ဆက်ပါ၊ ပုံမှန်လည်ပတ်မှုကို စစ်ဆေးပါ။.
ဘေးကင်းရေးအန္တရာယ်သည် ဤအလုပ်ကို သာမန်ပြုပြင်ခြင်းနှင့် ကွဲပြားစေသည်။ main breaker ကို ပိတ်ပြီးနောက်ပင်၊ ဘောင်ဒီဇိုင်းပေါ်မူတည်၍ ဘောင်၏ အစိတ်အပိုင်းအချို့သည် ပါဝါဆက်လက်ရရှိနေနိုင်သည်။ ထို့ကြောင့် ဤလမ်းညွှန်သည် အစားထိုးလဲလှယ်ရန် သင့်လျော်သည့်အချိန်၊ မည်သည့်အချိန်တွင် ရပ်တန့်ရမည်၊ ဘေးကင်းစွာ မည်သို့ဆက်လက်လုပ်ဆောင်ရမည်ကို ဦးစွာအာရုံစိုက်ထားသည်။.
သော့ထုတ်ယူမှုများ
- circuit breaker ကိုသာ အစားထိုးလဲလှယ်ပါ။ ဘောင်အတွက် သတ်မှတ်ထားသော မှန်ကန်သောအမှတ်တံဆိပ်၊ အမျိုးအစား၊ pole စီစဉ်မှုနှင့် ampere အဆင့်သတ်မှတ်ချက် ဘောင်အတွက် သတ်မှတ်ထားသည်။.
- ထပ်ခါတလဲလဲ ခလုတ်တိုက်နေသော breaker သည် အမြဲတမ်း မကောင်းသော breaker မဟုတ်ပါ။ အမှန်တကယ်ပြဿနာမှာ ဝန်ပိုခြင်း၊ ဝါယာရှော့ဖြစ်ခြင်း၊ မြေပြင်ချို့ယွင်းခြင်း သို့မဟုတ် ပျက်စီးနေသော ဝါယာကြိုးများ ဖြစ်နိုင်သည်။.
- ဘောင်သည် ဟောင်းနွမ်းနေပါက၊ ပျက်စီးနေပါက၊ စိုစွတ်နေပါက၊ ပူနေပါက သို့မဟုတ် မရင်းနှီးပါက ရပ်တန့်ပြီး လိုင်စင်ရ လျှပ်စစ်ပညာရှင်ကို ခေါ်ပါ။.
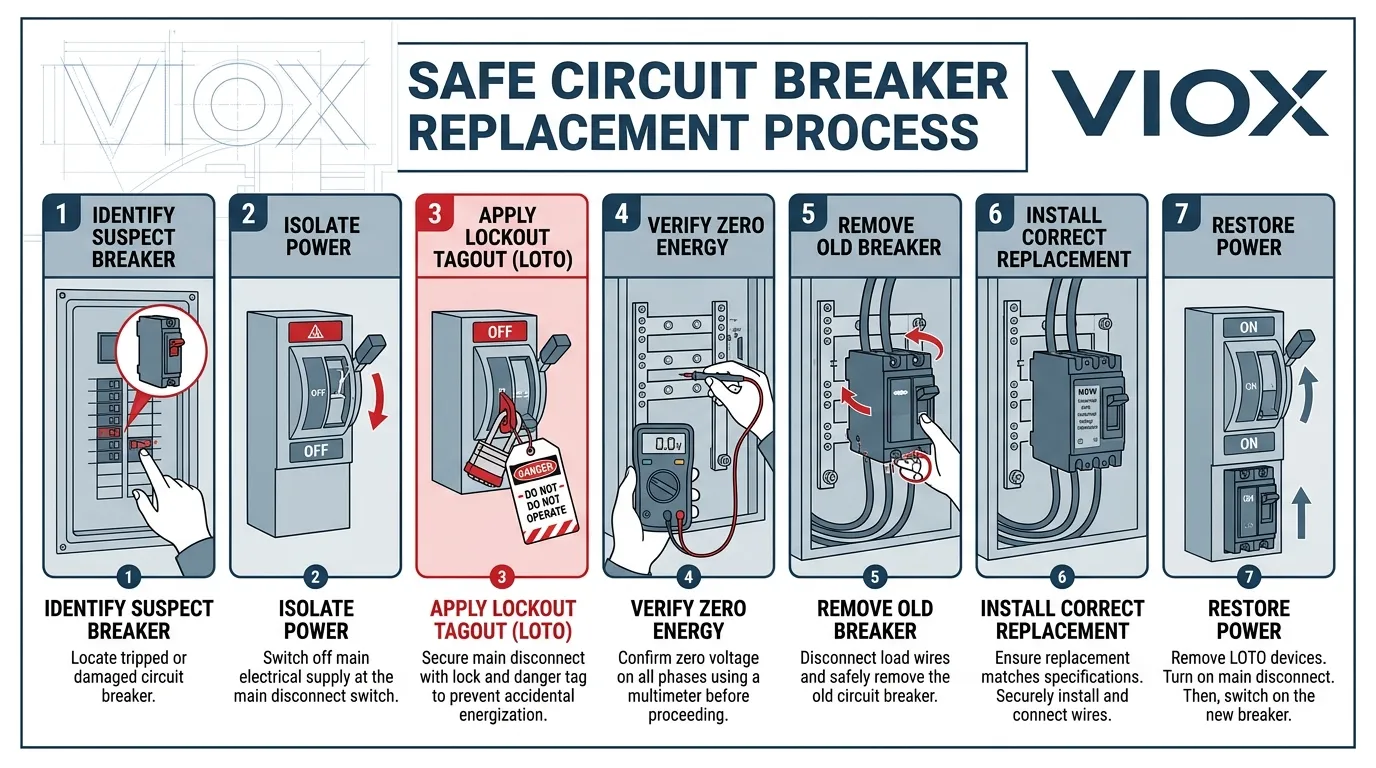
- အလုံခြုံဆုံး လုပ်ငန်းစဉ်မှာ- ပြဿနာကို ဖော်ထုတ်ပါ -> အစားထိုးလဲလှယ်ရန် သင့်လျော်ကြောင်း အတည်ပြုပါ -> ပါဝါကို ဖြတ်တောက်ပါ -> အစားထိုးလဲလှယ်ပါ -> စမ်းသပ်ပါ -> စောင့်ကြည့်ပါ.
- breaker အသစ်သည် ခလုတ်တိုက်နေသေးပါက၊ ပြဿနာသည် များသောအားဖြင့် circuit ၏ အခြားနေရာတွင် ရှိနေသည်။.
circuit breaker ကို ဘယ်အချိန်မှာ အစားထိုးလဲလှယ်သင့်လဲ။
breaker ကိုယ်တိုင် ချို့ယွင်းနေသည်ဟု ယုံကြည်ရန် အကြောင်းပြချက်ကောင်းရှိမှသာ သို့မဟုတ် circuit ကို code နှင့်ကိုက်ညီသောနည်းလမ်းဖြင့် တရားဝင်ပြုပြင်မွမ်းမံနေချိန်တွင်သာ breaker ကို အစားထိုးလဲလှယ်သင့်သည်။.
အစားထိုးလဲလှယ်ရန် အကြောင်းရင်းများ
- ဝန်ကို ဖယ်ရှားပြီး circuit ကို စစ်ဆေးပြီးနောက်ပင် breaker သည် ပြန်လည်သတ်မှတ်မည်မဟုတ်ပါ။
- လက်ကိုင်သည် စက်ပိုင်းဆိုင်ရာအရ ပျက်စီးနေသည် သို့မဟုတ် ယုံကြည်စိတ်ချရမှုမရှိဟု ခံစားရသည်။
- breaker သည် မြင်နိုင်သော အပူပျက်စီးမှုကို ပြသသည်။
- breaker သည် အတွင်းပိုင်းတွင် ပျက်ကွက်ခဲ့သည်။
- circuit ဒီဇိုင်းကို ပြောင်းလဲနေပြီး အစားထိုးလဲလှယ်မှုကို application အတွက် အတည်ပြုထားသည်။
သာမန်သတိပေးလက္ခဏာများ
- breaker သည် ON အနေအထားတွင် ရှိနေမည်မဟုတ်ပါ။
- breaker အိမ်ရာကို ရုပ်ပိုင်းဆိုင်ရာ ပျက်စီးခြင်း။
- breaker အနီးတွင် မီးလောင်ရာအမှတ်အသားများ သို့မဟုတ် အပူလွန်ကဲသော အနံ့။
- တရားဝင်ဝန်နှင့်သက်ဆိုင်သော ရှင်းပြချက်မရှိဘဲ breaker ခလုတ်တိုက်ခြင်း။
circuit သည် ဝန်ပိုနေခြင်း သို့မဟုတ် ချို့ယွင်းနေခြင်းကြောင့် breaker သည် ခလုတ်တိုက်နေပါက၊ breaker ကို အစားထိုးလဲလှယ်ခြင်းတစ်ခုတည်းဖြင့် အမှန်တကယ်ပြဿနာကို ဖြေရှင်းနိုင်မည်မဟုတ်ပါ။.
DIY မလုပ်သင့်သည့်အခါ
ဤသည်မှာ ဆောင်းပါးပါ အရေးကြီးဆုံးအပိုင်းဖြစ်သည်။.
လုပ်ပါ။ မ အောက်ပါအခြေအနေများတွင် breaker ကို ကိုယ်တိုင်အစားထိုးလဲလှယ်ပါ-
- ဘောင်သည် အပူ၊ ချေး သို့မဟုတ် အစိုဓာတ်၏ လက္ခဏာများကို ပြသနေသည်။
- မည်သည့် breaker အမျိုးအစား မှန်ကန်သည်ကို သင်မသေချာပါ။
- breaker သည် main breaker ဖြစ်သည်။
- ဘောင်သည် ဟောင်းနွမ်းနေပါက၊ ပျက်စီးနေပါက သို့မဟုတ် ပြဿနာရှိသော အမွေအနှစ်အမှတ်တံဆိပ်မှ ဖြစ်သည်။
- circuit တွင် ထပ်ခါတလဲလဲ ရှင်းပြမရသော ခလုတ်တိုက်ခြင်းများ ပါဝင်သည်။
- ဒေသဆိုင်ရာ စည်းမျဉ်းများသည် လိုင်စင်ရ လျှပ်စစ်အလုပ်ကို လိုအပ်သည်။
- ဘောင်အတွင်းရှိ ပါဝါရှိသော အစိတ်အပိုင်းများနှင့် ဖြတ်တောက်ထားသော အစိတ်အပိုင်းများကို ခွဲခြားသတ်မှတ်ရာတွင် သင်အဆင်မပြေပါ။
အကယ်၍ ၎င်းတို့ထဲမှ တစ်ခုခုနှင့် သက်ဆိုင်ပါက၊ လိုင်စင်ရ လျှပ်စစ်ပညာရှင်သည် ပိုမိုလုံခြုံသော ရွေးချယ်မှုဖြစ်သည်။.
မစတင်မီ- အစားထိုးလဲလှယ်မှု မှန်ကန်ကြောင်း အတည်ပြုပါ
Breaker များကို အပြန်အလှန်အသုံးပြုနိုင်သည်ဟု ဘယ်တော့မှ မမှတ်ယူပါနှင့်။.
အစားထိုးလဲလှယ်ခြင်းမပြုမီ အောက်ပါတို့ကို စစ်ဆေးပါ-
- ဘောင်ထုတ်လုပ်သူ
- breaker မိသားစုနှင့် လိုက်ဖက်ညီမှု
- single-pole သို့မဟုတ် double-pole စီစဉ်မှု
- ampere အဆင့်သတ်မှတ်ချက်
- standard thermal-magnetic, AFCI, GFCI သို့မဟုတ် dual-function ကဲ့သို့သော ခရီးစဉ်လုပ်ဆောင်ချက်
အစားထိုးလဲလှယ်သော breaker သည် ဘောင်နှင့် application နှင့် ကိုက်ညီရမည်။ “အလုံအလောက်နီးစပ်သော” အစားထိုးလဲလှယ်ခြင်းသည် လုံခြုံသောနည်းလမ်းမဟုတ်ပါ။.
low-voltage ကာကွယ်ရေးကိရိယာများဆိုင်ရာ ထုတ်ကုန်နောက်ခံအတွက်၊ အောက်ပါတို့ကို ကြည့်ပါ။ လျှပ်စစ်တွင် MCB အပြည့်အစုံပုံစံ နှင့် MCB, MCCB, RCB, RCD, RCCB နှင့် RCBO အကြား ကွာခြားချက်ကဘာလဲ.
စက်ပစ္စည်းအမျိုးအစားကို အတည်ပြုနေစဉ် ထုတ်ကုန်အဆင့်ကိုးကားချက် လိုအပ်ပါက၊ VIOX ကို ကြည့်ပါ။ တက္ကို miniature circuit breaker application များအတွက် စာမျက်နှာနှင့် VIOX MCCB molded case circuit breaker application များအတွက် စာမျက်နှာ။.
အလုပ်ပတ်ဝန်းကျင်ကို မျှဝေရာတွင် သီးခြားခွဲထားခြင်းကို အလေးအနက်ထားပါ။
စက်ပစ္စည်းသည် အလုပ်ရုံ၊ စီးပွားဖြစ်နေရာ၊ စက်ရုံခန်း သို့မဟုတ် အခြားသူတစ်ဦးမှ မမျှော်လင့်ဘဲ ပါဝါကို ပြန်လည်ရယူနိုင်သည့် မည်သည့်နေရာတွင်မဆို ရှိနေပါက၊ အခြေခံ lockout/tagout (LOTO) စည်းကမ်းသည် အရေးကြီးသည်။ ဘေးကင်းရေး၏ ရည်မှန်းချက်သည် ပါဝါကို ပိတ်ရန်သာ မဟုတ်ပါ။ ရည်မှန်းချက်မှာ အလုပ်လုပ်နေစဉ်အတွင်း ထိန်းချုပ်ထားရန်ဖြစ်သည်။.
ယင်းသည် များသောအားဖြင့် အောက်ပါတို့ကို ဆိုလိုသည်-
- မှန်ကန်သောအရင်းအမြစ်ကို သီးခြားခွဲထားခြင်း
- လိုအပ်သည့်အခါ သော့ခတ်ခြင်း သို့မဟုတ် အတည်ပြုထားသော သီးခြားခွဲထားသည့်ကိရိယာကို အသုံးပြုခြင်း
- သတိပေးတံဆိပ်ကို ချိတ်ဆက်ခြင်း
- မည်သူမျှ မမျှော်လင့်ဘဲ ပါဝါကို ပြန်လည်ရယူနိုင်ခြင်း မရှိကြောင်း သေချာစေခြင်း
လူနေအိမ်အခြေအနေငယ်များတွင်၊ အတိအကျနည်းလမ်းသည် စက်မှုလုပ်ငန်းဆိုင်ရာ အဆောက်အအုံထက် ပိုမိုရိုးရှင်းနိုင်သော်လည်း၊ အခြေခံမူသည် အတူတူပင်ဖြစ်သည်- အလုပ်လုပ်နေသူသည် သီးခြားခွဲထားသည့်အခြေအနေကို ထိန်းချုပ်ရမည်ဖြစ်သည်။.
ကိရိယာများနှင့် ဘေးကင်းရေးပစ္စည်းများ
အလုပ်နှင့် သင့်လျော်သော လျှပ်ကာကိရိယာများနှင့် အခြေခံအကာအကွယ်ပစ္စည်းများကိုသာ အသုံးပြုပါ။.
ပုံမှန်ကိရိယာများ
- လျှပ်ကာဝက်အူလှည့်
- voltage tester for quick screening
- digital multimeter
- flashlight or work light
- camera or phone for reference photos
Basic safety equipment
- safety glasses
- appropriate insulated gloves if required by the task and site practice
- dry work area and stable footing
The goal is not just to remove and replace the part. The goal is to do it without confusion, accidental contact, or wiring mistakes.
Step-by-Step: How to Replace a Circuit Breaker
Step 1: Identify the Suspect Breaker
Confirm which breaker is being replaced and which circuit it serves.
Before touching the panel:
- identify the affected load or circuit
- confirm the breaker label if available
- reduce or remove connected load where possible
If the fault pattern suggests a short circuit, ground fault, or damaged wiring, stop and investigate that first.
Step 2: Obtain the Correct Replacement
Before opening the panel, confirm the replacement breaker matches:
- panel brand and listed compatibility
- pole count
- ampere အဆင့်သတ်မှတ်ချက်
- breaker function
Do not increase the breaker rating unless the entire circuit design justifies it.
In many residential and light commercial branch-circuit replacements, the device is effectively in the တက္ကို class. In larger feeder or industrial distribution work, the relevant breaker may be closer to an MCCB, which is a different application and should not be treated as the same replacement job.
Step 3: Shut Off Power
Turn off the branch breaker being replaced, then turn off the main breaker if the job requires panel access beyond the branch space.
After that:
- verify the panel area is dry
- remember that some line-side parts may still remain energized
- ကို အသုံးပြုပါ digital multimeter, not only a quick tester, to verify the parts you may approach
What to verify with the multimeter
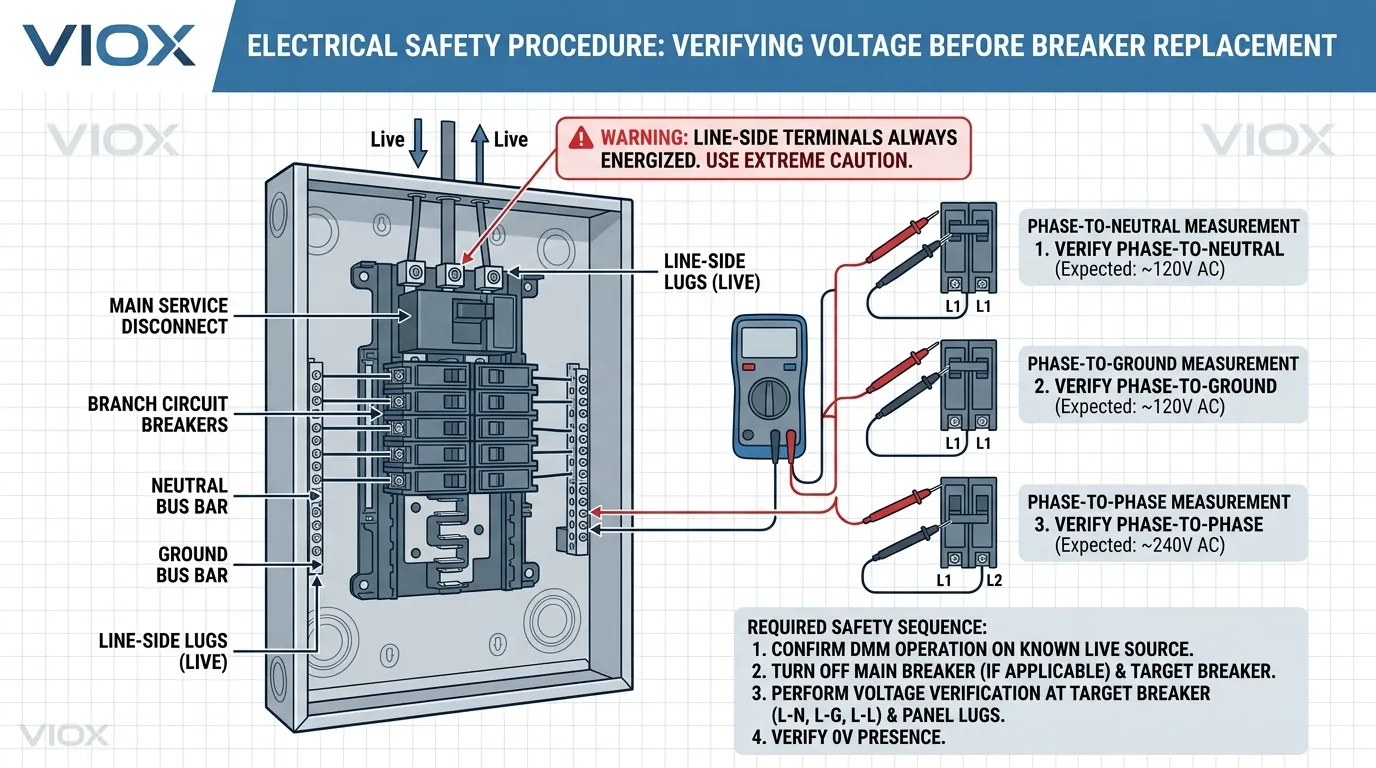
Depending on the panel and system type, verify as appropriate:
- phase-to-phase ဗို့အား
- phase-to-neutral voltage
- phase-to-ground voltage
This matters because a non-contact tester is useful for quick indication, but it is not a substitute for deliberate meter verification. On multi-pole or multi-phase systems, the absence of one expected voltage does not automatically mean the whole work area is safe.
This is where many DIY articles become too casual. Panel interiors can still present serious shock hazard even when the main breaker is off.
Step 4: Remove the Panel Cover
Support the dead front or cover carefully as screws are removed.
Before touching anything inside:
- inspect for overheating
- inspect for corrosion
- inspect for loose or damaged conductors
- inspect for signs that the panel condition is worse than expected
If the panel condition looks unsafe, stop and call an electrician.
Step 5: Document the Existing Setup
Take a clear photo before disconnecting the conductor.
This helps confirm:
- conductor routing
- terminal position
- breaker location
- any neutral or pigtail arrangement in special breaker types
Step 6: Disconnect the Branch Conductor
With the panel in a safe state and the breaker identified:
- loosen the breaker terminal screw
- remove the branch hot conductor
- keep the conductor positioned safely away from contact points
If the breaker is AFCI, GFCI, or dual-function, additional conductors may also be involved. Those should be documented and handled carefully.
Step 7: Remove the Old Breaker
Remove the breaker according to its mounting design.
Most plug-in panel breakers release by:
- ထိန်းသိမ်းထားသောအစွန်းမှ လွတ်မြောက်ခြင်း
- ဘတ်စ်ချိတ်ဆက်မှုမှ မြှောက်ခြင်း သို့မဟုတ် လှုပ်ခါခြင်း
ဘရိတ်ကာကို အတင်းမတွန်းပါနှင့်။ ပုံမှန်အတိုင်း မလွတ်မြောက်ပါက တပ်ဆင်ပုံစံကို ပြန်စစ်ဆေးပါ။.
အဆင့် ၈- ဘရိတ်ကာအသစ်ကို တပ်ဆင်ပါ
တပ်ဆင်ခြင်းမပြုမီ ဘရိတ်ကာအသစ်သည် OFF အနေအထားတွင် ရှိနေကြောင်း သေချာပါစေ။.
ထို့နောက်-
- panel တွင် မှန်ကန်စွာ ထိုင်ပါစေ။
- အပြည့်အဝ ပါဝင်ကြောင်း အတည်ပြုပါ
- ဌာနခွဲ conductor ကို ပြန်လည်ချိတ်ဆက်ပါ
- ဘရိတ်ကာလိုအပ်ချက်များနှင့်အညီ terminal ကို မှန်ကန်စွာ တင်းကျပ်ပါ
conductor သည် လုံခြုံပြီး မှန်ကန်စွာ ဖယ်ရှားထားပြီး ပျက်စီးနေသော strands များ ကင်းစင်သင့်သည်။.
အဆင့် ၉- Panel အဖုံးကို ပြန်လည်တပ်ဆင်ပါ
panel ကို မပိတ်မီ-
- conductor များ မညှပ်မိကြောင်း အတည်ပြုပါ
- ဘရိတ်ကာလက်ကိုင်သည် အဖွင့်မှတဆင့် မှန်ကန်စွာ တန်းစီကြောင်း အတည်ပြုပါ
- panel အတွင်းရှိ လုပ်ငန်းခွင်သည် သန့်ရှင်းသပ်ရပ်ကြောင်း အတည်ပြုပါ
ထို့နောက် အဖုံးကို လုံခြုံစွာ ပြန်လည်တပ်ဆင်ပါ။.
အဆင့် ၁၀- ပါဝါကို ပြန်လည်ရယူပြီး စမ်းသပ်ပါ
ပါဝါကို ထိန်းချုပ်ထားသောနည်းလမ်းဖြင့် ပြန်လည်ရယူပါ။.
ထို့နောက်-
- ပိတ်ထားပါက main breaker ကို ဖွင့်ပါ
- ဘရိတ်ကာအသစ်ကို ဖွင့်ပါ
- circuit ကို စမ်းသပ်ပါ
- ဘရိတ်ကာသည် တည်ငြိမ်နေသေးလား စောင့်ကြည့်ပါ
အောင်မြင်သော အစားထိုးမှုသည် ချက်ချင်း ခရီးထွက်ခြင်း၊ ပုံမှန်မဟုတ်သော အပူချိန် သို့မဟုတ် ထူးခြားသောအနံ့မရှိဘဲ ပုံမှန်လည်ပတ်မှုကို ပြန်လည်ရရှိစေသင့်သည်။.
ဘရိတ်ကာအသစ်သည် ထပ်မံ ခရီးထွက်ပါက
ယင်းသည် များသောအားဖြင့် ဘရိတ်ကာသည် အမှန်တကယ် ပြဿနာမဟုတ်ကြောင်း ဆိုလိုသည်။.
အဖြစ်များသော အကြောင်းရင်းများ ပါဝင်သည်။
- ဝန်ပိုနေသော circuit
- ဝါယာရှော့
- မြေပြင်ချို့ယွင်းချက်
- ပျက်ကွက်သော ကိရိယာ
- ပျက်စီးနေသော conductor
- circuit အတွက် မမှန်ကန်သော ဘရိတ်ကာ အမျိုးအစား
ဘရိတ်ကာအသစ်သည် ချက်ချင်း သို့မဟုတ် ထပ်ခါထပ်ခါ ခရီးထွက်ပါက ၎င်းကို ပြန်လည်သတ်မှတ်မနေပါနှင့်။ circuit သည် အတင်းအကျပ် ပြန်လည်သတ်မှတ်ရန် မလိုအပ်ဘဲ ရောဂါရှာဖွေရန် လိုအပ်သည်။.
ဘုံအမှားတွေကိုရှောင်ကြဉ်ရန်
ခရီးထွက်ရသည့်အကြောင်းရင်းကို မရှာဖွေဘဲ ဘရိတ်ကာကို အစားထိုးခြင်း
ထပ်ခါထပ်ခါ ခရီးထွက်ခြင်းသည် ဘရိတ်ကာပြဿနာမဟုတ်ဘဲ circuit ပြဿနာကို ညွှန်ပြလေ့ရှိသည်။.
တွဲဖက်မသုံးနိုင်သော ဘရိတ်ကာကို အသုံးပြုခြင်း
အမှတ်တံဆိပ်၊ မိသားစုနှင့် စာရင်းသွင်းခြင်း တွဲဖက်အသုံးပြုနိုင်မှုသည် အရေးကြီးပါသည်။.
circuit ကို ပြန်လည်ဒီဇိုင်းမဆွဲဘဲ ဘရိတ်ကာကို အရွယ်အစားကြီးအောင် ပြုလုပ်ခြင်း
၎င်းသည် အန္တရာယ်ရှိပြီး ဝါယာကြိုးများကို overcurrent အန္တရာယ်နှင့် ထိတွေ့စေနိုင်သည်။.
panel အခြေအနေကို လျစ်လျူရှုခြင်း
အပူပျက်စီးခြင်း၊ အစိုဓာတ်၊ သံချေးတက်ခြင်းနှင့် ပျက်စီးနေသော ဘတ်စ်ချိတ်ဆက်မှုအမှတ်များသည် အန္တရာယ်ပရိုဖိုင်ကို လုံးဝပြောင်းလဲစေသည်။.
ဘရိတ်ကာ အမျိုးအစားအားလုံးကို တူညီစွာ ဆက်ဆံခြင်း
Standard breakers၊ AFCI breakers၊ GFCI breakers နှင့် dual-function breakers များသည် ဝါယာကြိုးနှင့် ပြန်လည်သတ်မှတ်ခြင်းကို တူညီသောနည်းလမ်းဖြင့် မပြုလုပ်ပါ။.
ပြုပြင်ခြင်းနှင့် အစားထိုးခြင်း
ဘရိတ်ကာကိုယ်တိုင်ကို ယေဘုယျအားဖြင့် ပြုပြင်မည့်အစား အစားထိုးသည်။.
ဘရိတ်ကာက ပြသပါက-
- အတွင်းပိုင်း ချို့ယွင်းချက်
- စက်ပိုင်းဆိုင်ရာ လက်ကိုင် ချို့ယွင်းချက်
- မြင်နိုင်သော အပူပျက်စီးခြင်း
- မယုံကြည်ရသော ပြန်လည်သတ်မှတ်ခြင်း အပြုအမူ
အစားထိုးခြင်းသည် ပုံမှန်လမ်းကြောင်းဖြစ်သည်။.
သို့သော် အမှန်တကယ် ချို့ယွင်းချက်သည် ဌာနခွဲ circuit၊ ကိရိယာ သို့မဟုတ် panel ဘတ်စ်ချိတ်ဆက်မှုတွင် ရှိနေပါက ဘရိတ်ကာကို အစားထိုးခြင်းသည် တစ်ခုတည်းသော ပြည့်စုံသော ပြုပြင်မှု မဟုတ်ပါ။.
ဆက်စပ် Circuit Breaker ခေါင်းစဉ်များ
- လျှပ်စစ်တွင် MCB အပြည့်အစုံပုံစံ
- Miniature Circuit Breaker (MCB) ဆိုသည်မှာ အဘယ်နည်း။
- MCB တွင် မည်သည့်အရာသည် ဖွင့်ထားပြီး ပိတ်ထားသနည်း။
- 2-Pole Circuit တစ်ခုအတွက် 3-Pole Breaker ကိုသုံးနိုင်ပါသလား။
နိဂုံး
If you want to know circuit breaker ကို ဘယ်လိုအစားထိုးမလဲ, မှန်ကန်သောအဖြေမှာ “ဖယ်ရှားပြီး တပ်ဆင်ပါ” ဟူ၍သာ မဟုတ်ပါ။ မှန်ကန်သောအဖြေမှာ ဘရိတ်ကာသည် အမှန်တကယ် ပြဿနာဖြစ်ကြောင်း ဦးစွာအတည်ပြုရန်၊ အတိအကျ အစားထိုးမှုကို စစ်ဆေးရန်၊ panel အတွင်း၌ ဘေးကင်းစွာ လုပ်ဆောင်ရန်နှင့် panel အခြေအနေ သို့မဟုတ် circuit အပြုအမူသည် ပိုကြီးသော ချို့ယွင်းချက်ကို အကြံပြုပါက ချက်ချင်းရပ်တန့်ရန်ဖြစ်သည်။.
ဘရိတ်ကာကို အစားထိုးခြင်းသည် ရိုးရှင်းပုံရသော်လည်း အန္တရာယ်မှာ အမှန်တကယ်ဖြစ်သည်။ ဂရုတစိုက်နှင့် ဘေးကင်းမှုကို ဦးစားပေးသည့် ချဉ်းကပ်မှုသည် အလုပ်ကို စီမံခန့်ခွဲနိုင်စေသည်။.
အမြဲမေးလေ့ရှိသောမေးခွန်းများ
ကျွန်ုပ်ကိုယ်တိုင် circuit breaker အစားထိုးနိုင်ပါသလား။
Only if the replacement is straightforward, the correct breaker is clearly identified, the panel is in safe condition, and you understand electrical safety procedures. If not, call a licensed electrician.
How do I know if a circuit breaker is bad?
Possible signs include failure to reset, mechanical handle problems, overheating, visible damage, or tripping behavior that persists after the circuit has been checked and the load has been reduced.
Why does the new breaker trip immediately?
That usually means the circuit still has a real fault, such as overload, short circuit, ground fault, or a failed connected device.
Can I replace a 15A breaker with a 20A breaker?
Not unless the circuit wiring and design are properly rated for it and the change is justified by code-compliant design. The breaker should protect the circuit, not exceed it.
Do I need to turn off the main breaker first?
In many branch-breaker replacement situations, yes, but even then some parts of the panel may remain energized depending on the panel design. That is one reason this work requires caution.
ပျက်စီးနေသော circuit breaker ကို ပြုပြင်သင့်သလား သို့မဟုတ် အစားထိုးသင့်သလား။
Circuit breakers are generally replaced rather than repaired.
