Direct Answer: How Do You Choose a Copper Lug?
To choose the right copper lug, match the lug barrel to the conductor size and strand class, match the stud hole to the bolt or busbar terminal, choose the correct lug type for the connection, and use the proper crimping or tightening method. For most power connections, visual fit is not enough; the cable size, lug size chart, crimp die, terminal pad, and environment must all match.
For copper conductors connected to a flat copper terminal or busbar, a copper ring lug or two-hole copper compression lug is commonly used. For humid, outdoor, marine, battery, or corrosive environments, a tinned copper lug is often preferred because the tin plating improves corrosion resistance.
Copper Lug Selection Table
| Selection Item | What to Match | Common Mistake |
|---|---|---|
| Cable size | AWG, kcmil, or mm² | Choosing by visual fit instead of barrel size |
| Conductor material | Copper conductor, not aluminum | Using copper lug directly on aluminum cable |
| Barrel type | Standard, long barrel, bell-mouth, narrow palm | Wrong barrel for flexible or fine-stranded cable |
| Stud hole | M5, M6, M8, M10, M12, 1/4 in, 3/8 in, etc. | Oversized hole reduces contact area |
| Lug type | Ring, fork, pin, one-hole, two-hole, compression, mechanical | Using a loose or rotating termination |
| Surface finish | Bare copper or tinned copper | Bare copper in harsh or corrosive areas |
| Tooling | Correct crimp tool and die | Poor crimp creates hot joints |
| Application | Busbar, breaker, battery, terminal block, grounding | Same lug used everywhere without checking fit |
For a wider overview of cable lugs, see VIOX’s complete guide to cable lugs. This article focuses specifically on copper lug size, type, and selection.
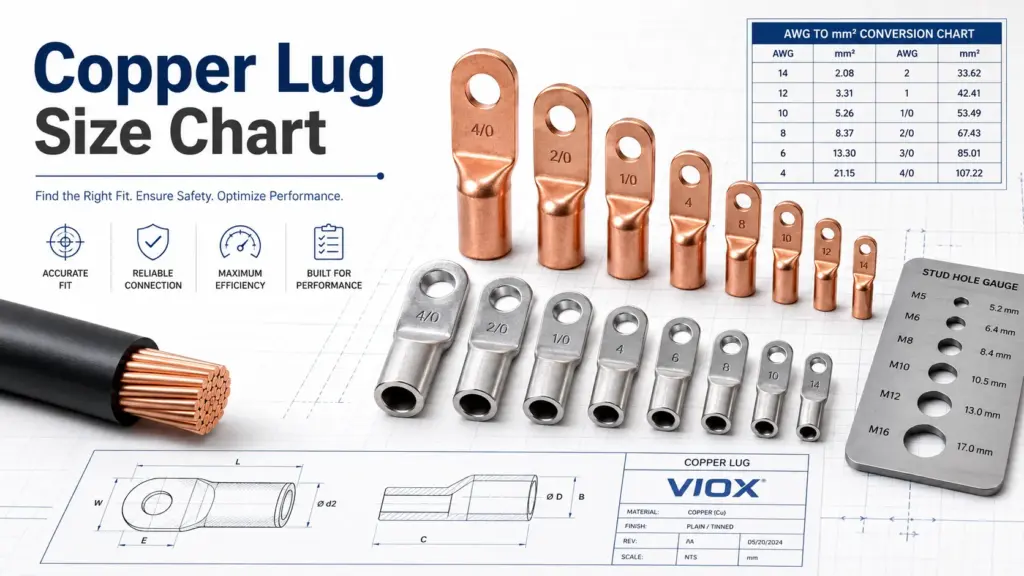
Copper Lug Size Chart: AWG, kcmil, and mm²
The lug barrel must match the conductor size. AWG and kcmil are common in North America; mm² is common in IEC and international markets. They are not perfectly interchangeable, so the table below should be used as a practical conversion reference, not a substitute for the lug manufacturer’s chart.
| AWG / kcmil | Approx. Conductor Area | Common Metric Reference | Lug Selection Note |
|---|---|---|---|
| 8 AWG | 8.37 mm² | 10 mm² class | Verify barrel fit; not identical to 10 mm² |
| 6 AWG | 13.3 mm² | 16 mm² class | Often compared with 16 mm² |
| 4 AWG | 21.2 mm² | 25 mm² class | Common battery and power cable size |
| 2 AWG | 33.6 mm² | 35 mm² class | Check barrel and strand class |
| 1 AWG | 42.4 mm² | 50 mm² class | Between 35 and 50 mm² metric sizes |
| 1/0 AWG | 53.5 mm² | 50 mm² class | Close reference for 50 mm² cable |
| 2/0 AWG | 67.4 mm² | 70 mm² class | Between 50 and 70 mm² |
| 3/0 AWG | 85.0 mm² | 95 mm² class | Check exact lug chart |
| 4/0 AWG | 107 mm² | 120 mm² class | Often compared with 120 mm² |
| 250 kcmil | 127 mm² | 120/150 mm² class | Depends on lug series |
| 350 kcmil | 177 mm² | 185 mm² class | Near 185 mm² applications |
| 400 kcmil | 203 mm² | 200/240 mm² class | Larger than 185 mm² |
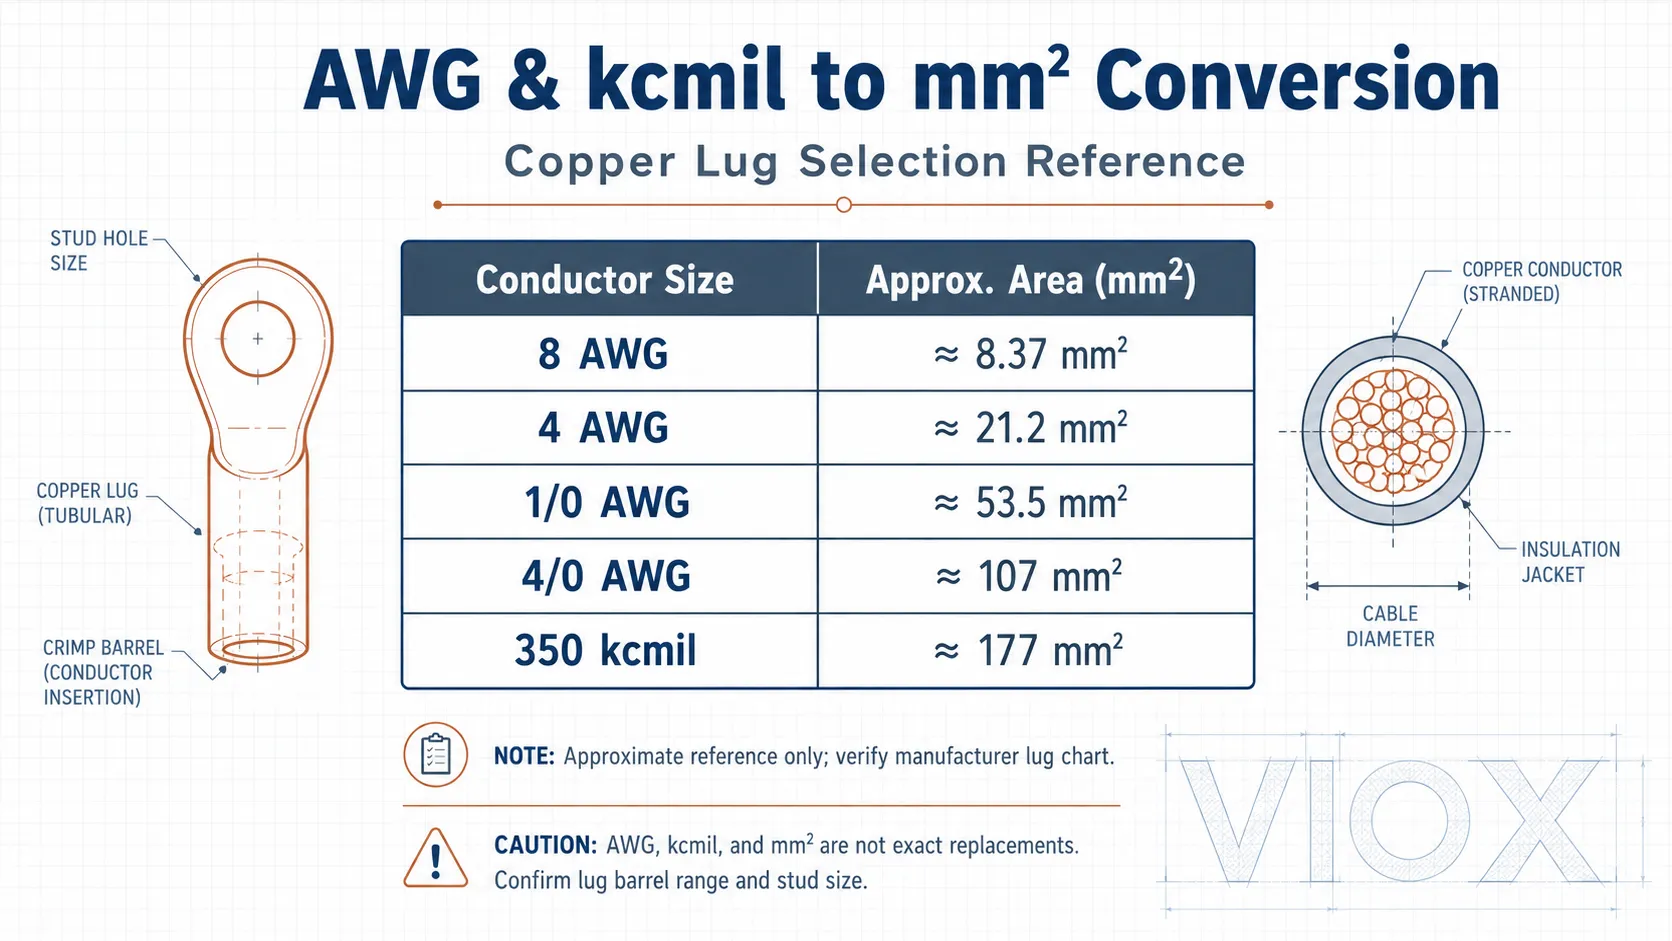
The conversion is approximate because AWG sizes and IEC metric conductor sizes follow different systems. When selecting a copper lug, use the exact cable size printed on the cable and the lug manufacturer’s sizing table.
What Lug Size Is Used for 50 mm² or 185 mm² Cable?
For a 50 mm² copper cable, choose a lug marked for 50 mm² if you are using a metric lug series. In AWG terms, 1/0 AWG is close to 50 mm², but it is not an exact replacement. The lug must still match conductor strand class and crimp tool.
For a 185 mm² copper cable, choose a lug marked for 185 mm² in a metric series. In North American references, 350 kcmil is near 185 mm², but again the lug series and crimp system must be verified.
| Cable Size | Practical Lug Guidance |
|---|---|
| 50 mm² | Use a 50 mm² lug in metric systems; 1/0 AWG is only a rough reference |
| 70 mm² | Use a 70 mm² lug; compare carefully with 2/0 AWG if converting |
| 95 mm² | Use a 95 mm² lug; 3/0 AWG is close but not identical |
| 120 mm² | Use a 120 mm² lug; 4/0 AWG may be a rough comparison |
| 185 mm² | Use a 185 mm² lug; 350 kcmil is a near reference |
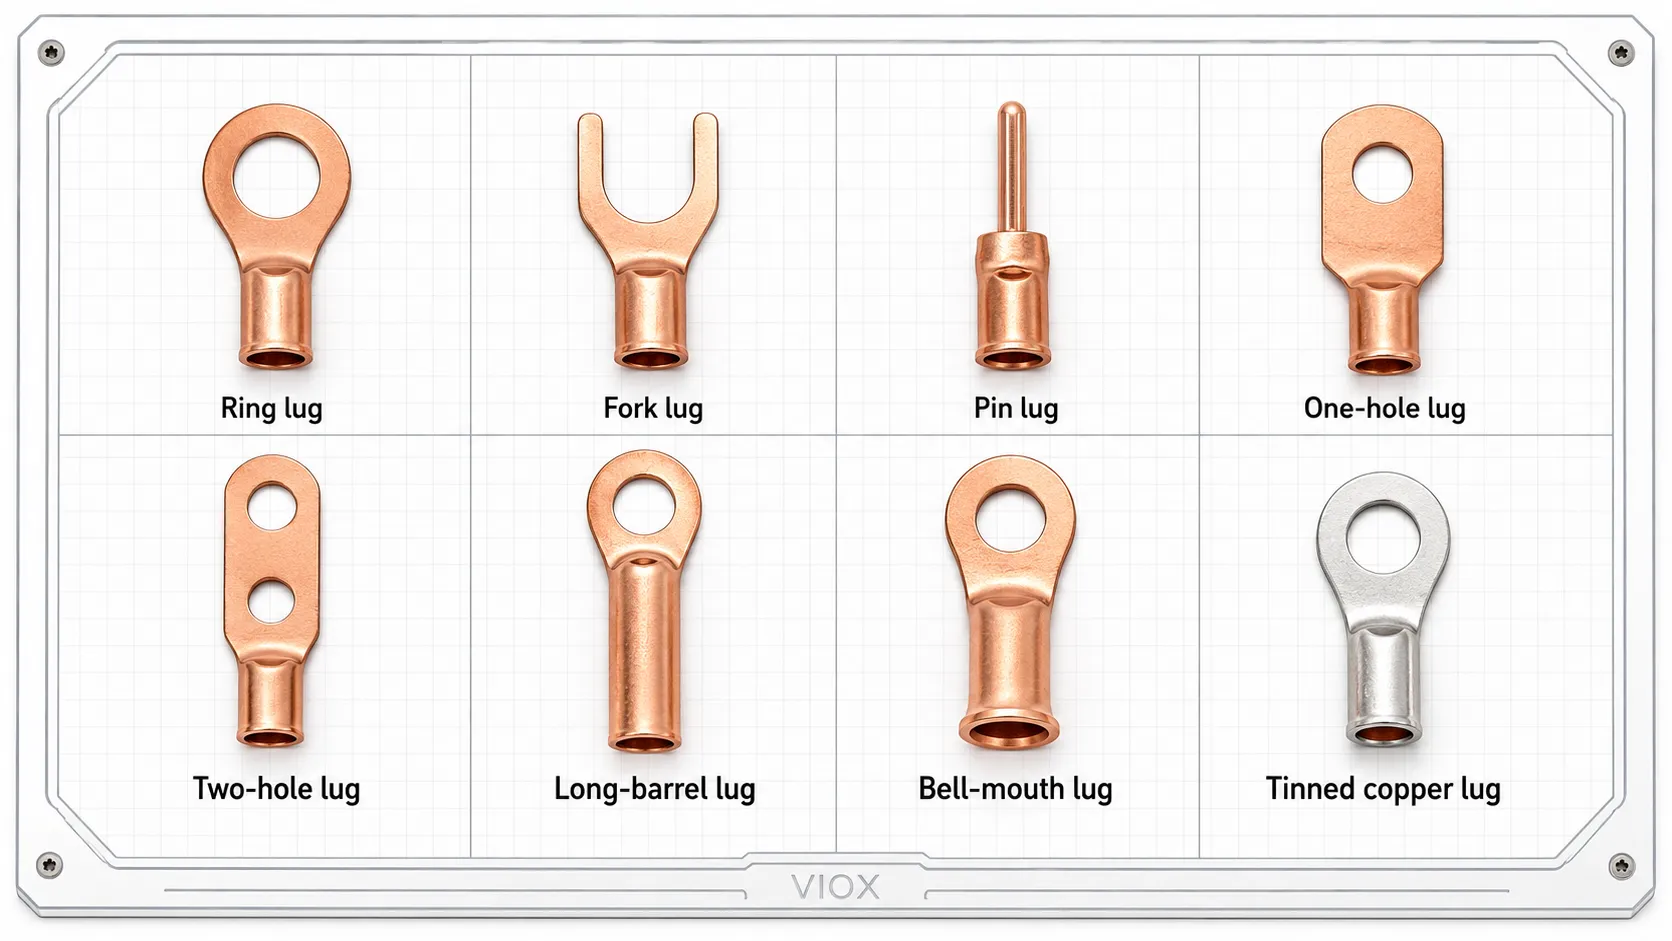
Types of Copper Lugs
Copper lugs come in different shapes because not every termination has the same mechanical requirement.
| Copper Lug Type | Best Use | Main Risk if Misused |
|---|---|---|
| Ring lug / O-type lug | Bolted busbars, breakers, batteries, grounding points | Wrong stud hole or poor contact area |
| Fork / spade lug | Screw terminals where easy removal is needed | Can loosen under vibration |
| Pin lug | Terminal blocks and compact control wiring | Wrong pin size causes poor clamping |
| One-hole lug | General power termination | Can rotate if not secured properly |
| Two-hole lug | Busbars, switchgear, high-vibration connections | Hole spacing must match terminal pad |
| Long-barrel lug | Heavy-duty crimping and higher pull-out strength | Needs correct die and crimp count |
| Bell-mouth lug | Flexible or fine-stranded conductors | Must match conductor class |
| Narrow-palm lug | Compact breaker or terminal spaces | Contact area must still be adequate |
| Tinned copper lug | Outdoor, humid, marine, battery, or corrosive areas | Still needs correct crimp and size |
If the connection is subject to vibration, heat cycling, or high current, a two-hole or long-barrel lug may be more appropriate than a basic one-hole lug.
Compression Lugs vs Mechanical Lugs
Compression lugs and mechanical lugs solve the same basic problem: connecting a conductor to equipment. The installation method is different.
| Lug Type | How It Works | Best For | Caution |
|---|---|---|---|
| Compression lug | Crimped onto conductor with die and tool | Permanent low-resistance power connections | Wrong die or poor crimp causes overheating |
| Mechanical lug | Screw or bolt clamps conductor | Field service and removable connections | Torque and conductor class matter |
| Solder lug | Conductor is soldered | Small or special applications | Not preferred for many high-current power terminations |
| Shear-bolt lug | Bolt head shears at target torque | Utility and field installations | Follow manufacturer instructions exactly |
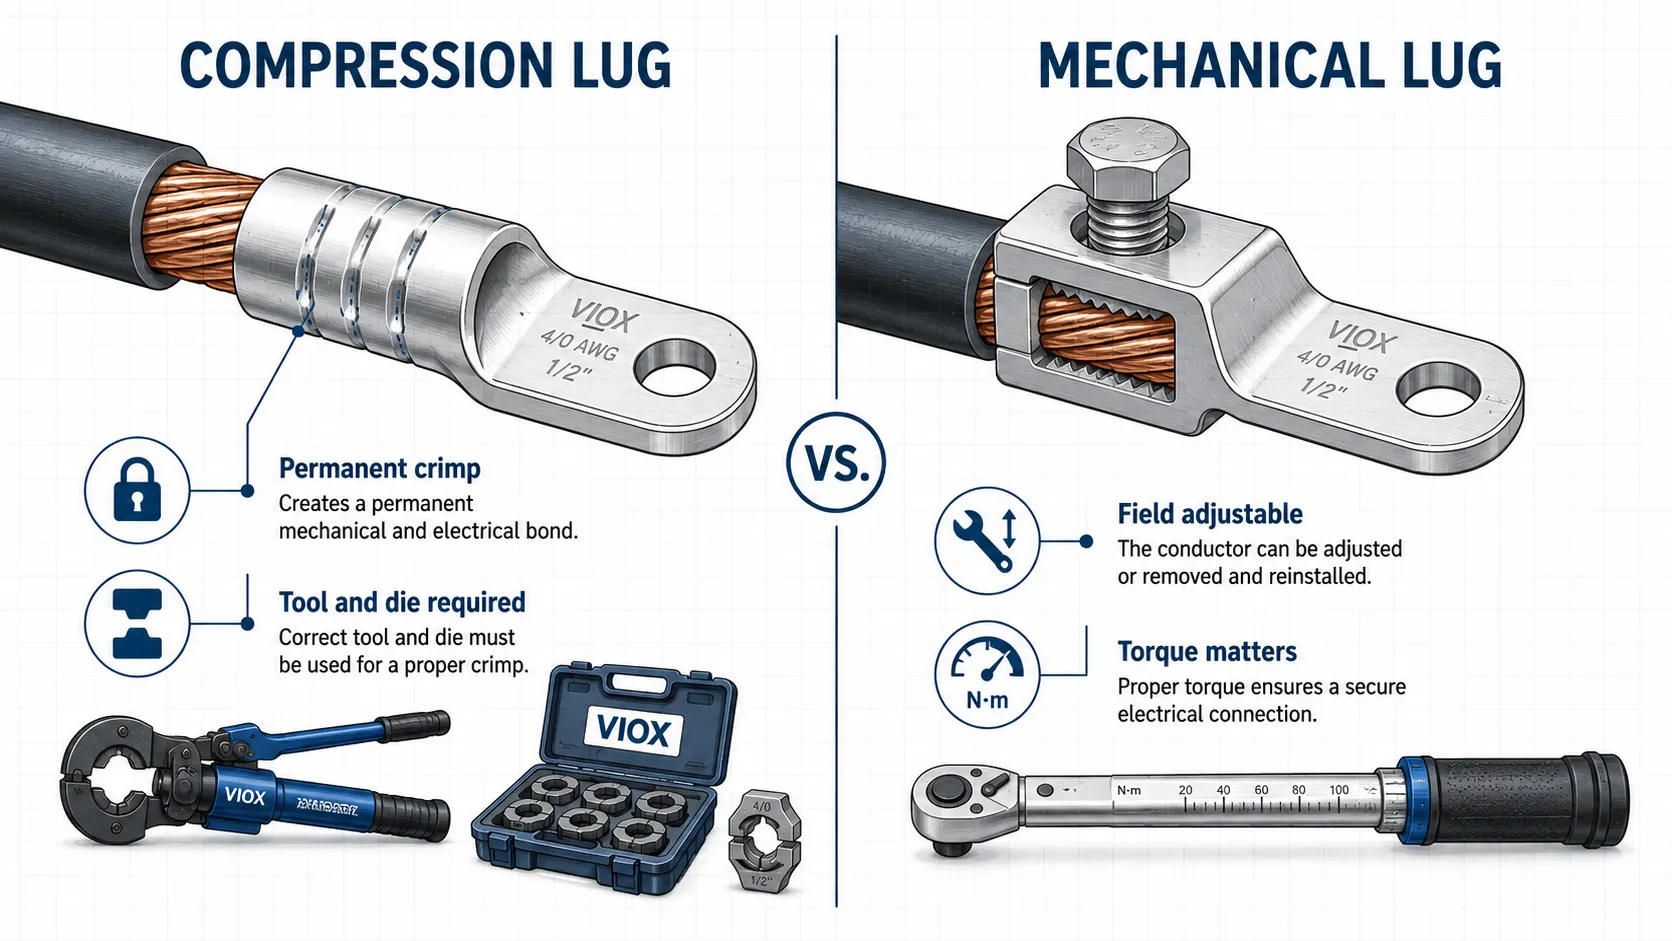
For high-current power panels, compression lugs are common because a correct crimp creates a stable low-resistance connection. Mechanical lugs are useful when field adjustability or removable connection is needed.
Bare Copper vs Tinned Copper Lugs
Tinned copper lugs are copper lugs with a tin-plated surface. The tin layer helps protect against oxidation and corrosion.
| Item | Bare Copper Lug | Tinned Copper Lug |
|---|---|---|
| Appearance | Reddish copper | Silver-colored tin surface |
| Conductivity | Excellent copper surface conductivity | Tin layer adds corrosion protection |
| Corrosion resistance | Good in dry indoor panels | Better in humid, outdoor, marine, battery, or industrial environments |
| Best use | Dry indoor copper-to-copper connections | Harsh or corrosive environments |
| Cost | Usually lower | Usually higher |
| Selection warning | Can oxidize in harsh environments | Still must match cable size, tool, and terminal |
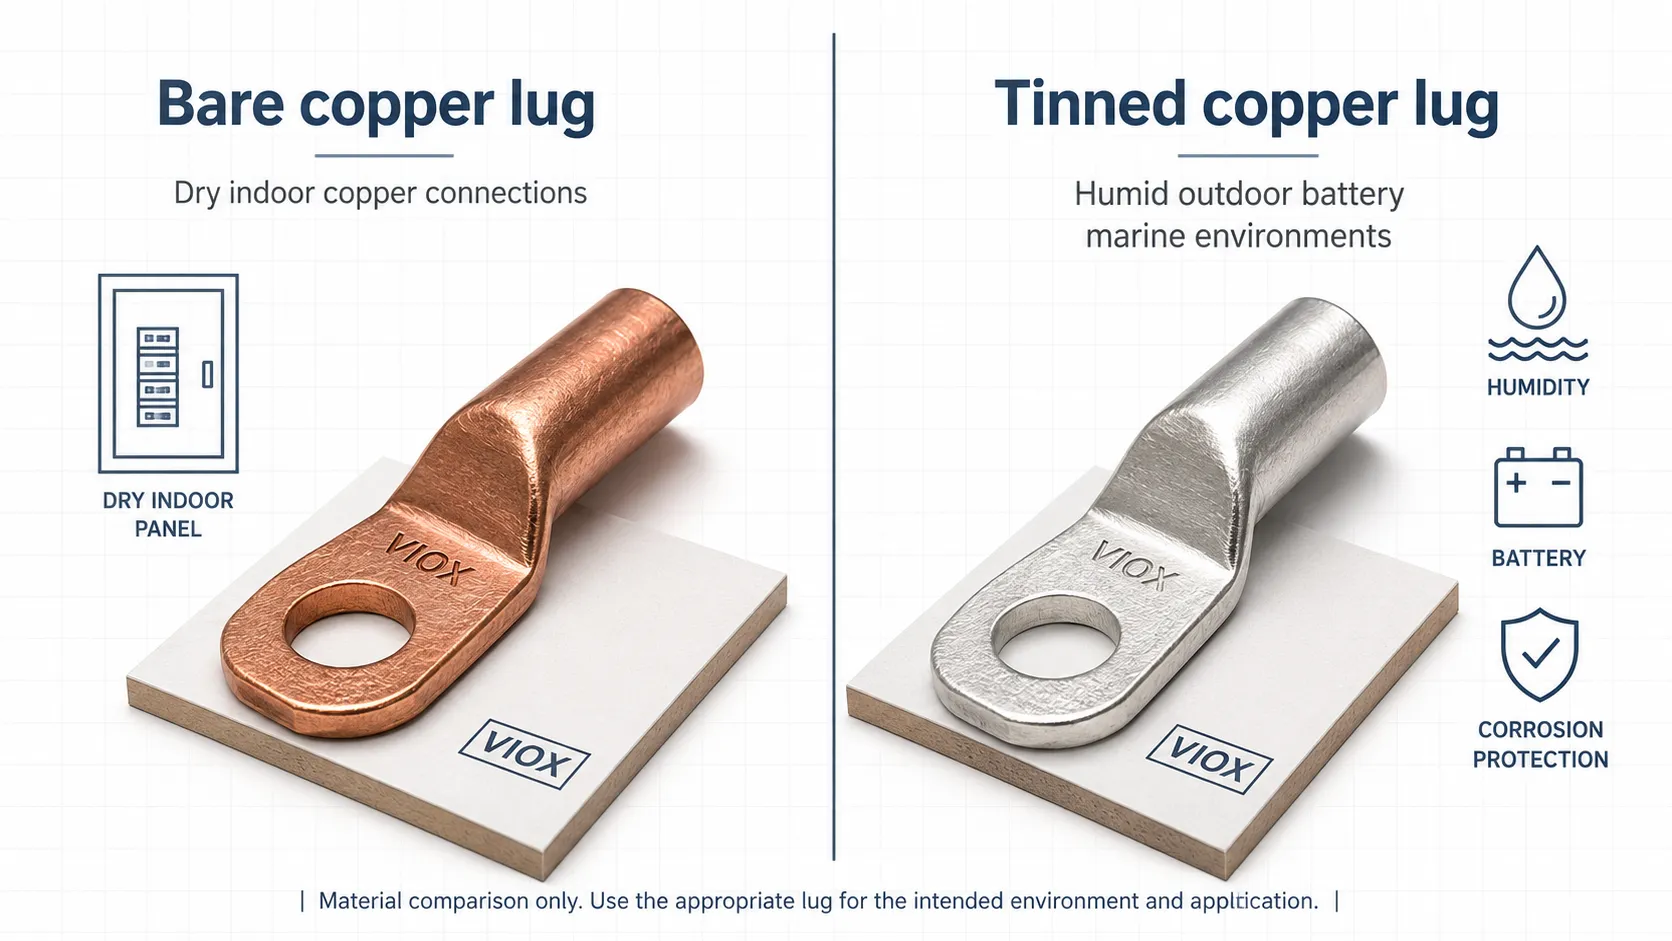
Tinned copper is not a cure for poor crimping. A correctly sized bare copper lug in a dry indoor panel can perform well, while a poorly crimped tinned lug can still overheat.
For material-level context, see VIOX’s guide to conductivity, resistivity, and %IACS.
How to Choose the Right Copper Lug Step by Step
Step 1: Confirm the Cable Size
Use the size printed on the cable jacket or the project documentation. Do not guess from cable diameter. Flexible cable, compact conductor, and standard stranded conductor can have different constructions.
Step 2: Match the Lug Barrel
The lug barrel should match the conductor size and strand class according to the manufacturer’s chart. If the barrel is too large, the crimp may be loose. If it is too small, the conductor may not insert correctly.
Step 3: Match the Stud Hole
The stud hole must match the bolt or equipment terminal. Common metric examples include M6, M8, M10, and M12. In inch-based systems, common holes include 1/4 in, 5/16 in, 3/8 in, and 1/2 in.
An oversized stud hole can reduce contact area and allow movement. An undersized hole simply will not fit.
Step 4: Choose One-Hole or Two-Hole Lug
Use one-hole lugs for general connections where rotation is not a concern. Use two-hole lugs where the connection needs better anti-rotation support, such as busbar, switchgear, grounding, or vibration-prone equipment.
Step 5: Choose Bare Copper or Tinned Copper
Choose bare copper for dry indoor copper-to-copper connections when corrosion is not a major concern. Choose tinned copper for batteries, outdoor panels, humid areas, marine environments, or industrial environments where oxidation and corrosion are more likely.
Step 6: Use the Correct Crimp Tool and Die
The lug, cable, crimp die, and tool should work as one system. A poor crimp creates high resistance, heat, voltage drop, and possible failure.
For compression lugs, check the die index or die code marked by the lug manufacturer. Many compression systems are designed so the crimp tool and die leave a die index mark on the barrel after crimping. That mark helps inspectors confirm that the correct die was used. If the lug, die, and tool are not matched, the crimp may look acceptable from the outside but still have high resistance inside.
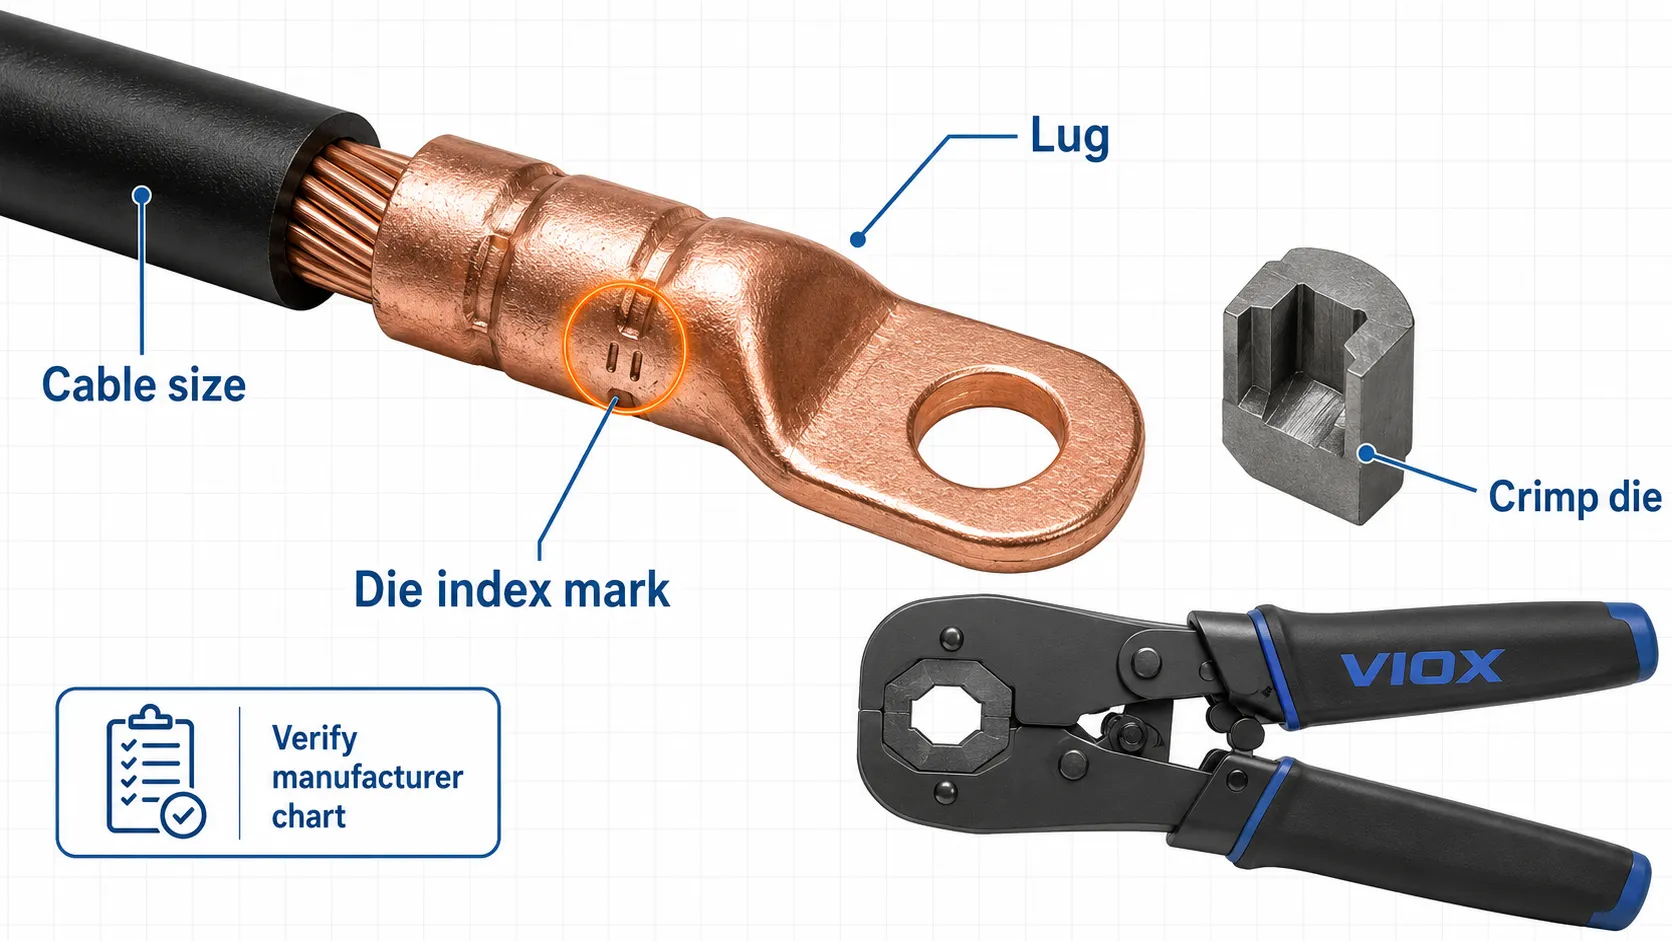
Do not mix crimp tools, dies, and lugs from different systems unless the manufacturer documentation clearly allows it. For critical power connections, the crimp system should be selected from the lug manufacturer’s instructions or project-approved tooling list.
Battery Terminal and Copper Lug Selection
Battery cables often use copper or tinned copper lugs because they carry high current and may face vibration, moisture, and chemical exposure.
For battery connections, check:
- cable size
- battery post or stud size
- lug hole size
- tinned surface requirement
- heat-shrink insulation
- flexibility and vibration
- crimp tool compatibility
Tinned copper lugs are often preferred for battery environments because corrosion resistance is more important than appearance.
Can You Use a Copper Lug on Aluminum Cable?
Do not use a standard copper lug directly on aluminum cable unless the lug is specifically rated for that conductor and application. Aluminum-to-copper transitions can create galvanic corrosion, oxidation, heating, and loose connections if handled incorrectly.
For aluminum cable connected to copper busbar or equipment, a bimetallic lug or properly rated connector is often required. Check the project specification, connector marking, and manufacturer instructions.
Common Copper Lug Selection Mistakes
| Mistake | Result |
|---|---|
| Choosing by visual fit | Loose crimp, pull-out, overheating |
| Confusing AWG and mm² | Wrong barrel size |
| Using wrong stud hole | Poor contact or mechanical looseness |
| Bare copper in corrosive area | Oxidation and higher contact resistance |
| Wrong crimp die or missing die index check | High-resistance joint, heat rise, failed inspection |
| Copper lug on aluminum cable | Galvanic corrosion and overheating risk |
| Ignoring conductor strand class | Poor insertion or poor crimp |
| Using one-hole lug where anti-rotation is needed | Lug movement under vibration |
FAQ
What size copper lug do I need?
Choose a copper lug that matches the cable size, conductor class, stud hole, and crimp tool. Use the manufacturer’s size chart rather than judging by visual fit.
How do I choose a cable lug size?
Match the lug barrel to the conductor size, then match the palm hole to the equipment stud. After that, check lug type, surface finish, tool compatibility, and environment.
What is the difference between AWG and mm² for lugs?
AWG is a North American wire gauge system. mm² is the metric conductor cross-sectional area. They can be compared approximately, but they are not exact replacements.
What lug size is used for 50 mm² cable?
Use a lug marked for 50 mm² in a metric lug system. 1/0 AWG is close to 50 mm² as a reference, but the exact lug and crimp tool must still be verified.
What lug size is used for 185 sq mm cable?
Use a lug marked for 185 mm² in a metric system. 350 kcmil is near 185 mm² in approximate conversion, but do not treat it as automatically interchangeable.
What are the main types of copper lugs?
Common types include ring lugs, fork lugs, pin lugs, one-hole lugs, two-hole lugs, long-barrel lugs, bell-mouth lugs, bare copper lugs, and tinned copper lugs.
Are tinned copper lugs better than bare copper lugs?
Tinned copper lugs are better for corrosion resistance. Bare copper lugs can be suitable for dry indoor copper-to-copper connections. The best choice depends on environment and application.
What is the difference between compression lugs and mechanical lugs?
Compression lugs are crimped permanently with a tool and die. Mechanical lugs clamp the conductor with screws or bolts and are often easier to service or replace.
Can I use a copper lug on aluminum cable?
Not unless the connector is specifically rated for that use. In many aluminum-to-copper applications, a bimetallic lug or rated transition connector is needed.
When a copper conductor is connected to a flat copper terminal, what lug is used?
A copper ring lug or two-hole copper compression lug is commonly used, depending on current, vibration, terminal pad size, and mechanical requirements.
Conclusion
Choosing a copper lug is not just choosing a hole and a cable size. The correct lug must match the conductor size, AWG or mm² system, stud hole, barrel type, crimp tool, conductor material, and installation environment.
For simple dry indoor copper wiring, a correctly sized bare copper compression lug may be enough. For batteries, outdoor panels, humid environments, or corrosion-prone applications, a tinned copper lug is often the safer choice. For aluminum cable, do not substitute a standard copper lug unless the connector is specifically rated for that use.
