

800 PLN. Tyle kosztował nieoryginalny zestaw stereo.
Wymiana wiązki przewodów? Kolejne 1200 PLN. Robocizna za rozebranie deski rozdzielczej i prześledzenie każdego stopionego przewodu? Nie pytaj. Likwidator szkód z ubezpieczenia domu stojący na twoim podjeździe i pytający, dlaczego zainstalowałeś bezpiecznik 30A na przewodzie 18 AWG? Bezcenne – ale nie w dobrym sensie.
Oto co się stało: Stereo pobierało 12 amperów. Instalator pomyślał, że “większy bezpiecznik = lepsza ochrona” i włożył bezpiecznik nożowy 30A. Działało dobrze przez trzy miesiące. Potem śruba mocująca poluzowała się wewnątrz deski rozdzielczej, przewód dodatni przetarł się przez izolację i ten przewód 18 AWG próbował przenieść cały prąd, jaki bateria mogła dostarczyć – gdzieś powyżej 400 amperów. Bezpiecznik 30A siedział tam, nic nie robiąc, podczas gdy przewód zamienił się w element grzejny. Zanim zapach dotarł do kierowcy, połowa okablowania deski rozdzielczej była stopiona.
Bezpiecznik nie przepalił się, ponieważ nigdy nie miał chronić stereo. Miał chronić przewód.
Większość ludzi rozumie to na opak. Naprawmy to.
Bezpiecznik nie chroni twojego urządzenia (chroni twój przewód)
Oto objawienie, które wszystko zmienia: twój bezpiecznik jest Strażnikiem Przewodu, a nie strażnikiem urządzenia.
Pomyśl o tym. Twój zestaw stereo za 800 PLN ma własne wewnętrzne zabezpieczenia – płytki obwodów z wyłącznikami termicznymi, regulatory napięcia, wewnętrzne bezpieczniki. Nowoczesna elektronika zaskakująco dobrze chroni się sama. Ale ten przewód 18 AWG biegnący od akumulatora do urządzenia? To tylko miedź i izolacja. Uderz go 50 amperami, a zamieni się w rozpałkę za 15 PLN za stopę.
Podstawowym zadaniem bezpiecznika jest przepalenie się, zanim zanim izolacja przewodu się stopi. Urządzenie jest drugorzędne. W rzeczywistości większość wartości znamionowych bezpieczników zalecanych przez producenta jest niższa niż to, co urządzenie technicznie może obsłużyć – są one dobrane tak, aby chronić przewód, którego prawdopodobnie użyjesz, a nie maksymalną wartość, jaką urządzenie może przetrwać.
Oto obliczenia, które to wyjaśniają: Przewód 18 AWG może bezpiecznie przenosić około 16 amperów w typowych instalacjach samochodowych (na podstawie standardów ABYC dla zamkniętych przebiegów przewodów). Umieść bezpiecznik 30A w tym obwodzie, a właśnie powiedziałeś układowi elektrycznemu: “można przepuścić 30 amperów przez ten przewód, zanim obwód powinien zostać przerwany”. Z wyjątkiem tego, że 30 amperów przez przewód 18 AWG generuje wystarczająco dużo ciepła, aby stopić izolację PVC w czasie krótszym niż minuta podczas zwarcia.
To nie jest ochrona. To opóźniony system zapłonowy.
Koncepcja Strażnika Przewodu oznacza to: Dobierz bezpiecznik najpierw na podstawie obciążalności prądowej przewodu, a dopiero potem na podstawie wymagań urządzenia. Jeśli twoje urządzenie potrzebuje bezpiecznika 20A, ale używasz przewodu 18 AWG (o wartości znamionowej 16A), potrzebujesz grubszego przewodu – a nie większego bezpiecznika. Pomiń to sprawdzenie, a zasadniczo usuniesz swój system bezpieczeństwa, zachowując iluzję, że jesteś chroniony.
Metoda doboru bezpiecznika dwuczynnikowego

Prawidłowy dobór bezpiecznika wymaga przejścia dwóch oddzielnych kontroli. Pomyśl o tym jak o bramce logicznej AND – oba warunki muszą być spełnione, w przeciwnym razie system zawiedzie.
Czynnik 1: Prąd urządzenia × 1,25 = Minimalna wartość znamionowa bezpiecznika
Martwy punkt napięcia: Dlaczego wyłączniki automatyczne nie widzą problemów z napięciem Zasada 125%.. Twój bezpiecznik musi być o 25% większy niż ciągły pobór prądu przez twoje urządzenie. Dlaczego? Ponieważ bezpieczniki nie są instrumentami precyzyjnymi – to urządzenia termiczne, które nagrzewają się i topią. Bezpiecznik 10A przenoszący dokładnie 10A będzie powoli ulegał zmęczeniu przez miesiące i ostatecznie się przepali, mimo że nic nie jest nie tak. Margines 125% zapobiega uciążliwym przepaleniom, zapewniając jednocześnie ochronę.
Przykład: Twój panel LED pobiera 8 amperów w sposób ciągły.
– 8A × 1,25 = minimalny rozmiar bezpiecznika 10A
Zaokrąglij w górę do następnej dostępnej wartości znamionowej bezpiecznika. Jeśli obliczenia dają 12,7A, użyj bezpiecznika 15A (standardowe wartości znamionowe bezpieczników nożowych: 5, 7,5, 10, 15, 20, 25, 30A). Nigdy nie zaokrąglaj w dół – to gwarantuje uciążliwe przepalenia. Zawsze zaokrąglaj w górę do następnego dostępnego rozmiaru.
Czynnik 2: Obciążalność prądowa przewodu ≥ Wartość znamionowa bezpiecznika
To jest sprawdzenie, które większość ludzi pomija. Twój przewód musi być przystosowany do obsługi co najmniej tyle prądu, ile przepuszcza twój bezpiecznik. Właściwie najlepsza praktyka mówi, że przewód powinien obsługiwać 125% wartości znamionowej bezpiecznika dla marginesu bezpieczeństwa, ale co najmniej musi się z nią zgadzać.
Ten sam przykład: Obliczyłeś bezpiecznik 15A dla swojego panelu LED o mocy 8 amperów.
– Sprawdź tabelę grubości przewodów: Czy używasz przewodu o wartości znamionowej ≥15A?
– 18 AWG (samochodowy) = wartość znamionowa 16A ✓ (ledwo przechodzi, ale akceptowalne)
– 20 AWG (samochodowy) = wartość znamionowa 11A ✗ (nie przechodzi – bezpiecznik przepuści więcej prądu, niż przewód może obsłużyć)
Jeśli Czynnik 2 zawiedzie, masz dwie opcje:
1. Zwiększ rozmiar przewodu, aby dopasować go do wymagań bezpiecznika (lepsze rozwiązanie)
2. Zmniejsz rozmiar bezpiecznika, aby dopasować go do wartości znamionowej przewodu (tylko jeśli Czynnik 1 nadal przechodzi)
Sprawdzenie Dwuczynnikowe nie jest opcjonalne. Pomiń Czynnik 1, a otrzymasz uciążliwe przepalenia. Pomiń Czynnik 2, a otrzymasz pożary.
4-etapowa metoda prawidłowego doboru bezpieczników
Przejdźmy przez cały proces z rzeczywistymi liczbami i konkretnymi scenariuszami.
Krok 1: Oblicz pobór prądu przez twoje urządzenie
Zacznij od podstawowego wzoru: Prąd (Ampery) = Moc (Watty) ÷ Napięcie (Volty)
Dla systemów 12V: I = P ÷ 12
Przykład z życia wzięty: Instalujesz panel LED o mocy 100 watów w swoim samochodzie.
– Prąd = 100W ÷ 12V = 8,33 ampera
To jest twój ciągły pobór prądu – prąd w stanie ustalonym, gdy urządzenie działa normalnie.
Ale tutaj robi się ciekawie: prąd ciągły vs. prąd udarowy. Niektóre urządzenia pobierają znacznie więcej prądu podczas uruchamiania (silniki, falowniki, sprężarki). Bezpieczniki mogą wytrzymać krótkotrwałe skoki bez przepalenia się, ale musisz znać charakterystykę swojego urządzenia:
- Obciążenia rezystancyjne (światła, grzejniki, większość elektroniki): Skok ≈ ciągły. Użyj prądu ciągłego do obliczeń.
- Indukcyjne obciążenia (silniki, elektrozawory, przekaźniki): Skok = 3-7× ciągły. Zajmiemy się nimi w Kroku 2.
Jeszcze jedna uwaga: Jeśli twoje urządzenie podaje natężenie prądu bezpośrednio na tabliczce znamionowej lub w instrukcji, użyj tej liczby. Jest to dokładniejsze niż obliczanie wsteczne z mocy. Producenci uwzględniają straty wydajności i współczynnik mocy w swoich wartościach znamionowych prądu.
Krok 2: Zastosuj zasadę 125% (lub 250% dla silników)
Weź swój prąd ciągły i pomnóż go przez 1,25.
Dla obciążeń rezystancyjnych (światła, elektronika, grzejniki):
– Minimalny bezpiecznik = Prąd urządzenia × 1,25
Kontynuując nasz przykład z panelem LED:
– 8,33A × 1,25 = 10,4A
– Zaokrąglij w górę do następnego standardowego rozmiaru: Bezpiecznik 15A
Dla obciążeń silnikowych (wciągarki, pompy, wentylatory, sprężarki):
– Minimalny bezpiecznik = Ampery urządzenia × 2,5
Dlaczego 250% dla silników? Prąd rozruchowy. Kiedy pompa zęzowa włącza się po raz pierwszy, może pobierać 40 amperów przez 200 milisekund, zanim ustabilizuje się na 8 amperach prądu roboczego. Standardowy bezpiecznik 10A (125% z 8A) przepaliłby się za każdym razem, gdy pompa się uruchomi. Współczynnik 250% uwzględnia ten skok rozruchowy.
Przykład: Pompa zęzowa 8-amperowa.
– 8A × 2,5 = minimalny rozmiar bezpiecznika 20A
Krytyczna zasada zaokrąglania: Zawsze zaokrąglaj W GÓRĘ do następnego dostępnego rozmiaru bezpiecznika, nigdy w dół. Standardowe rozmiary bezpieczników samochodowych to 5, 7.5, 10, 15, 20, 25, 30A. Jeśli obliczenia dają 12A, użyj 15A. Jeśli dają 17A, użyj 20A. Zaokrąglanie w dół powoduje uciążliwe przepalenia; zaokrąglanie w górę jest już uwzględnione w marginesie bezpieczeństwa.
Krok 3: Sprawdź obciążalność prądową przewodu
Teraz dla Dwuczynnikowej Kontroli drugi czynnik. Określiłeś minimalny rozmiar bezpiecznika — ale czy twój przewód to wytrzyma?
Obciążalność prądowa przewodu zależy od kilku czynników:
– Przekrój przewodu (AWG): Mniejsza liczba = grubszy przewód = wyższa obciążalność prądowa
– Długość przewodu: Dłuższe odcinki wymagają większego przewodu ze względu na spadek napięcia (oddzielny od obciążalności prądowej, ale powiązany)
– Metoda instalacji: Zamknięty w rurze/wiązce vs. wolne powietrze
– Temperatura otoczenia: Przedział silnika vs. przestrzeń kabiny
Oto uproszczony wykres obciążalności prądowej przewodu 12V dla typowych instalacji samochodowych (na podstawie dopuszczalnego spadku napięcia 3% i okablowania zamkniętego):
| Grubość drutu | Maksymalny prąd (Ampery) | Typowe Zastosowanie |
|---|---|---|
| 20 AWG | 11A | Małe światła LED, akcesoria |
| 18 AWG | 16A | Średnie oświetlenie, radia, ładowarki do telefonów |
| 16 AWG | 22A | Większe światła, gniazdka elektryczne, małe pompy |
| 14 AWG | 32A | Ciężkie akcesoria, małe inwertery |
| 12 AWG | 41A | Duże inwertery, akcesoria o wysokim prądzie |
| 10 AWG | 55A | Wciągarki, duże inwertery, główne zasilania |
| 8 AWG | 73A | Inwertery o dużej mocy (1000W+), główna dystrybucja |
Krytyczna kontrola: Znamionowa wartość bezpiecznika musi być ≤ znamionowej obciążalności prądowej przewodu.
Wracając do naszej listwy świetlnej LED:
– Obliczony bezpiecznik: 15A
– Proponowany przewód: 18 AWG (znamionowa wartość 16A)
– Sprawdź: 15A ≤ 16A ✓ ZALICZONE (ledwo, ale akceptowalne)
Jeśli używasz 20 AWG (znamionowa wartość 11A):
– Sprawdź: 15A ≤ 11A ✗ NIEZALICZONE
– Rozwiązanie: Zaktualizuj do przewodu 18 AWG lub większego
Wskazówka dla profesjonalistów: Kiedy jesteś blisko znamionowej wartości przewodu (w granicach 2-3 amperów), przejdź o jeden rozmiar przewodu w górę. Bezpiecznik 15A na przewodzie 18 AWG zadziała, ale 16 AWG daje większy margines termiczny i zmniejsza spadek napięcia. Przewód jest tani w porównaniu z rozwiązywaniem problemów z przerywanymi problemami elektrycznymi.
Temperatura też ma znaczenie. Ten wykres obciążalności prądowej przewodu zakłada temperaturę otoczenia 30°C (86°F). Jeśli prowadzisz przewód przez przedział silnika, gdzie temperatury osiągają 60°C (140°F), musisz obniżyć obciążalność przewodu o około 30%. Przewód 16A w gorącym otoczeniu staje się efektywnie przewodem 11A. W razie wątpliwości przejdź o jeden rozmiar większy.
Krok 4: Wybierz typ bezpiecznika i umieść go prawidłowo
Obliczyłeś rozmiar bezpiecznika i sprawdziłeś, czy twój przewód to wytrzyma. Teraz: jaki typ bezpiecznika i gdzie go umieścić?
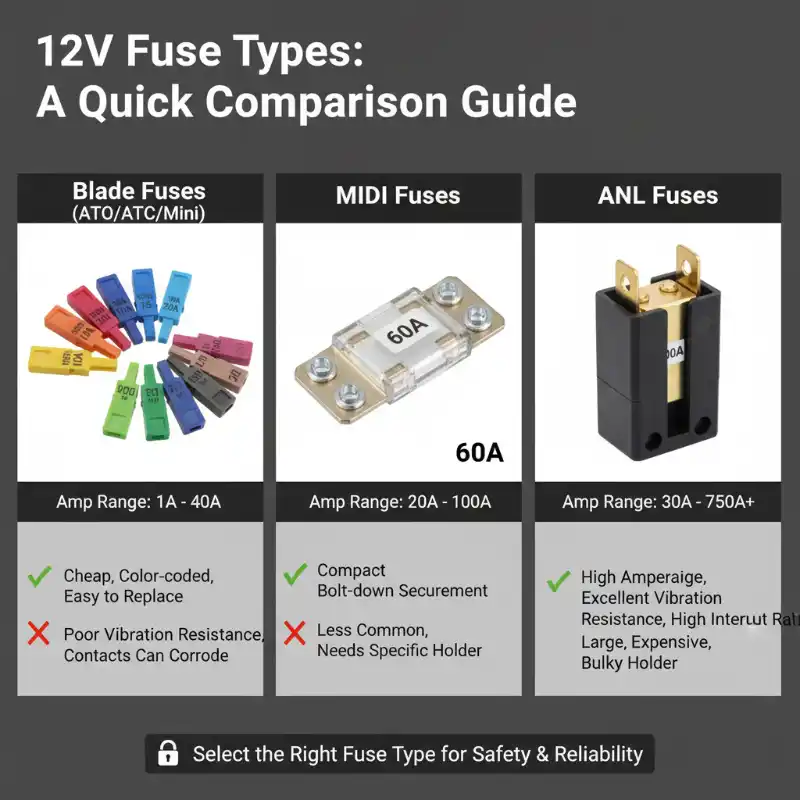
Typy bezpieczników dla systemów 12V:
- Bezpieczniki płytkowe (ATO/ATC/Mini/Maxi) — 1A do 40A
– Zalety: Tanie, powszechnie dostępne, oznaczone kolorami, łatwe do wymiany
– Wady: Słaba odporność na wibracje powyżej 20A, styki mogą korodować
– Użyj do: Indywidualne obwody, akcesoria, oświetlenie, elektronika
– Najlepsze dla prądów: Poniżej 30A - Bezpieczniki ANL — 30A do 750A
– Zalety: Zaciski przykręcane, doskonała odporność na wibracje, wysoka zdolność wyłączania
– Wady: Większe, droższe, wymagają specyficznych uchwytów
– Zastosowanie: Główna ochrona akumulatora, falowniki, urządzenia o dużej mocy
– Najlepsze dla prądów: 30A i więcej - Bezpieczniki MIDI — 20A do 100A
– Zalety: Pośrednie rozwiązanie między bezpiecznikami płytkowymi a ANL, bardziej kompaktowe niż ANL
– Wady: Mniej popularne niż bezpieczniki płytkowe
– Zastosowanie: Punkty dystrybucji, obwody średniej i dużej mocy
– Najlepsze dla prądów: 30-100A
Do naszej listwy świetlnej LED 15A? Standardowy Bezpiecznik płytkowy ATC jest idealny.
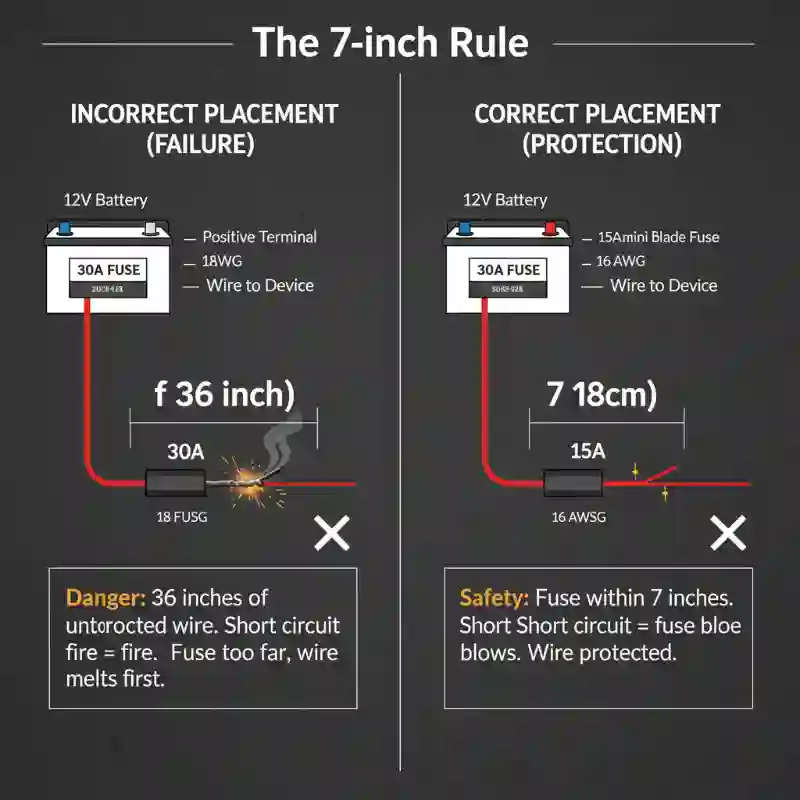
Teraz najważniejsza część: umiejscowienie. Wchodzi Zasada 7 cali.
Każdy bezpiecznik musi być umieszczony w odległości do 7 cali (18 cm) od źródła zasilania. W przypadku obwodów zasilanych bateryjnie oznacza to w odległości do 7 cali od dodatniego zacisku akumulatora. W przypadku obwodów odgałęziających się od bloku rozdzielczego, w odległości do 7 cali od punktu rozdzielczego.
Dlaczego 7 cali? Ponieważ każdy odcinek niebezpieczonego przewodu to potencjalne zagrożenie pożarowe. Jeśli przewód dodatni przetrze się przez izolację i zwiera do masy, każdy cal między akumulatorem a bezpiecznikiem staje się przewodnikiem próbującym przepuścić setki amperów. Siedem cali przewodu 18-gauge może generować 50-100 watów ciepła podczas zwarcia – wystarczająco, aby zapalić izolację przewodu lub pobliskie materiały w ciągu kilku sekund.
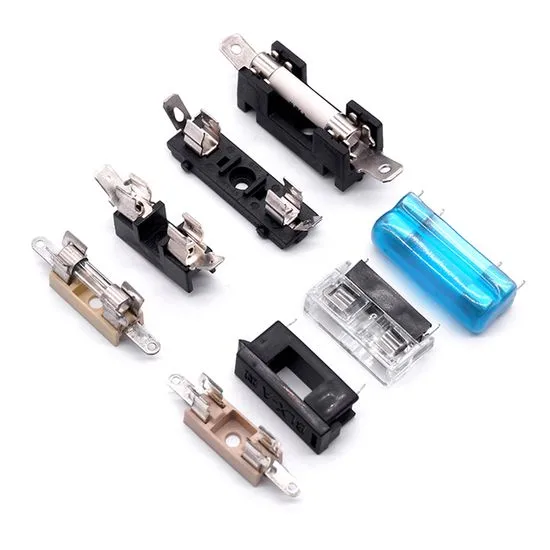
Sam uchwyt bezpiecznika również ma znaczenie:
– Używaj uchwytów bezpieczników o odpowiednich parametrach (nie wkładaj bezpiecznika 30A do uchwytu 10A)
– Prawidłowo zaciskaj końcówki (luźne połączenia = ciepło = awaria)
– Używaj wodoodpornych uchwytów do zastosowań morskich lub w miejscach narażonych na działanie czynników atmosferycznych
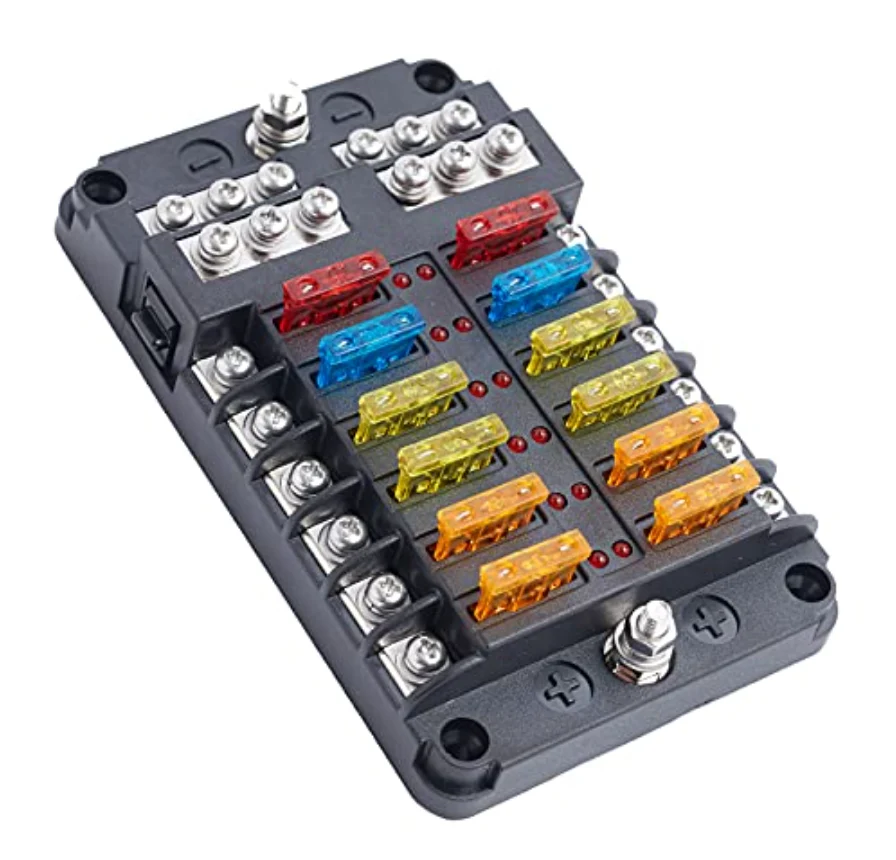
– Rozważ bloki bezpiecznikowe dla wielu obwodów zamiast pojedynczych uchwytów liniowych
Jedna uwaga na koniec: Bezpiecznik tylko po stronie dodatniej, nigdy po obu stronach. Ujemna (uziemiona) ścieżka powrotna powinna być niebezpieczona i ciągła. Bezpiecznik po obu stronach stwarza sytuację, w której przepalony bezpiecznik po stronie uziemienia pozostawia obudowę urządzenia pod napięciem akumulatora – zagrożenie porażeniem i pożarem.
3 Najgroźniejsze Błędy w Doborze Rozmiaru Bezpiecznika
Porozmawiajmy o trybach awarii, które zamieniają urządzenia zabezpieczające w zagrożenia pożarowe.
Błąd nr 1: Mit „Im większy, tym bezpieczniejszy”
“Bezpiecznik ciągle się przepalał, więc przeszedłem na następny rozmiar. Problem rozwiązany!”
Z wyjątkiem tego, że problem nie został rozwiązany – został odroczony. Ten bezpiecznik przepalał się z jakiegoś powodu: albo twoje urządzenie pobierało więcej prądu niż oczekiwano (może się psuło), albo twój przewód był za mały. Zwiększenie rozmiaru bezpiecznika po prostu powiedziało układowi elektrycznemu “ignoruj problem, dopóki coś się nie stopi”.”
Prawdziwy scenariusz: Klient zainstalował falownik 400-watowy na przewodzie 14 AWG (obciążalność 32A). Użył bezpiecznika 40A, ponieważ “falownik potrzebuje 35 amperów, więc 40 to następny rozmiar w górę”. Matematyka się zgadza, prawda?
Źle. Przy trwałym dużym obciążeniu ten falownik pobierał 38 amperów w sposób ciągły. Bezpiecznik 40A nigdy się nie przepalił. Przewód 14 AWG nagrzał się do 90°C i zaczął topić izolację. Koszt: falownik 400 USD (uszkodzenie termiczne), wymiana wiązki przewodów za 800 USD, robocizna za 1200 USD.
Prawidłowe rozwiązanie: przewód 10 AWG (obciążalność 55A) z bezpiecznikiem 40A. Obciążalność przewodu przekracza obciążalność bezpiecznika, wszystko jest chronione.
Mit „Im większy, tym bezpieczniejszy” zabija więcej układów elektrycznych niż za małe bezpieczniki. Kiedy bezpiecznik się przepala, krzyczy “napraw prawdziwy problem!” Uciszenie go przez zwiększenie rozmiaru po prostu wyłącza alarm, podczas gdy ogień się tli.
Błąd nr 2: Ignorowanie Obciążalności Przewodu (Awaria Strażnika Przewodu)
Ludzie dobierają rozmiar bezpieczników wyłącznie na podstawie wymagań urządzenia i zapominają sprawdzić, czy ich przewód może to wytrzymać. To najczęstszy sposób na obejście własnego systemu bezpieczeństwa.
Matematyka wydaje się logiczna: “Mój zestaw stereo potrzebuje 20 amperów, więc użyję bezpiecznika 25A (zasada 125%)”. Następnie prowadzisz przewód 18-gauge (obciążalność 16A), ponieważ był już w pojeździe lub to, co polecił sklep z częściami.
Teraz masz bezpiecznik, który z radością przepuści 25 amperów przez przewód o obciążalności 16 amperów. Podczas zwarcia ten przewód staje się bezpiecznikiem – z tym wyjątkiem, że przepala się, topiąc się i potencjalnie zapalając wszystko, co znajduje się w pobliżu.
Sprawdź: Obciążalność bezpiecznika ≤ Obciążalność przewodu. Zawsze. Bez wyjątków.
Błąd nr 3: Niewłaściwe Umiejscowienie Bezpiecznika (Problem Niebezpieczonego Przewodu)
Bezpiecznik trzy stopy od akumulatora? “Wystarczająco blisko, prawda?” Nie. Te trzy stopy niebezpieczonego przewodu to obciążenie.
Dlaczego to ma znaczenie: Akumulator może dostarczyć setki amperów podczas zwarcia – ograniczone jedynie przez rezystancję wewnętrzną i rezystancję przewodu. Nawet 12 cali przewodu 14 AWG przenoszącego 400 amperów generuje około 32 watów ciepła na stopę. Na 3 stopach to prawie 100 watów ogrzewania w przewodzie. Izolacja się topi. Sąsiednie przewody zaczynają się topić. Sytuacja szybko staje się ekscytująca.
Zasada 7 cali istnieje, ponieważ testy wykazały, że 7 cali przewodu o odpowiednim rozmiarze może przetrwać zwarcie wystarczająco długo, aby bezpiecznik się przepalił bez powodowania wtórnych uszkodzeń. Przesuń to do 3 stóp, a ryzykujesz, że bezpiecznik przepali się, zanim izolacja przewodu zawiedzie gdzieś na tym niebezpieczonym odcinku.
Umieść bezpieczniki w odległości do 7 cali od źródeł zasilania. To nie jest sugestia – to różnica między przepalonym bezpiecznikiem a pożarem instalacji elektrycznej.
Podłącz Swój System Prawidłowo (I Utrzymuj Go W Ten Sposób)
Bezpiecznik to Strażnik Przewodu – dobierz jego rozmiar, aby chronić przewód, sprawdź, czy twój przewód może wytrzymać bezpiecznik, umieść go w odległości do 7 cali od źródła zasilania.
Szybka lista kontrolna przed włączeniem jakiegokolwiek obwodu:
– ✓ Obliczony prąd urządzenia (Wat ÷ 12V = Ampery)
– ✓ Zastosowano 125% (lub 250% dla silników)
– ✓ Sprawdzono obciążalność przewodu (bezpiecznik ≤ obciążalność przewodu)
– ✓ Bezpiecznik umieszczony w odległości do 7″ od źródła zasilania
– ✓ Wybrano odpowiedni typ bezpiecznika dla poziomu prądu
– ✓ Wszystkie połączenia prawidłowo zaciśnięte, a końcówki przystosowane do prądu
Pamiętasz ten pożar zestawu stereo za 800 USD z początku? Oto jak to powinno być zrobione: zestaw stereo 12-amperowy, bezpiecznik 15A (12A × 1,25), przewód 16 AWG (obciążalność 22A), bezpiecznik umieszczony 6 cali od dodatniego bieguna akumulatora. Obciążalność przewodu przekracza obciążalność bezpiecznika. Bezpiecznik znajduje się w odległości do 7 cali. Jeśli ta śruba mocująca poluzuje się i zewrze przewód, bezpiecznik przepali się w milisekundach – na długo zanim przewód nagrzeje się na tyle, aby cokolwiek stopić.
Całkowity koszt zrobienia tego dobrze: 18 USD za odpowiedni przewód, 2 USD za odpowiedni bezpiecznik, 15 dodatkowych minut czasu instalacji.
Całkowity koszt zrobienia tego źle: 2800 USD i tłumaczenie likwidatorowi szkód, dlaczego uważałeś, że bezpiecznik 30A na przewodzie 18-gauge to dobry pomysł.
Bezpieczniki są najtańszym ubezpieczeniem w twoim układzie elektrycznym. Dobierz ich rozmiar na podstawie obciążalności przewodu, a nie pobożnych życzeń. Strażnik Przewodu działa tylko wtedy, gdy pozwolisz mu wykonywać swoją pracę.
