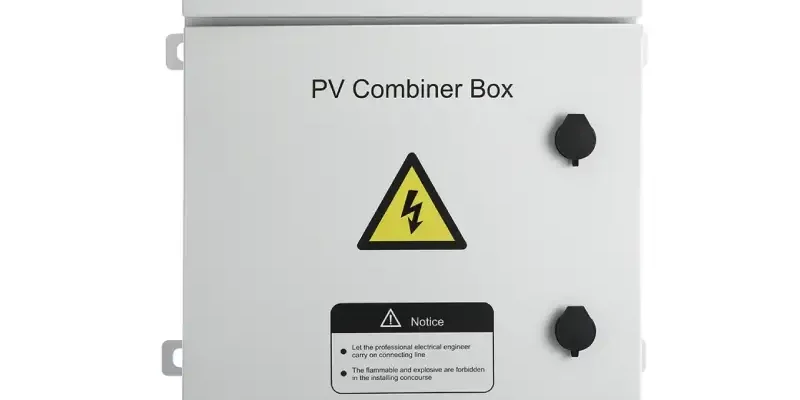
Ein Solarkombinationskasten ist eine wichtige Komponente in Photovoltaikanlagen, die mehrere Solarmodulstränge zu einem einzigen Ausgang zusammenfasst und so die Effizienz und Sicherheit verbessert. Die ordnungsgemäße Installation und Verdrahtung dieser Kästen ist für eine optimale Leistung und Langlebigkeit von Solarstromsystemen unerlässlich.

Komponenten der Solar Combiner Box
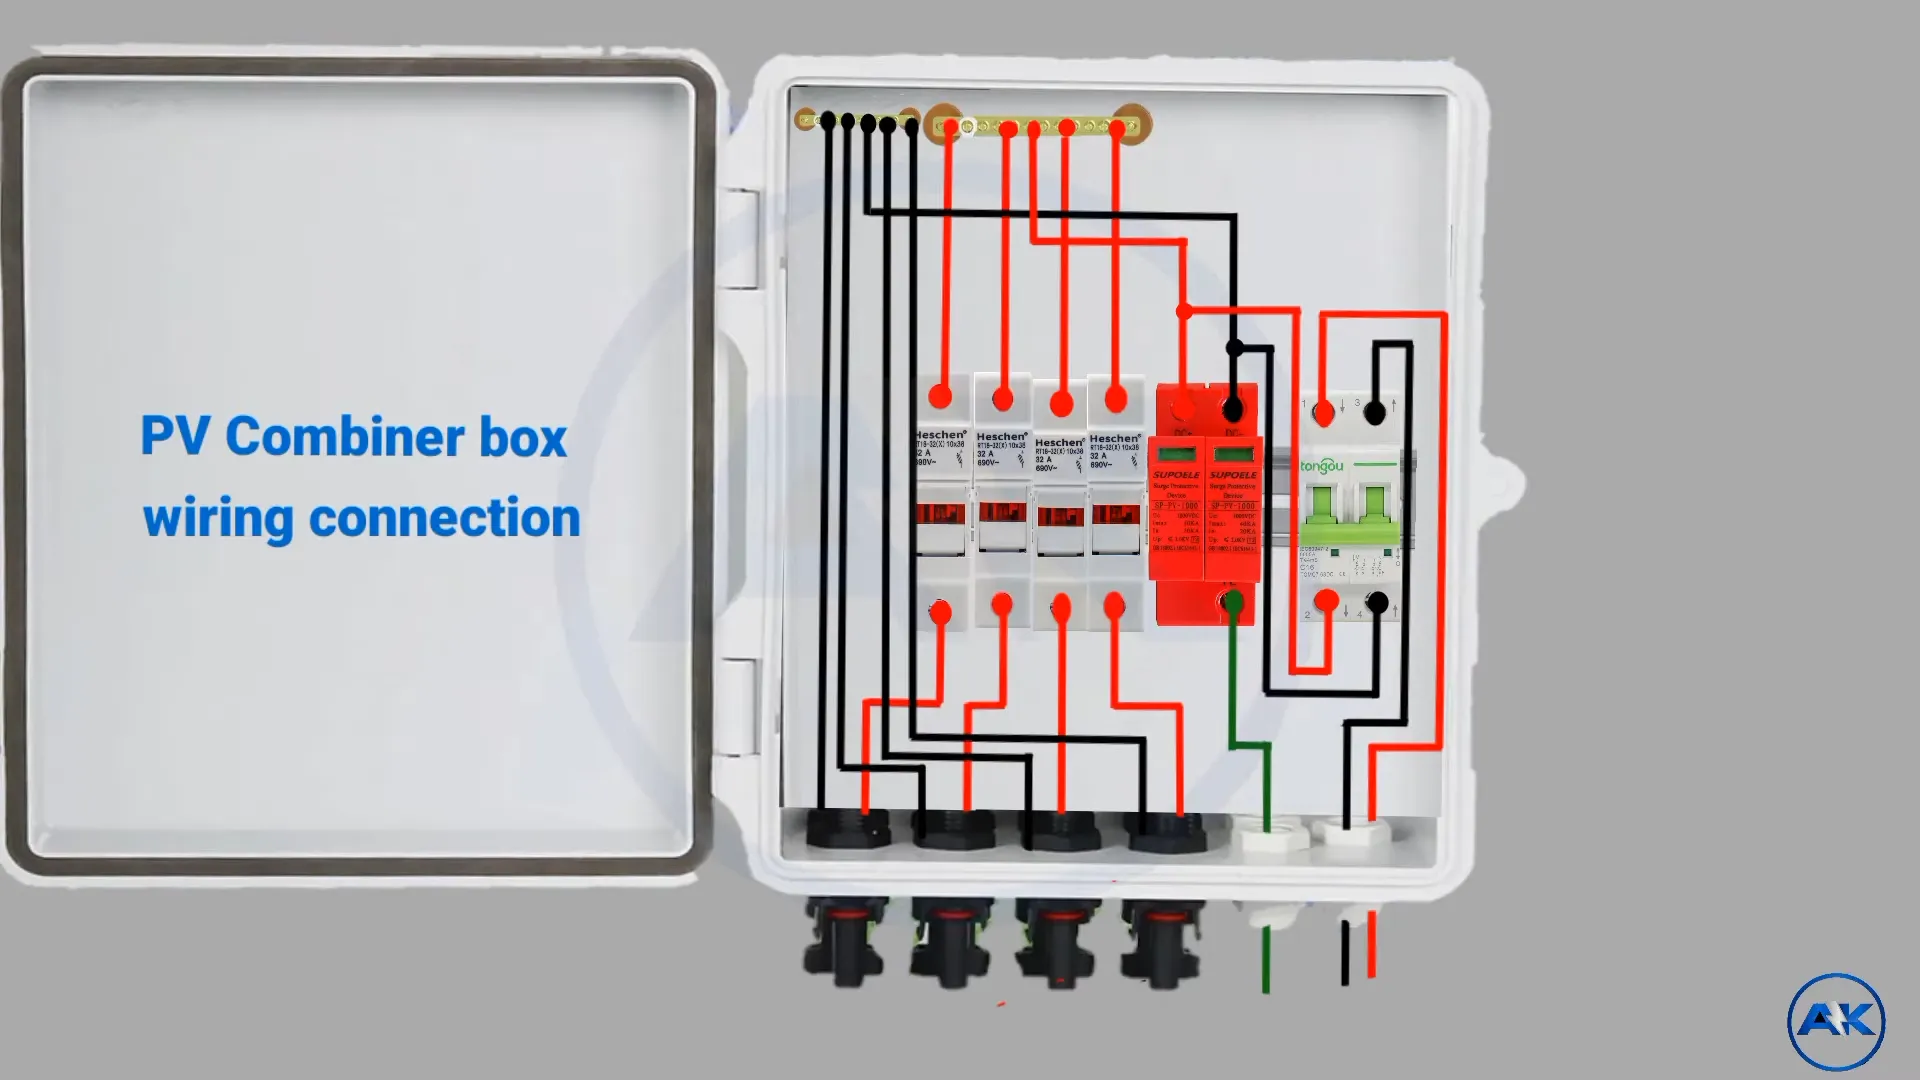
Ein typischer Solarkombinationskasten besteht aus mehreren Schlüsselkomponenten, die zusammenarbeiten, um einen sicheren und effizienten Betrieb zu gewährleisten. Dazu gehören:
- Ein Gehäuse um innere Teile vor Umwelteinflüssen zu schützen.
- Halter für Sicherungen oder Schutzschalter für den Überstromschutz.
- Stromschienen oder Klemmenleisten für den Anschluss der Plus- und Minuskabel.
- Eine Erdungssammelschiene für die ordnungsgemäße Erdung des Systems.
- Kabel Eintrittsöffnungen, um die Wasserdichtigkeit zu erhalten.
- Überspannungsschutzgeräte (SPDs) zum Schutz vor Spannungsspitzen.
Das Gehäuse beherbergt diese Komponenten und bietet einen zentralen Punkt für die Konsolidierung mehrerer Stränge von Photovoltaikmodulen zu einem einzigen Ausgang, was die Effizienz und Sicherheit des Gesamtsystems erhöht.
Verdrahtungsschema und Verfahren
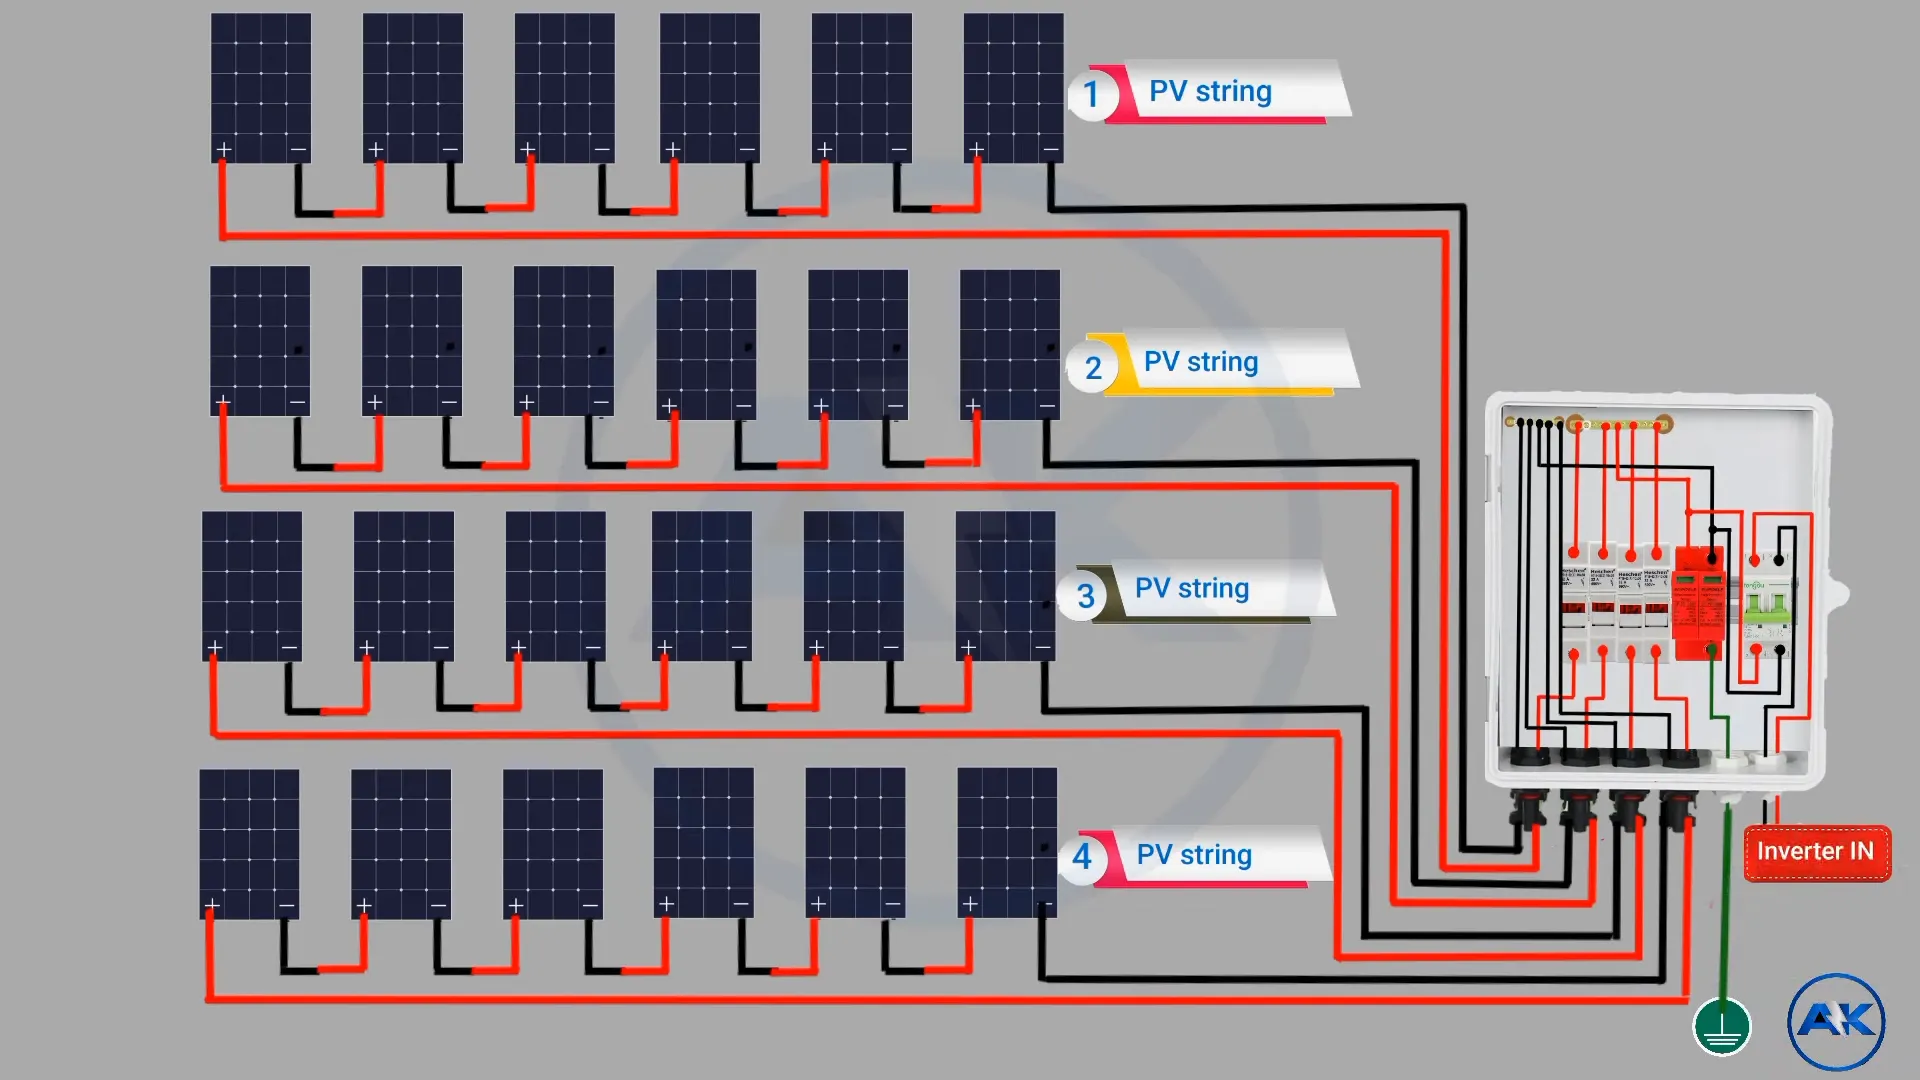
Bei der Installation eines Solarkombinationskastens ist es für die Effizienz und Sicherheit des Systems von entscheidender Bedeutung, dass ein ordnungsgemäßer Schaltplan und die entsprechenden Verfahren eingehalten werden. Ein typischer Schaltplan für einen PV-DC-Solar-Kombinationskasten umfasst mehrere String-Eingänge und weniger Ausgangsverbindungen zum Wechselrichter.
Für eine Konfiguration mit 4 Saiten am Eingang und 2 Saiten am Ausgang:
- Verbinden Sie die Pluskabel (+) von jedem der vier Solarmodulstränge mit den einzelnen Sicherungen oder Schutzschaltern in der Combiner Box.
- Verbinden Sie die negativen (-) Drähte aller vier Strings mit einer gemeinsamen negativen Stromschiene.
- Führen Sie zwei positive Ausgangskabel von den Sicherungen/Unterbrechern zum MPPT1-Eingang (Maximum Power Point Tracking) des Wechselrichters, um zwei Strings am Wechselrichter zu parallelisieren.
- Schließen Sie den dritten und vierten String an MPPT2 des Wechselrichters an.
- Führen Sie ein einzelnes negatives Ausgangskabel von der negativen Sammelschiene zum negativen Anschluss des Wechselrichters.
Bei der Umsetzung dieses Verdrahtungsschemas:
- Vergewissern Sie sich, dass alle Kabel, die in den Kombinationskasten gelangen, ordnungsgemäß abgedichtet sind, um die Umweltverträglichkeit zu gewährleisten.
- Verwenden Sie Kabelverschraubungen oder Rohrverschraubungen, die für den Kabelquerschnitt und die Dosenspezifikationen geeignet sind.
- Beschriften Sie alle Drähte innerhalb des Gehäuses deutlich, damit sie bei der Wartung oder Fehlersuche leicht zu identifizieren sind.
- Stellen Sie sicher, dass der Gesamtstrom der parallel geschalteten Strings die Eingangsleistung des Wechselrichters nicht übersteigt.
- Es ist wichtig, die Anschlussdrähte so kurz und gerade wie möglich zu halten, um die Leistungsverluste zu minimieren. Die Querschnittsfläche dieser Drähte sollte nicht weniger als 16 Quadratmillimeter betragen, um den kombinierten Strom effektiv zu bewältigen.
Überprüfen Sie vor dem Schließen des Sammelkastens alle Anschlüsse anhand des Verdrahtungsplans und der internen Markierungen, um die Richtigkeit sicherzustellen. Dieser letzte Überprüfungsschritt ist entscheidend, um mögliche Probleme zu vermeiden und sicherzustellen, dass das System wie vorgesehen funktioniert.
Denken Sie daran, dass dieser Schaltplan zwar als allgemeiner Leitfaden dient, Sie aber immer die spezifischen Anweisungen des Herstellers und die örtlichen Elektrovorschriften für Ihr spezielles Solarkastenmodell und die Installationsanforderungen beachten sollten.
Step-by-Step Installation Guide
Um eine sichere und effiziente Installation eines Solarkombinationskastens zu gewährleisten, befolgen Sie diese schrittweisen Richtlinien:
- Montage der Kombidose:
- Wählen Sie einen Standort, der leicht zugänglich und vor direkter Sonneneinstrahlung und Regen geschützt ist.
- Befestigen Sie die Box mit geeignetem Befestigungsmaterial sicher an einer stabilen Oberfläche.
- Vorbereitungen für die Verkabelung:
- Schalten Sie vor Beginn der Arbeiten alle Stromkreisunterbrecher und Trennschalter aus.
- Isolieren Sie die Enden aller anzuschließenden Drähte ca. 12 mm ab.
- Verwenden Sie einen Draht mit einer Querschnittsfläche von mindestens 16 Quadratmillimetern, um eine optimale Leistung zu erzielen.
- Verbinden von Eingangsstrings:
- Führen Sie die Plus- und Minuskabel der einzelnen Solarmodulstränge durch die vorgesehenen Kabeleinführungen.
- Verbinden Sie die positiven Drähte mit den entsprechenden Sicherungshaltern oder Schutzschaltern.
- Befestigen Sie die Minuskabel an der Minus-Sammelschiene oder am Klemmenblock.
- Installation von Schutzvorrichtungen:
- Wenn Sie Sicherungen verwenden, vergewissern Sie sich, dass sie die richtige Leistung für Ihr System haben.
- Bei Konfigurationen mit Leistungsschaltern ist zu überprüfen, ob diese richtig dimensioniert und sicher installiert sind.
- Installieren Sie Überspannungsschutzgeräte (SPDs) gemäß den Anweisungen des Herstellers.
- Verdrahtung des Ausgangs:
- Schließen Sie die Hauptausgangskabel an die positiven und negativen Stromschienen an.
- Vergewissern Sie sich, dass die Ausgangskabel ausreichend dimensioniert sind, um den kombinierten Strom von allen Eingangssträngen zu verarbeiten.
- Erdung:
- Schließen Sie alle Erdungsleiter der Geräte an die Erdungsschiene im Sammelkasten an.
- Überprüfen Sie, ob der Haupterdungsleiter ordnungsgemäß angebracht ist.
- Kennzeichnung und Dokumentation:
- Beschriften Sie alle Kabelanschlüsse und Bauteile im Kasten deutlich.
- Erstellen Sie einen detaillierten Schaltplan für künftige Referenz- und Wartungszwecke.
- Abschließende Kontrollen und Tests:
- Überprüfen Sie alle Anschlüsse anhand des Schaltplans und der internen Markierungen.
- Führen Sie Isolationswiderstandsprüfungen durch, wenn die örtlichen Vorschriften oder Systemspezifikationen dies erfordern.
- Schließen Sie den Kombinationskasten sicher und stellen Sie sicher, dass alle Dichtungen intakt sind, um die Umweltverträglichkeit zu gewährleisten.
Wenn Sie diese Schritte befolgen und sich an die örtlichen Elektrovorschriften und Herstellerrichtlinien halten, können Sie eine ordnungsgemäße und sichere Installation Ihres Solarkombinators gewährleisten.
Übliche Verdrahtungskonfigurationen
Solarklemmenkästen können verschiedene Verdrahtungskonfigurationen aufnehmen, um unterschiedlichen Systemanforderungen und Panelanordnungen gerecht zu werden. Im Folgenden sind einige gängige Verdrahtungskonfigurationen für Solaranlagen aufgeführt:
- Serien-Parallel-Konfiguration:
- Um die Spannung zu erhöhen, werden mehrere Stränge von Paneelen in Reihe geschaltet.
- Diese in Reihe geschalteten Stränge werden dann in der Combiner Box parallel geschaltet.
- Bei dieser Konfiguration werden die Spannungs- und Stromanforderungen für den Wechselrichter ausgeglichen.
- Wird in der Regel in größeren Systemen verwendet, um die Leistungsabgabe zu optimieren.
- Einzelne MPPT-Konfiguration:
- Alle Zeichenfolgen werden zu einer einzigen Ausgabe zusammengefasst.
- Geeignet für Systeme mit gleichmäßiger Plattenausrichtung und minimaler Abschattung.
- Vereinfacht die Verdrahtung, kann aber in manchen Fällen die Gesamteffizienz des Systems verringern.
- Multi-MPPT-Konfiguration:
- Die Strings werden gruppiert und an separate MPPT-Eingänge des Wechselrichters angeschlossen.
- Ermöglicht die Optimierung unterschiedlicher Ausrichtungen der Paneele oder Beschattungsbedingungen.
- Gesicherte String-Konfiguration:
- Jeder Strang hat eine eigene Sicherung zum Schutz vor Überstrom.
- Ermöglicht eine einfache Isolierung und Wartung der einzelnen Saiten.
- Erhöht die Sicherheit durch Verhinderung von Rückstrom.
- Nicht geerdete Systemkonfiguration:
- Sowohl der positive als auch der negative Leiter sind von der Erde isoliert.
- Erfordert besondere Aufmerksamkeit bei der Isolierung und Überwachung.
- Wird häufig in bestimmten Arten von Dünnschicht-Solaranlagen verwendet.
- Bipolare Konfiguration:
- Plus- und Minuspol sind getrennt verdrahtet.
- Erzeugt ein mittig angezapftes System mit positiven und negativen Spannungen.
- Kann die Gesamtsystemspannung unter Beibehaltung der Ausgangsleistung reduzieren.
Bei der Implementierung dieser Konfigurationen müssen Faktoren wie diese berücksichtigt werden:
- Maximale Spannung und Stromstärke des Systems.
- Wechselrichterspezifikationen und MPPT-Funktionen.
- Örtliche elektrische Vorschriften und Bestimmungen.
- Umweltbedingungen und Eigenschaften der Platten.
Die richtige Auswahl und Umsetzung der Verdrahtungskonfigurationen kann die Leistung, Sicherheit und Wartungsfreundlichkeit des Systems erheblich beeinflussen. Wenden Sie sich immer an einen qualifizierten Solarspezialisten, um die beste Konfiguration für Ihre spezifische Installation zu bestimmen.
Wenn Sie weitere Änderungen oder zusätzliche Details benötigen, fragen Sie einfach nach!


