
Trả Lời Nhanh: Cài đặt công tắc hẹn giờ bằng chốt bao gồm việc cắm các chốt hẹn giờ xung quanh mặt đồng hồ 24 giờ để tạo lịch bật/tắt, kết nối công tắc với mạch điện của bạn theo các quy tắc điện địa phương và kiểm tra lịch đã lập trình để đảm bảo hoạt động đúng.
Công tắc hẹn giờ bằng chốt cung cấp khả năng điều khiển lịch trình cơ học đáng tin cậy cho đèn, quạt, thiết bị hồ bơi và các thiết bị điện khác mà không cần lập trình kỹ thuật số hoặc pin dự phòng.
Công tắc hẹn giờ bằng chốt là gì?
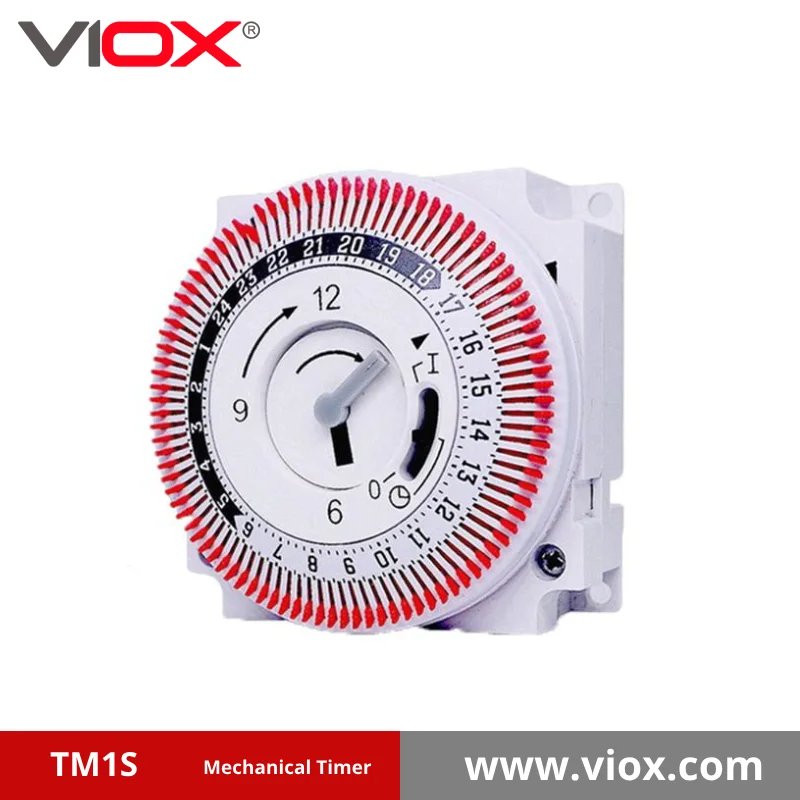
Công tắc hẹn giờ bằng chốt (còn được gọi là hẹn giờ cơ công tắc hoặc hẹn giờ chốt) là một thiết bị điều khiển điện sử dụng các chốt vật lý được cắm xung quanh mặt đồng hồ xoay 24 giờ để tự động bật và tắt các mạch điện vào những thời điểm đã định trước.
Các thành phần chính:
- Mặt đồng hồ 24 giờ xoay liên tục
- Chốt hẹn giờ (thường là nhựa) kích hoạt công tắc
- Công tắc ghi đè thủ công để điều khiển bật/tắt ngay lập tức
- Đầu nối điện để kết nối mạch
- Giá đỡ để lắp đặt hộp điện
So sánh các loại công tắc hẹn giờ
| Năng | Công tắc hẹn giờ chốt | Công tắc hẹn giờ kỹ thuật số | Công tắc hẹn giờ thông minh |
|---|---|---|---|
| Phương pháp lập trình | Chốt vật lý trên mặt đồng hồ | Giao diện nút/LCD | Ứng dụng điện thoại thông minh |
| Yêu cầu về nguồn điện | Không (cơ học) | Cần pin dự phòng | Yêu cầu kết nối Wi-Fi |
| Độ chính xác | Khoảng thời gian 15-30 phút | Khoảng thời gian 1 phút | Khoảng thời gian 1 phút |
| Độ bền | 15-20 năm | Từ 5 đến 10 năm | 3-7 tuổi |
| Chi phí | $15-40 | $25-60 | $40-120 |
| Độ phức tạp của cài đặt | Đi dây cơ bản | Đi dây cơ bản + lập trình | Yêu cầu thiết lập nâng cao |
Từng bước quá Trình Lắp đặt
Các yêu cầu an toàn trước khi bắt đầu
dr. trước CẢNH BÁO AN TOÀN: Luôn tắt nguồn ở bộ ngắt mạch trước khi bắt đầu công việc điện. Sử dụng máy kiểm tra điện áp không tiếp xúc để xác minh rằng nguồn đã tắt. Nếu bạn không thoải mái với công việc điện, hãy thuê một thợ điện được cấp phép.
Công cụ cần thiết:
- Máy tuốt dây
- Tua vít (đầu dẹt và Phillips)
- Đai ốc dây
- Máy kiểm tra điện áp không tiếp xúc
- Băng điện
Cài Đặt Bước
Bước 1: Tắt nguồn và tháo công tắc cũ
- Tắt bộ ngắt mạch điều khiển vị trí công tắc
- Tháo tấm công tắc và công tắc hiện có khỏi hộp điện
- Kiểm tra dây bằng máy kiểm tra điện áp để xác nhận rằng nguồn đã tắt
- Chụp ảnh các kết nối dây hiện có để tham khảo
Bước 2: Xác định cấu hình dây
| Thiết lập dây | Mô tả | Kết nối hẹn giờ |
|---|---|---|
| Hệ thống hai dây | Dây nóng (đen) và dây trung tính (trắng) | Dây nóng đến LINE, dây tải đến LOAD |
| Hệ thống ba dây | Dây nóng, dây trung tính và dây nối đất | Dây nối đất đến vít xanh lục, dây nóng đến LINE |
| Vòng lặp công tắc | Dây nóng và dây nóng đã chuyển mạch | Yêu cầu thêm dây trung tính |
Bước 3: Kết nối dây công tắc hẹn giờ
- Kết nối dây nóng đến (thường là màu đen) với đầu nối LINE
- Kết nối dây tải đi đến đầu nối LOAD
- Kết nối các dây trung tính với nhau bằng các đai ốc dây (nếu có)
- Kết nối dây nối đất với vít nối đất màu xanh lục
- Cố định tất cả các kết nối bằng đai ốc dây và băng dính điện
Bước 4: Gắn công tắc hẹn giờ vào hộp điện
- Cẩn thận gấp dây vào hộp điện
- Căn chỉnh công tắc hẹn giờ với các lỗ lắp
- Cố định bằng các vít được cung cấp
- Lắp đặt nắp tấm công tắc
Bước 5: Khôi phục nguồn và kiểm tra
- Bật lại cầu dao (circuit breaker)
- Xác minh công tắc hẹn giờ nhận được nguồn (đồng hồ phải bắt đầu chạy)
- Kiểm tra chức năng ghi đè thủ công
- Lập trình cài đặt hẹn giờ ban đầu
Lập trình công tắc hẹn giờ dạng chốt (Pin Timer Switch)
Tìm hiểu về mặt đồng hồ
Mặt đồng hồ 24 giờ biểu thị một ngày đầy đủ, với mỗi phân đoạn thường đại diện cho 15 hoặc 30 phút tùy thuộc vào kiểu máy hẹn giờ của bạn.
Các tính năng của mặt đồng hồ:
- 12 giờ đêm (12 AM - midnight) ở trên cùng của mặt đồng hồ
- 6 giờ sáng (6 AM) ở bên phải
- 12 giờ trưa (12 PM - noon) ở dưới cùng
- 6 giờ tối (6 PM) ở bên trái
Quy trình lập trình bằng chốt (Pin)
Bước 1: Cài đặt thời gian hiện tại
- Xoay mặt đồng hồ sao cho thời gian hiện tại thẳng hàng với con trỏ
- Cho phép động cơ đồng bộ hóa (có thể mất vài phút)
- Xác minh độ chính xác của thời gian với đồng hồ khác
Bước 2: Chèn chốt hẹn giờ (Timing Pins)
- Đối với thời gian BẬT (ON): Chèn chốt ở mép ngoài của các phân đoạn trên mặt đồng hồ nơi bạn muốn thiết bị bật
- Đối với thời gian TẮT (OFF): Tháo chốt hoặc để trống các phân đoạn nơi bạn muốn thiết bị tắt
- Mỗi chốt thường đại diện cho: 15-30 phút thời gian BẬT
Bước 3: Các ví dụ lập trình phổ biến
| Nhu cầu lập lịch | Chiến lược đặt chốt |
|---|---|
| Chiếu sáng cảnh quan | Chèn chốt từ 6 giờ tối đến 11 giờ tối và từ 5 giờ sáng đến 7 giờ sáng |
| Bơm hồ bơi | Chèn chốt cho các khoảng thời gian 6 giờ (6 giờ sáng - 12 giờ trưa, 6 giờ tối - 12 giờ đêm) |
| Chiếu sáng an ninh | Chèn chốt từ thời điểm mặt trời lặn đến mặt trời mọc |
| Trang trí ngày lễ | Chèn chốt từ 5 giờ chiều đến 10 giờ tối hàng ngày |
Sự Cố Vấn Đề Chung
Bộ hẹn giờ hoạt động không chính xác
Vấn đề:
Thiết bị không bật/tắt vào thời gian đã lập trình
Giải pháp:
- Xác minh rằng các chốt đã được lắp hoàn toàn và đặt chắc chắn
- Kiểm tra xem thời gian trên đồng hồ có khớp với thời gian thực tế hay không
- Đảm bảo chế độ ghi đè thủ công ở vị trí “AUTO”
- Kiểm tra với các vị trí chốt khác nhau để cô lập các vấn đề về thời gian
Vấn đề:
Đồng hồ chạy nhanh hoặc chậm
Giải pháp:
- Kiểm tra điện áp tại bộ hẹn giờ (phải khớp với điện áp định mức)
- Thay thế bộ hẹn giờ nếu cơ cấu đồng hồ bị lỗi
- Xác minh các kết nối điện thích hợp
Các vấn đề về điện
Vấn đề:
Bộ hẹn giờ không nhận được nguồn
Giải pháp:
- Kiểm tra vị trí của cầu dao (circuit breaker)
- Xác minh các kết nối dây được an toàn
- Kiểm tra nguồn điện đầu vào bằng bút thử điện áp
- Kiểm tra các kết nối lỏng lẻo trong hộp điện
Tiêu chí lựa chọn công tắc hẹn giờ
Thông số kỹ thuật điện cần xem xét
| Đặc điểm kỹ thuật | Phạm vi tiêu chuẩn | Hướng dẫn lựa chọn |
|---|---|---|
| Điện Đánh Giá | 120V hoặc 240V | Phải phù hợp với điện áp mạch của bạn |
| Hiện Tại Giá | 15A, 20A, 30A | Phải vượt quá cường độ dòng điện của tải được kết nối |
| Loại động cơ | Đồng bộ | Chính xác hơn loại lên dây cót |
| Liên Hệ Với Giá | Điện trở so với Điện cảm | Tính cảm ứng cho động cơ/đèn huỳnh quang |
Khi nào nên chọn bộ hẹn giờ dạng chốt
Ứng dụng tốt nhất:
- Điều khiển chiếu sáng ngoài trời
- Thiết bị hồ bơi và spa
- Quạt thông gió
- Hệ thống tưới tiêu cảnh quan
- Màn hình trang trí ngày lễ
Ưu điểm của bộ hẹn giờ dạng chốt:
- Không mất chương trình khi mất điện
- Vận hành đơn giản, trực quan
- Tuổi thọ cao (thường là 15-20 năm)
- Chi phí thấp hơn so với các lựa chọn thay thế kỹ thuật số
- Không cần thay pin
Tuân thủ quy định và cân nhắc về an toàn
Yêu cầu về mã điện
Hướng dẫn của Quy tắc Điện Quốc gia (NEC):
- Công tắc hẹn giờ phải được liệt kê bởi UL hoặc phòng thí nghiệm thử nghiệm tương tự
- Việc lắp đặt phải tuân theo hướng dẫn của nhà sản xuất
- Yêu cầu kích thước dây dẫn phù hợp cho tải được kết nối
- Có thể yêu cầu bảo vệ GFCI cho các ứng dụng ngoài trời
Cân nhắc về Quy tắc Địa phương:
- Một số khu vực pháp lý yêu cầu giấy phép cho việc lắp đặt công tắc hẹn giờ
- Có thể yêu cầu thợ điện được cấp phép cho một số ứng dụng nhất định
- Lắp đặt ngoài trời thường yêu cầu vỏ chống chịu thời tiết
Thực hành an toàn tốt nhất
🔒 DANH SÁCH KIỂM TRA AN TOÀN:
- ✓ Luôn tắt nguồn ở cầu dao trước khi lắp đặt
- ✓ Sử dụng đầu nối dây thích hợp được đánh giá cho ứng dụng
- ✓ Xác minh tất cả các kết nối được an toàn trước khi khôi phục nguồn
- ✓ Kiểm tra bảo vệ GFCI hàng tháng nếu có
- ✓ Lên lịch kiểm tra hàng năm cho các cài đặt ngoài trời
Lời khuyên của chuyên gia cho hiệu suất tối ưu
💡 Khuyến nghị chuyên môn:
- Chọn thương hiệu chất lượng như Intermatic, Leviton hoặc Woods để hoạt động đáng tin cậy
- Kích thước phù hợp – bộ hẹn giờ phải xử lý ít nhất 125% tải được kết nối
- Cân nhắc bảo vệ chống sét lan truyền cho tải điện tử và đèn LED
- Lập kế hoạch cho việc mở rộng – lắp đặt bộ hẹn giờ dung lượng lớn hơn nếu có thể có tải trong tương lai
- Ghi lại cài đặt – chụp ảnh vị trí chốt để tham khảo trong tương lai
Bảo trì và tuổi thọ
Lịch trình bảo trì định kỳ
| Tính thường xuyên | Nhiệm vụ bảo trì | Mục đích |
|---|---|---|
| Hàng tháng | Kiểm tra độ chính xác của đồng hồ | Đảm bảo thời gian chính xác |
| Quý, | Làm sạch mặt số và chốt | Ngăn chặn sự ràng buộc cơ học |
| Hàng năm | Kiểm tra ghi đè thủ công | Xác minh hoạt động khẩn cấp |
| Hai năm một lần | Kiểm tra kết nối | Ngăn ngừa các vấn đề về điện |
Khi nào nên thay thế công tắc hẹn giờ
Chỉ số thay thế:
- Đồng hồ chạy nhanh hoặc chậm liên tục mặc dù điện áp phù hợp
- Chốt không giữ chắc chắn ở vị trí
- Ghi đè thủ công không hoạt động đúng cách
- Hư hỏng có thể nhìn thấy đối với mặt số hoặc vỏ
- Các tiếp điểm điện có dấu hiệu cháy hoặc rỗ
Những Câu Hỏi Thường
Công tắc hẹn giờ dạng chốt chính xác đến mức nào?
Công tắc hẹn giờ dạng chốt thường duy trì độ chính xác trong vòng 1-2 phút mỗi ngày khi được lắp đặt và bảo trì đúng cách, khiến chúng phù hợp với hầu hết các ứng dụng hẹn giờ dân dụng và thương mại.
Tôi có thể sử dụng công tắc hẹn giờ dạng chốt với đèn LED không?
Có, nhưng hãy đảm bảo bộ hẹn giờ được đánh giá cho loại trình điều khiển LED được sử dụng. Một số đèn LED có trình điều khiển điện tử có thể yêu cầu bộ hẹn giờ được đánh giá đặc biệt cho tải điện tử.
Sự khác biệt giữa định mức tải điện trở và điện cảm là gì?
Tải điện trở (đèn sợi đốt, máy sưởi) có dòng khởi động thấp hơn, trong khi tải điện cảm (động cơ, đèn huỳnh quang) có dòng khởi động cao hơn, yêu cầu các tiếp điểm hẹn giờ được đánh giá đặc biệt.
Công tắc hẹn giờ dạng chốt tồn tại được bao lâu?
Bộ hẹn giờ dạng chốt cơ học chất lượng thường kéo dài 15-20 năm với việc lắp đặt và bảo trì đúng cách, lâu hơn đáng kể so với bộ hẹn giờ kỹ thuật số.
Bộ hẹn giờ dạng chốt có hoạt động trong thời gian mất điện không?
Bộ hẹn giờ dạng chốt tiếp tục giữ thời gian trong thời gian mất điện ngắn vì chúng sử dụng cơ cấu đồng hồ cơ học, nhưng thời gian mất điện kéo dài sẽ yêu cầu đặt lại thời gian khi có điện trở lại.
Bộ hẹn giờ dạng chốt có hoạt động với hệ thống nhà thông minh không?
Bộ hẹn giờ dạng chốt truyền thống hoạt động độc lập với hệ thống nhà thông minh, nhưng một số nhà sản xuất cung cấp các kiểu máy kết hợp kết hợp độ tin cậy cơ học với các tùy chọn kết nối thông minh.
Kết luận
Cài đặt công tắc hẹn giờ bằng chốt cung cấp khả năng kiểm soát lập lịch đáng tin cậy, lâu dài cho các thiết bị điện của bạn mà không cần sự phức tạp của lập trình kỹ thuật số. Bằng cách tuân theo các quy trình lắp đặt thích hợp, hiểu các kỹ thuật lập trình chốt và duy trì tuân thủ mã, bạn có thể đạt được hàng thập kỷ kiểm soát tự động đáng tin cậy.
Liên quan
Tìm hiểu về các loại công tắc hẹn giờ
