
เมื่อระบบ PV ของคุณหยุดผลิตไฟฟ้ากะทันหันหรือแสดงกำลังไฟฟ้าลดลง สาเหตุอาจเกิดจากฟิวส์ DC ขาด การเรียนรู้วิธีทดสอบส่วนประกอบฟิวส์ DC ของระบบโซลาร์เซลล์จะช่วยประหยัดเวลา ประหยัดเงิน และป้องกันอันตรายด้านความปลอดภัยที่อาจเกิดขึ้นได้ คู่มือฉบับสมบูรณ์นี้จะแนะนำคุณตลอดกระบวนการระบุ ทดสอบ และแก้ไขปัญหาฟิวส์ DC ที่เสียในระบบโซลาร์เซลล์ของคุณ
สัญญาณที่บ่งบอกว่าฟิวส์ DC พลังงานแสงอาทิตย์ของคุณอาจเสีย
ก่อนที่จะดำเนินการทดสอบ สิ่งที่สำคัญคือต้องจดจำสัญญาณเตือนที่บ่งชี้ถึงความเป็นไปได้ที่ฟิวส์จะขาดในระบบพลังงานแสงอาทิตย์ของคุณ อาการฟิวส์โซลาร์ขาด มักจะปรากฏออกมาในรูปแบบที่แตกต่างกันหลายวิธีซึ่งสามารถช่วยให้คุณระบุปัญหาได้อย่างรวดเร็ว
ตัวบ่งชี้ที่ชัดเจนที่สุดคือการสูญเสียพลังงานจากแผงโซลาร์เซลล์ของคุณอย่างกะทันหัน หากระบบตรวจสอบของคุณแสดงพลังงานที่ผลิตได้เป็นศูนย์วัตต์ในวันที่แดดจัด หรือแบตเตอรี่ของคุณไม่ชาร์จแม้ว่าสภาวะแวดล้อมจะเหมาะสมที่สุด ฟิวส์ที่ขาดอาจกำลังตัดเส้นทางไฟฟ้า
คุณอาจสังเกตเห็นว่ากำลังไฟฟ้าจากแสงอาทิตย์ไม่สม่ำเสมอ โดยแผงโซลาร์เซลล์หรือแผงโซลาร์เซลล์บางแผงผลิตไฟฟ้าได้ ในขณะที่แผงโซลาร์เซลล์บางแผงผลิตไฟฟ้าไม่ได้ โดยทั่วไปแล้วปัญหานี้จะเกิดขึ้นในระบบที่มีจุดป้องกันฟิวส์หลายจุด เช่น กล่องรวมสัญญาณที่มีฟิวส์แยกแต่ละชุด
สัญญาณทางกายภาพ ได้แก่ กลิ่นไหม้รอบ ๆ ขั้วไฟฟ้า รอยเปลี่ยนสีที่มองเห็นได้บนตัวฟิวส์ หรือความเสียหายที่เห็นได้ชัดบนตัวฟิวส์เอง ฟิวส์บางชนิดมีปลอกใสที่ช่วยให้คุณตรวจสอบสายไฟภายในด้วยสายตาว่ามีรอยขาดหรือรอยไหม้หรือไม่
ข้อความแสดงข้อผิดพลาดของระบบจากอินเวอร์เตอร์หรือตัวควบคุมการชาร์จของคุณอาจบ่งบอกถึงปัญหาของฟิวส์ได้เช่นกัน ส่วนประกอบโซลาร์เซลล์สมัยใหม่หลายชิ้นจะแสดงรหัสข้อผิดพลาดเฉพาะเมื่อตรวจพบวงจรเปิดหรือสภาวะแรงดันไฟฟ้าที่ไม่คาดคิดซึ่งอาจเป็นผลมาจากฟิวส์ขาด
เครื่องมือที่จำเป็นสำหรับการทดสอบฟิวส์ DC พลังงานแสงอาทิตย์
เหมาะสม การทดสอบฟิวส์พลังงานแสงอาทิตย์ ต้องใช้เครื่องมือเฉพาะเพื่อให้แน่ใจว่าค่าที่อ่านได้ถูกต้องแม่นยำและรักษาความปลอดภัยตลอดกระบวนการ มัลติมิเตอร์แบบดิจิทัลเป็นเครื่องมือวินิจฉัยหลักของคุณ แต่ต้องแน่ใจว่ามีกระแสไฟฟ้าเพียงพอสำหรับข้อกำหนดของระบบของคุณ
มัลติมิเตอร์ของคุณควรมีพิกัดฟิวส์ที่สูงกว่ากระแสไฟฟ้าลัดวงจรของแผงโซลาร์เซลล์ ตัวอย่างเช่น หากแผงโซลาร์เซลล์ของคุณมีกระแสไฟฟ้าลัดวงจร 9 แอมป์ โปรดตรวจสอบให้แน่ใจว่ามัลติมิเตอร์ของคุณมีความจุฟิวส์อย่างน้อย 10 แอมป์ เพื่อป้องกันความเสียหายระหว่างการทดสอบ
อุปกรณ์ความปลอดภัยที่จำเป็นประกอบด้วยถุงมือฉนวนสำหรับงานไฟฟ้า แว่นตานิรภัยเพื่อป้องกันประกายไฟหรือเศษวัสดุที่อาจเกิดขึ้น และเครื่องมือที่ไม่นำไฟฟ้าเพื่อป้องกันไฟฟ้าลัดวงจรโดยไม่ได้ตั้งใจ อุปกรณ์เหล่านี้ไม่ใช่ทางเลือก แต่มีความสำคัญอย่างยิ่งต่อความปลอดภัยของคุณเมื่อทำงานกับระบบไฟฟ้ากระแสตรง
เครื่องมือที่มีประโยชน์เพิ่มเติม ได้แก่ แคลมป์มิเตอร์ DC สำหรับการวัดกระแสไฟฟ้าแบบไม่รบกวน ฟิวส์สำรองที่มีค่าแอมแปร์ที่ถูกต้องสำหรับการเปลี่ยนทันที และไฟฉายหรือไฟคาดศีรษะสำหรับการมองเห็นที่ชัดเจนในตู้ไฟฟ้าที่มีแสงสลัว
เตรียมสมุดบันทึกหรือสมาร์ทโฟนไว้ใกล้ตัวเพื่อบันทึกค่าแรงดันไฟ ค่าฟิวส์ และข้อสังเกตต่างๆ ที่อาจช่วยในการแก้ไขปัญหาหรือการบำรุงรักษาในอนาคต
ข้อควรระวังด้านความปลอดภัยก่อนทดสอบฟิวส์โซลาร์เซลล์
การแก้ไขปัญหาฟิวส์ DC พลังงานแสงอาทิตย์ ระบบต่างๆ จำเป็นต้องปฏิบัติตามมาตรการด้านความปลอดภัยอย่างเคร่งครัด เนื่องจากลักษณะเฉพาะของระบบไฟฟ้าโซลาร์เซลล์ ต่างจากวงจรไฟฟ้ากระแสสลับ แผงโซลาร์เซลล์จะผลิตไฟฟ้าอย่างต่อเนื่องเมื่อได้รับแสง ทำให้การแยกพลังงานทั้งหมดทำได้ยากยิ่งขึ้น
เริ่มต้นด้วยการปิดส่วนประกอบของระบบทั้งหมดตามลำดับที่ถูกต้องเสมอ เริ่มจากการตัดการเชื่อมต่อ AC ที่แผงไฟฟ้าของคุณ จากนั้นจึงตัดการเชื่อมต่อ DC ที่อินเวอร์เตอร์ และสุดท้ายให้ตัดการเชื่อมต่อแบตเตอรี่ใดๆ หากคุณมีระบบกักเก็บพลังงาน กระบวนการปิดระบบแบบหลายขั้นตอนนี้ช่วยให้มั่นใจได้ว่าแหล่งพลังงานทั้งหมดจะถูกแยกออกจากกัน
ถอดฟิวส์ออกจากวงจรทุกครั้งที่ทำได้ เพื่อผลลัพธ์การทดสอบที่แม่นยำที่สุด การทดสอบในวงจรบางครั้งอาจทำให้ค่าที่อ่านได้คลาดเคลื่อนเนื่องจากเส้นทางขนานหรือปฏิกิริยาระหว่างส่วนประกอบภายในระบบสุริยะของคุณ
ทำงานในสภาพแห้งเท่านั้น และห้ามทำงานไฟฟ้าขณะฝนตก หิมะ หรือความชื้นสูง ความชื้นอาจก่อให้เกิดสภาวะอันตรายและส่งผลต่อความแม่นยำในการวัด
โปรดจำไว้ว่าแม้จะปิดส่วนประกอบของระบบแล้ว แผงโซลาร์เซลล์ก็ยังคงสร้างแรงดันไฟฟ้าเมื่อได้รับแสง ควรคลุมแผงด้วยวัสดุทึบแสง หรือทำงานในช่วงที่มีแสงน้อยเมื่อทำได้ เพื่อลดแรงดันไฟฟ้าตกค้างนี้
คู่มือทีละขั้นตอน: วิธีทดสอบฟิวส์ DC ของส่วนประกอบระบบโซลาร์เซลล์
วิธีที่ 1: การทดสอบฟิวส์ที่ถอดออก (การทดสอบความต่อเนื่อง)
การทดสอบความต่อเนื่องเป็นวิธีที่เชื่อถือได้มากที่สุดสำหรับ ทดสอบฟิวส์ DC เสีย ส่วนประกอบต่างๆ เพราะจะช่วยป้องกันการรบกวนจากส่วนประกอบอื่นๆ ของระบบ วิธีนี้ได้ผลดีที่สุดเมื่อคุณสามารถถอดฟิวส์ออกจากที่ยึดได้อย่างปลอดภัย
เริ่มต้นด้วยการปิดระบบโซลาร์เซลล์ทั้งหมดตามขั้นตอนการปิดระบบที่ระบุไว้ข้างต้น รอสักครู่หลังจากปิดระบบเพื่อให้พลังงานที่เหลืออยู่ในตัวเก็บประจุของระบบระบายออกอย่างปลอดภัย
ถอดฟิวส์ที่สงสัยออกจากขั้วฟิวส์อย่างระมัดระวัง โดยสังเกตทิศทางและเครื่องหมายระบุต่างๆ ฟิวส์หลายตัวมีตัวบ่งชี้ทิศทางหรือข้อกำหนดตำแหน่งเฉพาะเพื่อการทำงานที่ถูกต้อง
ตั้งค่ามัลติมิเตอร์ของคุณเป็นโหมดต่อเนื่อง ซึ่งโดยทั่วไปจะแสดงด้วยสัญลักษณ์ไดโอดหรือไอคอนคลื่นเสียง ทดสอบการทำงานของมัลติมิเตอร์โดยการนำปลายหัววัดมาแตะกัน คุณควรได้ยินเสียงบี๊บที่ดังชัดเจน แสดงว่าฟังก์ชันต่อเนื่องทำงานอย่างถูกต้อง
วางหัววัดหนึ่งอันไว้ที่ปลายฟิวส์แต่ละด้าน โดยให้แน่ใจว่าสัมผัสกับขั้วโลหะได้ดี ลำดับการทดสอบนี้ไม่สำคัญ เนื่องจากฟิวส์เป็นอุปกรณ์ที่ไม่มีขั้ว
ฟิวส์ที่ใช้งานได้จะส่งเสียงบี๊บจากมัลติมิเตอร์ทันที แสดงว่าสายไฟฟ้าผ่านตัวฟิวส์ได้อย่างสมบูรณ์ หากไม่มีเสียงบี๊บ แสดงว่าตัวฟิวส์ละลายหรือแตกหัก แสดงว่าฟิวส์ขาดและต้องเปลี่ยนใหม่
วิธีที่ 2: การทดสอบฟิวส์ในวงจร (การทดสอบแรงดันไฟฟ้า)
หากการถอดฟิวส์ไม่สะดวกหรือปลอดภัย คุณสามารถทดสอบฟิวส์ขณะติดตั้งได้โดยใช้วิธีการวัดแรงดันไฟฟ้า เทคนิคนี้มีประโยชน์อย่างยิ่งสำหรับฟิวส์ในบริเวณที่เข้าถึงยาก หรือเมื่อคุณต้องการหลีกเลี่ยงการรบกวนการทำงานของระบบ
ให้รักษาระบบโซลาร์ของคุณไว้ในสถานะการทำงานปกติสำหรับการทดสอบนี้ แต่ต้องแน่ใจว่าคุณสวมอุปกรณ์ด้านความปลอดภัยที่เหมาะสม และใช้มาตรการป้องกันที่เหมาะสมเมื่ออยู่ใกล้วงจรไฟฟ้าที่มีกระแสไฟฟ้า
ตั้งค่ามัลติมิเตอร์ของคุณให้วัดแรงดันไฟฟ้ากระแสตรง (DC) ที่มีช่วงสูงกว่าแรงดันไฟฟ้าใช้งานของระบบ ระบบโซลาร์เซลล์สำหรับที่อยู่อาศัยส่วนใหญ่ทำงานที่ 400-600 โวลต์กระแสตรง ดังนั้นควรเลือกช่วงที่เหมาะสมบนมิเตอร์ของคุณ
วางหัววัดมัลติมิเตอร์ไว้ที่แต่ละด้านของขั้วฟิวส์อย่างระมัดระวัง คุณกำลังวัดแรงดันตกคร่อมฟิวส์ภายใต้สภาวะการทำงานปกติ
ฟิวส์ที่ดีจะมีแรงดันตกคร่อมเพียงเล็กน้อยหรือแทบไม่มีเลย โดยทั่วไปจะน้อยกว่า 0.1 โวลต์ ค่าที่อ่านได้น้อยที่สุดนี้บ่งชี้ว่ากระแสไฟฟ้าไหลผ่านตัวฟิวส์ได้อย่างอิสระโดยมีค่าความต้านทานปกติ
หากคุณวัดแรงดันไฟฟ้าที่สำคัญที่ฟิวส์ โดยเฉพาะอย่างยิ่งหากใกล้เคียงกับแรงดันไฟฟ้าทำงานเต็มของระบบ แสดงว่าฟิวส์ขาดและปิดกั้นการไหลของกระแสไฟฟ้า
วิธีที่ 3: การทดสอบความต้านทานเพื่อยืนยัน
การทดสอบความต้านทานช่วยให้ยืนยันสภาพฟิวส์เพิ่มเติมได้ และช่วยระบุฟิวส์ที่เริ่มจะขาดแต่ยังไม่ขาดสนิทได้
ถอดฟิวส์ออกจากวงจร และตั้งค่ามัลติมิเตอร์ให้วัดค่าความต้านทาน ซึ่งโดยทั่วไปจะแสดงด้วยสัญลักษณ์โอเมก้า (Ω) เลือกช่วงความต้านทานต่ำสุดสำหรับค่าที่อ่านได้แม่นยำที่สุด
สัมผัสหัววัดกับขั้วฟิวส์ เพื่อให้แน่ใจว่าจุดสัมผัสสะอาดเพื่อการวัดที่แม่นยำ การเกิดออกซิเดชันหรือการกัดกร่อนที่ขั้วอาจส่งผลต่อการอ่านค่า ดังนั้นควรทำความสะอาดจุดเชื่อมต่อหากจำเป็น
ฟิวส์ที่แข็งแรงควรมีความต้านทานใกล้ศูนย์ โดยทั่วไปจะน้อยกว่า 0.1 โอห์ม ความต้านทานต่ำนี้ยืนยันว่าฟิวส์สามารถจ่ายกระแสไฟฟ้าได้อย่างไม่มีสิ่งกีดขวาง
ค่าความต้านทานสูงหรือค่าความต้านทานไม่สิ้นสุด (มักแสดงเป็น "OL" สำหรับโหลดเกิน) บ่งชี้ว่าฟิวส์ขาด ฟิวส์บางชนิดอาจแสดงค่าความต้านทานเพิ่มขึ้นเรื่อยๆ ตามอายุการใช้งาน ซึ่งเป็นสัญญาณเตือนล่วงหน้าถึงความบกพร่องที่อาจเกิดขึ้น
ทำความเข้าใจประเภทฟิวส์ DC ในระบบโซลาร์เซลล์
สถานที่ต่างๆ ภายในระบบโซลาร์เซลล์ของคุณจำเป็นต้องใช้ฟิวส์ชนิดเฉพาะที่ออกแบบมาเพื่อคุณสมบัติทางไฟฟ้าและสภาพแวดล้อมเฉพาะตัว การทำความเข้าใจความแตกต่างเหล่านี้จะช่วยให้มั่นใจได้ว่ามีขั้นตอนการทดสอบและการเลือกฟิวส์ทดแทนที่เหมาะสม
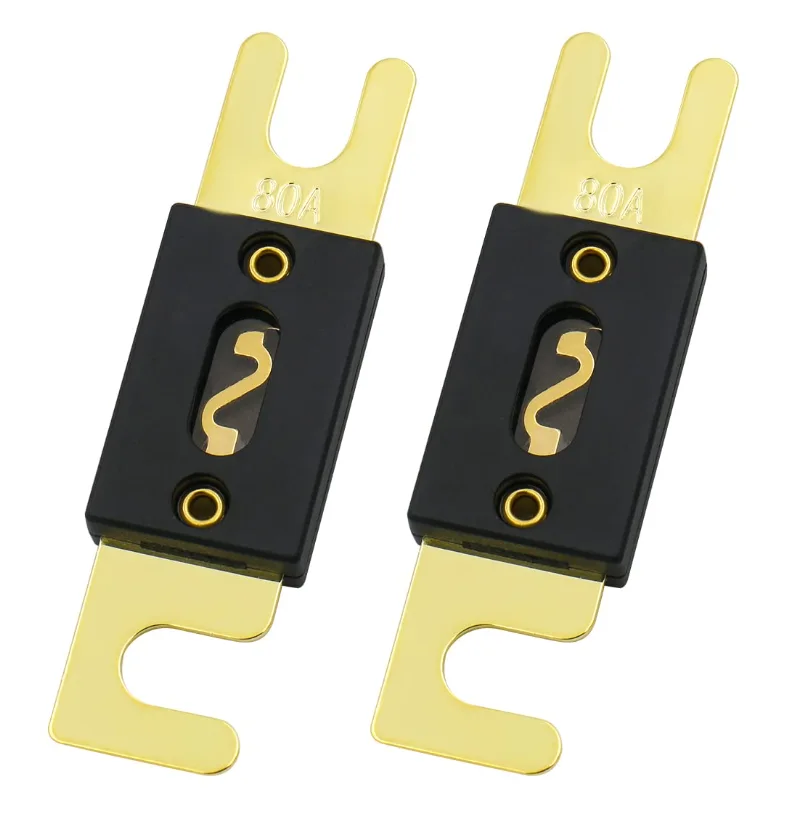
ฟิวส์ ANL มักใช้กับงานที่ต้องการกระแสสูง เช่น การเชื่อมต่อระหว่างตัวควบคุมการชาร์จและแบตเตอรี่ ฟิวส์ทรงกระบอกเหล่านี้โดยทั่วไปรองรับกระแสไฟได้ 30-400 แอมป์ และใช้การเชื่อมต่อแบบสลักยึดเพื่อการติดตั้งที่แน่นหนาในที่ยึดฟิวส์เกรดทางทะเล
ฟิวส์ MEGA ใช้งานกับอุปกรณ์ที่มีกระแสสูงคล้ายกัน แต่ใช้รูปแบบทางกายภาพที่แตกต่างกัน มักพบในอุปกรณ์ประเภทยานยนต์ และสามารถติดตั้งในบล็อกฟิวส์เฉพาะทางที่ออกแบบให้เปลี่ยนได้ง่าย
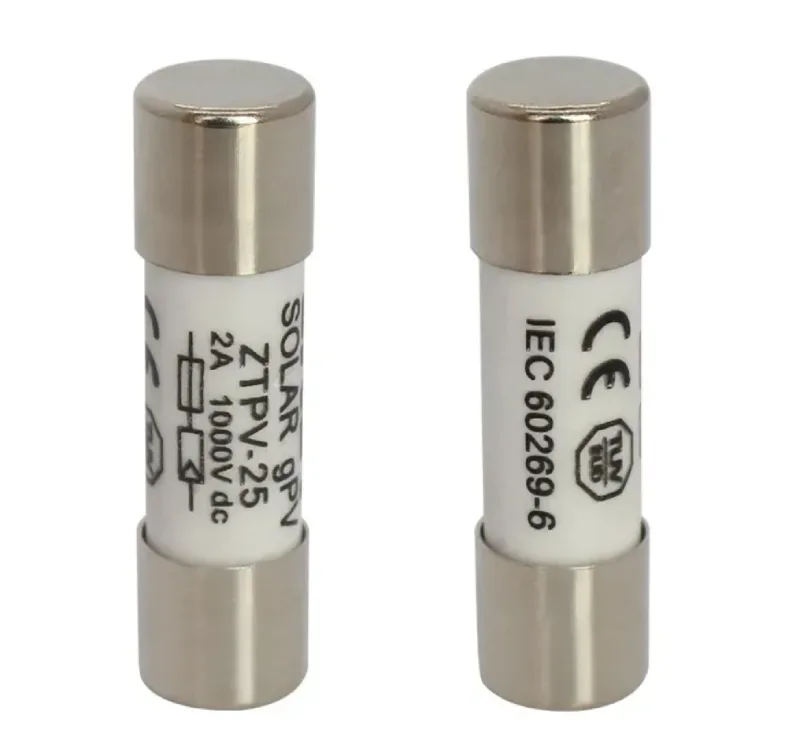
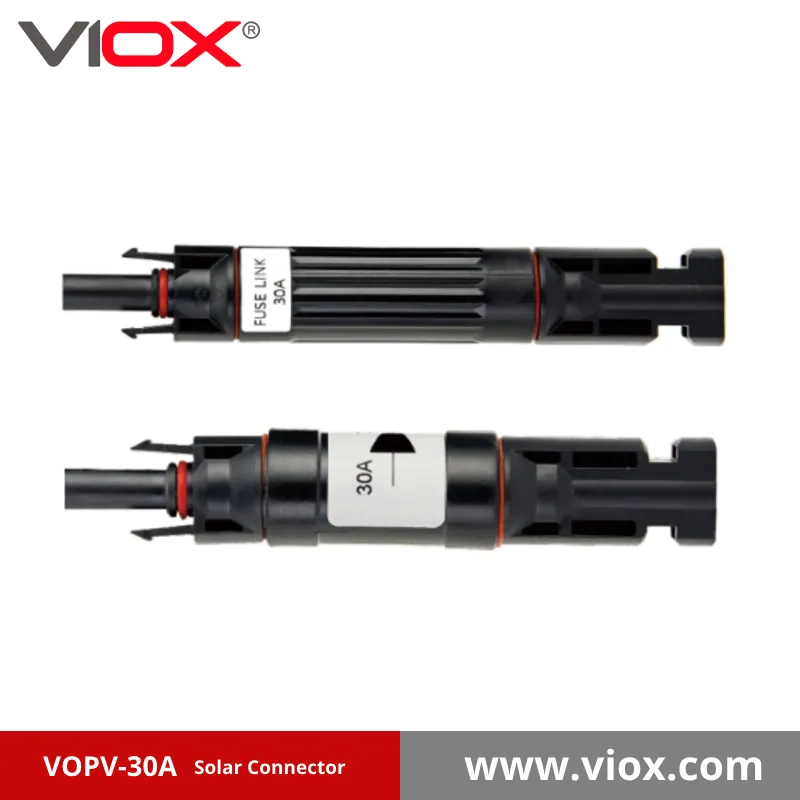
ฟิวส์อินไลน์ MC4 มอบการปกป้องระดับแผงโซลาร์เซลล์ในระบบที่มีแผงโซลาร์เซลล์เชื่อมต่อแบบขนาน ฟิวส์กันน้ำเหล่านี้สามารถเชื่อมต่อเข้ากับระบบขั้วต่อ MC4 ได้โดยตรง จึงเหมาะอย่างยิ่งสำหรับการติดตั้งภายนอกอาคารที่ต้องการการปกป้องแผงโซลาร์เซลล์แบบแยกแผง
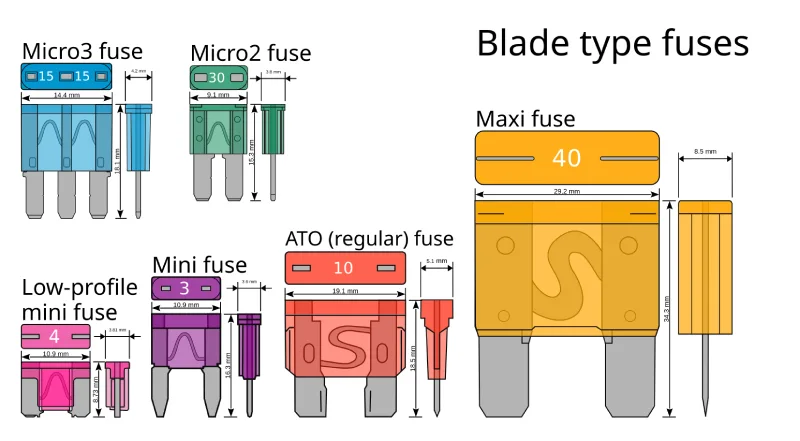
ฟิวส์ใบมีด ปกป้องโหลด DC ขนาดเล็กภายในระบบของคุณ เช่น อุปกรณ์ตรวจสอบ พัดลม หรือวงจรควบคุม ฟิวส์แบบยานยนต์ที่คุ้นเคยเหล่านี้ทดสอบและเปลี่ยนได้ง่าย แต่ไม่เหมาะสำหรับการใช้งานกับพลังงานแสงอาทิตย์กระแสสูง
สาเหตุทั่วไปของความล้มเหลวของฟิวส์ DC พลังงานแสงอาทิตย์
การเข้าใจสาเหตุที่ฟิวส์ขาดช่วยป้องกันปัญหาในอนาคตและช่วยแนะนำแนวทางการแก้ไขปัญหาของคุณเมื่อ การทดสอบฟิวส์ DC ในระบบโซลาร์เซลล์ความล้มเหลวของฟิวส์ส่วนใหญ่มักเกิดจากความผิดพลาดทางไฟฟ้ามากกว่าการสึกหรอตามปกติ ดังนั้นการวิเคราะห์หาสาเหตุจึงมีความจำเป็น
ภาวะกระแสเกินเป็นสาเหตุที่พบบ่อยที่สุดของฟิวส์ขาด ซึ่งอาจเกิดจากไฟฟ้าลัดวงจรในสายไฟ ไฟฟ้าลัดวงจรภายในส่วนประกอบของระบบ หรือกระแสไฟฟ้าย้อนกลับจากชุดสายขนานที่กำหนดค่าไม่ถูกต้อง
การเชื่อมต่อไฟฟ้าที่ไม่ดีจะก่อให้เกิดความร้อนสูงเกินไป ซึ่งอาจทำให้ฟิวส์ขาดได้ แม้ว่าระดับกระแสไฟฟ้าจะอยู่ในเกณฑ์ปกติก็ตาม สกรูขั้วต่อหลวม การเชื่อมต่อที่เป็นสนิม หรือการจีบสายไฟที่ไม่เหมาะสม ล้วนสร้างจุดเชื่อมต่อที่มีความต้านทานสูง ซึ่งก่อให้เกิดความร้อนสะสมที่เป็นอันตราย
การใช้ฟิวส์ที่มีขนาดไม่ถูกต้องสำหรับการใช้งานของคุณแทบจะรับประกันได้ว่าอาจเกิดความล้มเหลวก่อนเวลาอันควร ฟิวส์ที่มีขนาดเล็กเกินไปสำหรับวงจรจะขาดโดยไม่จำเป็น ในขณะที่ฟิวส์ที่มีขนาดใหญ่เกินไปจะไม่สามารถป้องกันได้อย่างเพียงพอและอาจทำให้เกิดภาวะกระแสเกินที่เป็นอันตรายจนสร้างความเสียหายให้กับส่วนประกอบอื่นๆ ของระบบได้
ปัจจัยด้านสิ่งแวดล้อม เช่น การแทรกซึมของความชื้น อุณหภูมิที่สูงเกินไป หรือการสัมผัสรังสียูวี อาจทำให้ส่วนประกอบของฟิวส์เสื่อมสภาพลงเมื่อเวลาผ่านไป โดยเฉพาะอย่างยิ่งสำหรับฟิวส์ที่ติดตั้งในสถานที่กลางแจ้งที่ไม่มีกล่องหุ้มที่ทนทานต่อสภาพอากาศ
การแก้ไขปัญหาหลังจากพบฟิวส์เสีย
การตรวจพบฟิวส์ขาดเป็นเพียงจุดเริ่มต้นของกระบวนการวินิจฉัยของคุณ การเปลี่ยนฟิวส์โดยไม่ทราบสาเหตุที่แท้จริงอาจทำให้เกิดปัญหาซ้ำๆ และอันตรายด้านความปลอดภัยที่อาจเกิดขึ้นได้
เริ่มต้นการวิเคราะห์หาสาเหตุโดยการตรวจสอบจุดเชื่อมต่อไฟฟ้าทั้งหมดในวงจรที่ได้รับผลกระทบอย่างละเอียด มองหาสัญญาณของความร้อนสูงเกินไป เช่น สายไฟเปลี่ยนสี ฉนวนละลาย หรือขั้วไฟฟ้าไหม้ ขันจุดเชื่อมต่อที่หลวมให้แน่นและทำความสะอาดขั้วไฟฟ้าที่สึกกร่อนก่อนดำเนินการ
ตรวจสอบสายไฟเพื่อหาความเสียหายทางกายภาพที่อาจทำให้เกิดไฟฟ้าลัดวงจรหรือไฟฟ้ารั่ว ความเสียหายจากหนู รอยขีดข่วนจากขอบคม หรือการเสื่อมสภาพจากการถูกรังสียูวี อาจทำให้เกิดความผิดปกติที่ทำให้ฟิวส์ขาดซ้ำๆ ได้
ตรวจสอบให้แน่ใจว่าฟิวส์ที่ขาดมีขนาดเหมาะสมกับการใช้งาน ฟิวส์ DC พลังงานแสงอาทิตย์โดยทั่วไปควรมีพิกัดกระแสลัดวงจร 1.25 ถึง 1.56 เท่าของวงจรป้องกัน การใช้ข้อมูลจำเพาะของผู้ผลิตจะช่วยให้มั่นใจได้ถึงการป้องกันที่ดีที่สุดโดยไม่เกิดการสะดุด
ทดสอบส่วนประกอบอื่นๆ ของระบบที่อาจทำให้เกิดกระแสเกิน ซึ่งรวมถึงการตรวจสอบแผงโซลาร์เซลล์เพื่อหาข้อบกพร่องภายใน การทดสอบตัวควบคุมการชาร์จเพื่อให้ทำงานได้อย่างถูกต้อง และการตรวจสอบการทำงานของอินเวอร์เตอร์
เมื่อใดควรเรียกผู้เชี่ยวชาญหรือทดสอบด้วยตนเอง
แม้ว่าขั้นตอนการทดสอบฟิวส์พลังงานแสงอาทิตย์หลายๆ ขั้นตอนจะอยู่ในความสามารถของผู้ที่สนใจ DIY ที่มีข้อมูล แต่เงื่อนไขบางประการจำเป็นต้องมีการแทรกแซงจากผู้เชี่ยวชาญเพื่อความปลอดภัยและประสิทธิภาพ
ระบบไฟฟ้าแรงสูง การใช้งานแรงดันไฟฟ้ากระแสตรงสูงกว่า 50 โวลต์จะเพิ่มความเสี่ยงด้านความปลอดภัย ซึ่งจำเป็นต้องมีการฝึกอบรมและอุปกรณ์เฉพาะทาง ระบบเหล่านี้สามารถส่งกระแสไฟฟ้าช็อตที่เป็นอันตรายหรือถึงแก่ชีวิตได้ ดังนั้นการประเมินโดยผู้เชี่ยวชาญจึงเป็นทางเลือกที่ปลอดภัยกว่า
ฟิวส์ขาดซ้ำๆ มักบ่งชี้ถึงปัญหาของระบบที่ซับซ้อนซึ่งต้องใช้ทักษะการวินิจฉัยขั้นสูงและอุปกรณ์เฉพาะทาง ช่างเทคนิคพลังงานแสงอาทิตย์มืออาชีพมีประสบการณ์ในสถานการณ์ที่ท้าทายเหล่านี้ และสามารถเข้าถึงเครื่องมือต่างๆ เช่น กล้องถ่ายภาพความร้อนและเครื่องวิเคราะห์ไฟฟ้าขั้นสูง
ความเสียหายจากไฟไหม้ หรือมีหลักฐานของความร้อนสูงเกินไปอย่างมีนัยสำคัญ จำเป็นต้องได้รับการดูแลจากผู้เชี่ยวชาญทันที สภาวะเหล่านี้อาจบ่งชี้ถึงอันตรายด้านความปลอดภัยที่ร้ายแรง ซึ่งจำเป็นต้องได้รับการประเมินจากผู้เชี่ยวชาญเพื่อป้องกันความเสียหายของอุปกรณ์หรือการบาดเจ็บส่วนบุคคล
หากคุณไม่สบายใจในการทำงานกับระบบไฟฟ้าหรือขาดความมั่นใจในความสามารถในการแก้ไขปัญหาของคุณ ความช่วยเหลือจากมืออาชีพจะช่วยให้คุณอุ่นใจและรับรองว่าระบบทำงานได้อย่างถูกต้อง
การป้องกันปัญหาฟิวส์โซลาร์ในอนาคต
การบำรุงรักษาเชิงรุกช่วยลดโอกาสที่ฟิวส์จะขาดได้อย่างมาก และช่วยยืดอายุการใช้งานโดยรวมของระบบโซลาร์เซลล์ของคุณ การทดสอบฟิวส์พลังงานแสงอาทิตย์ เป็นส่วนหนึ่งของโปรแกรมการบำรุงรักษาที่ครอบคลุม ระบุปัญหาที่อาจเกิดขึ้นก่อนที่จะทำให้ระบบล้มเหลว
กำหนดการตรวจสอบจุดเชื่อมต่อไฟฟ้าทั้งหมดด้วยสายตาอย่างน้อยปีละสองครั้ง ตรวจหาร่องรอยการกัดกร่อน ความหลวม หรือความร้อนสูงเกินไป ทำความสะอาดและขันจุดเชื่อมต่อให้แน่นตามความจำเป็น โดยใช้แรงบิดที่เหมาะสมตามข้อกำหนดจากเอกสารของผู้ผลิต
ตรวจสอบข้อมูลประสิทธิภาพของระบบของคุณเพื่อหาแนวโน้มที่อาจบ่งชี้ถึงปัญหาที่กำลังพัฒนา การลดเอาต์พุตจากสตริงเฉพาะหรือรูปแบบกระแสไฟฟ้าที่ผิดปกติลงอย่างค่อยเป็นค่อยไปสามารถแจ้งเตือนล่วงหน้าถึงสภาวะที่อาจนำไปสู่ความล้มเหลวของฟิวส์ได้
ตรวจสอบให้แน่ใจว่าตู้ไฟฟ้าทุกตู้มีระบบป้องกันสภาพอากาศที่เหมาะสมเพื่อป้องกันความชื้นซึมผ่าน เปลี่ยนปะเก็นที่ชำรุด ปิดผนึกช่องสายไฟ และตรวจสอบว่าฝาครอบตู้ไฟฟ้าได้รับการยึดอย่างแน่นหนา
เตรียมฟิวส์สำรองที่มีค่าพิกัดที่ถูกต้องไว้ให้พร้อม เพื่อเปลี่ยนได้อย่างรวดเร็วเมื่อจำเป็น วิธีนี้ช่วยลดระยะเวลาหยุดทำงานของระบบและป้องกันการใช้ค่าพิกัดฟิวส์ที่ไม่ถูกต้องเป็นวิธีแก้ปัญหาชั่วคราว
เทคนิคการทดสอบขั้นสูง
แคลมป์มิเตอร์ DC ให้ความสามารถในการวินิจฉัยที่มีคุณค่าสำหรับการทดสอบฟิวส์พลังงานแสงอาทิตย์ขั้นสูง โดยเฉพาะในระบบที่มีสายขนานหลายสายซึ่งความไม่สมดุลของกระแสไฟอาจบ่งชี้ถึงปัญหาที่กำลังพัฒนา
เครื่องมือเหล่านี้วัดการไหลของกระแสไฟฟ้าโดยไม่ทำให้การเชื่อมต่อวงจรขาด ช่วยให้คุณสามารถตรวจสอบกระแสในสายแต่ละสายได้ในระหว่างการทำงานของระบบตามปกติ ความแตกต่างอย่างมีนัยสำคัญระหว่างสายที่คล้ายคลึงกันอาจบ่งชี้ถึงปัญหาของแผงควบคุม ปัญหาการเดินสาย หรือฟิวส์ที่อาจเสียหายได้
เมื่อทดสอบฟิวส์แบบสายในกล่องรวมสัญญาณ ให้เปรียบเทียบค่ากระแสที่อ่านได้จากวงจรป้องกันแต่ละวงจร สายที่มีแผงและสายไฟเหมือนกันควรผลิตระดับกระแสที่ใกล้เคียงกันมากภายใต้สภาวะการแผ่รังสีเดียวกัน
ใช้การถ่ายภาพความร้อน (ถ้ามี) เพื่อระบุจุดร้อนในจุดเชื่อมต่อไฟฟ้าที่อาจมองไม่เห็นในระหว่างการตรวจสอบตามปกติ อุณหภูมิที่สูงขึ้นมักนำไปสู่ปัญหาฟิวส์ขาดและปัญหาไฟฟ้าอื่นๆ
คำถามที่พบบ่อยเกี่ยวกับการทดสอบฟิวส์พลังงานแสงอาทิตย์
ฉันสามารถทดสอบฟิวส์โดยไม่ต้องถอดออกจากวงจรได้หรือไม่
ใช่ ใช้วิธีการวัดแรงดันไฟฟ้าตามที่อธิบายไว้ข้างต้น อย่างไรก็ตาม การถอดฟิวส์ออกจะให้ผลลัพธ์ที่แม่นยำยิ่งขึ้นและช่วยลดสัญญาณรบกวนที่อาจเกิดขึ้นจากเส้นทางวงจรขนาน
ฉันควรใช้การตั้งค่ามัลติมิเตอร์แบบใดสำหรับการทดสอบฟิวส์พลังงานแสงอาทิตย์?
ใช้โหมดต่อเนื่องสำหรับฟิวส์ที่ถอดออก โหมดแรงดันไฟฟ้ากระแสตรงสำหรับการทดสอบในวงจร และโหมดความต้านทานสำหรับการยืนยันเพิ่มเติม ตรวจสอบให้แน่ใจว่าแรงดันไฟฟ้าและกระแสไฟฟ้าของมิเตอร์ของคุณเกินค่ามาตรฐานของระบบ
ฉันจะรู้ได้อย่างไรว่าฟิวส์ภายในมัลติมิเตอร์ของฉันขาด?
หากมัลติมิเตอร์ของคุณไม่สามารถวัดกระแสไฟฟ้าหรือแสดงค่าที่ไม่สม่ำเสมอ ให้ทดสอบฟิวส์ภายในโดยใช้มิเตอร์อื่นหรือโดยการตรวจสอบความต่อเนื่องของฟิวส์โดยถอดมิเตอร์ออก
ความแตกต่างระหว่างฟิวส์ขาดเร็วและฟิวส์ขาดช้าในการใช้งานพลังงานแสงอาทิตย์คืออะไร?
ฟิวส์แบบเป่าเร็วจะตอบสนองต่อสภาวะกระแสเกินได้ทันที ในขณะที่ฟิวส์แบบเป่าช้าจะทนต่อกระแสไฟกระชากระยะสั้นๆ ได้ โดยทั่วไปแล้ว การใช้งานพลังงานแสงอาทิตย์จะใช้ฟิวส์แบบเป่าช้าเพื่อรองรับกระแสไฟขณะสตาร์ทปกติและการเปลี่ยนแปลงที่เกิดจากก้อนเมฆระยะสั้นๆ
โดยปฏิบัติตามขั้นตอนการทดสอบที่ครอบคลุมเหล่านี้และเข้าใจหลักการเบื้องหลัง การแก้ไขปัญหาฟิวส์ DC พลังงานแสงอาทิตย์ ระบบต่างๆ จะช่วยให้คุณรักษาการทำงานที่เชื่อถือได้ของระบบโซลาร์เซลล์ของคุณ พร้อมทั้งมั่นใจในความปลอดภัยของทั้งอุปกรณ์และบุคลากร การทดสอบและการบำรุงรักษาเชิงรุกอย่างสม่ำเสมอจะช่วยเพิ่มประสิทธิภาพและอายุการใช้งานของการลงทุนด้านพลังงานแสงอาทิตย์ของคุณให้สูงสุด
เกี่ยวข้องกัน
ฟิวส์ AC เทียบกับฟิวส์ DC: คู่มือทางเทคนิคฉบับสมบูรณ์สำหรับการป้องกันไฟฟ้าอย่างปลอดภัย
