
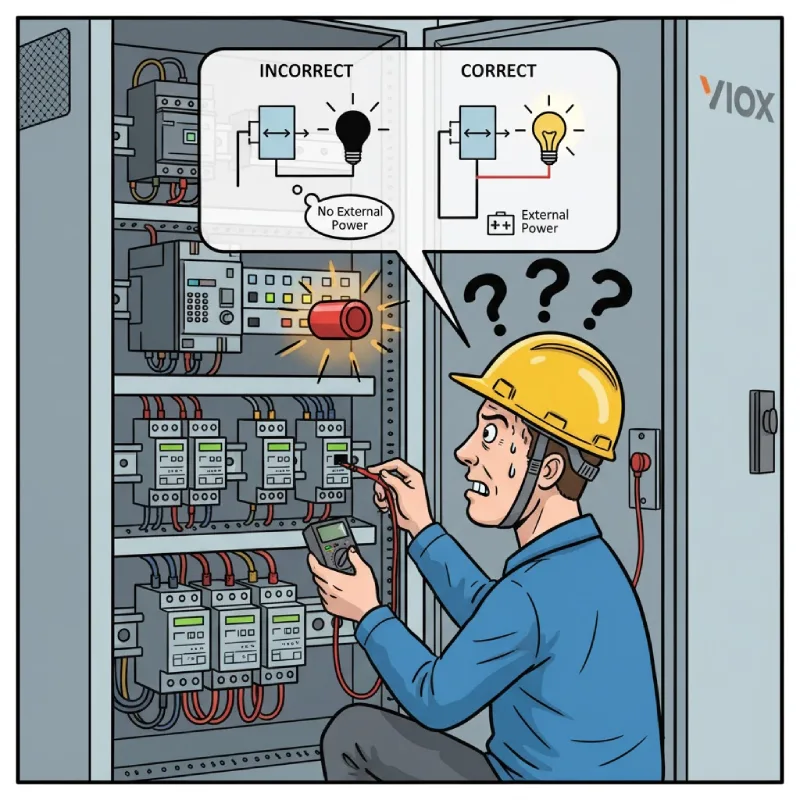
သင်သည် PLC သို့ အချက်အလက်ပို့သော proximity sensor များ၊ relay output များမှတစ်ဆင့် solenoid valve အစုအဝေးကို မောင်းနှင်သော control panel အသစ်တစ်ခုတွင် ဝါယာကြိုးများ တပ်ဆင်ခြင်းကို ယခုမှပင် ပြီးစီးခဲ့သည်။ schematic သည် အပြစ်အနာအဆာကင်းမဲ့ပြီး သင်၏ ဝါယာကြိုးအမှတ်အသားများသည် အလွန်ကိုက်ညီကာ continuity စမ်းသပ်မှုများသည် အောင်မြင်စွာ ပြီးဆုံးခဲ့သည်။.
သို့သော် သင်သည် စနစ်ကို စတင်အသုံးပြုသောအခါ မည်သည့်အရာမျှ ဖြစ်မလာပါ။ သင်သည် sensor ကို ကိုယ်တိုင်စတင်အသုံးပြုသည့်အခါ၌ပင် PLC input LED သည် မှောင်နေသည်။ သို့မဟုတ် ထိုထက်ဆိုးသည်မှာ တစ်နာရီလျှင် ထောင်ပေါင်းများစွာကုန်ကျသော မလိုလားအပ်သည့် ရပ်တန့်မှုများကို ဖြစ်စေသည့် ကျပန်းမှားယွင်းသော စတင်အသုံးပြုမှုများကို သင်ရရှိသည်။ သုံးနာရီကြာ ဆားကစ်များကို လိုက်လံရှာဖွေပြီးနောက် သင်သည် တရားခံကို နောက်ဆုံးတွင် ရှာဖွေတွေ့ရှိခဲ့သည်- relay output သည် load သို့ ပါဝါပေးမည်ဟု သင်ယူဆခဲ့သော်လည်း ၎င်းသည် ပြင်ပအရင်းအမြစ်တစ်ခု လိုအပ်သော dry contact တစ်ခုဖြစ်သည်။.
ဤတစ်ခုတည်းသော နားလည်မှုလွဲမှားခြင်း—wet contact နှင့် dry contact—သည် control system စတင်အသုံးပြုမှု နှောင့်နှေးမှု၏ ခန့်မှန်းခြေအားဖြင့် ၄၀% ကို ဖြစ်စေပြီး field engineer များက အစီရင်ခံသော နံပါတ်တစ် ဝါယာကြိုးအမှားဖြစ်သည်။. ထို့ကြောင့် သင်သည် မည်သည့် contact အမျိုးအစားကို ကိုင်တွယ်နေရသည်ကို မည်သို့လျင်မြန်စွာ ခွဲခြားသတ်မှတ်နိုင်မည်နည်း၊ ၎င်းကို ပထမဆုံးအကြိမ်တွင် မှန်ကန်စွာ ဝါယာကြိုးတပ်ဆင်နိုင်မည်နည်း၊ ပြီးပြည့်စုံသော ဒီဇိုင်းများကို အဖျက်အဆီးဖြစ်စေသော ဗို့အားမကိုက်ညီမှုများကို မည်သို့ရှောင်ရှားနိုင်မည်နည်း။
ဤလမ်းညွှန်သည် ပြန်လည်ပြုပြင်ခြင်းနှင့် အန္တရာယ်ရှိသော အမှားများကို ဖယ်ရှားရန်အတွက် contact အမျိုးအစားနှစ်ခုလုံးကို ခွဲခြားသတ်မှတ်ခြင်း၊ ဝါယာကြိုးတပ်ဆင်ခြင်းနှင့် ပြဿနာဖြေရှင်းခြင်းအတွက် လက်တွေ့ကျသော သုံးဆင့်နည်းလမ်းတစ်ခုဖြစ်သည့် ပြီးပြည့်စုံသောအဖြေကို ပေးထားပါသည်။.
ဤရှုပ်ထွေးမှုသည် အဘယ်ကြောင့် ဖြစ်ပွားရသနည်း (နှင့် အဘယ်ကြောင့် အရေးပါသနည်း)
အဓိကပြဿနာမှာ ထုတ်လုပ်သူများသည် လုံးဝကွဲပြားခြားနားသော switching အတွေးအခေါ်နှစ်ခုအောက်တွင် လုပ်ဆောင်ကြပြီး ၎င်းတို့ရွေးချယ်ထားသည့်အရာကို ရှင်းပြခဲခြင်းဖြစ်သည်။.
အချို့သောကိရိယာများကို ရိုးရှင်းစေရန်အတွက် ဒီဇိုင်းထုတ်ထားသည်။. ဥပမာအားဖြင့် စက်မှုအာရုံခံကိရိယာများသည် ဝါယာကြိုးနှစ်ခုပေါ်တွင် ပါဝါကို လက်ခံရရှိပြီး စတင်အသုံးပြုသောအခါ တတိယဝါယာကြိုးပေါ်တွင် ထိုပါဝါကို ထုတ်ပေးသည်—အရာအားလုံးသည် တူညီသောဗို့အား (ပုံမှန်အားဖြင့် 24V DC) တွင် လည်ပတ်သည်။ ဤသည်မှာ wet contactဖြစ်သည်- ပါဝါဝင်သည် ပါဝါထွက်နှင့် ညီမျှပြီး ဆားကစ်တစ်ခုတည်းတွင် ပေါင်းစပ်ထားသည်။.
အခြားကိရိယာများကို လိုက်လျောညီထွေဖြစ်စေရန်နှင့် လျှပ်စစ်ပိုင်းဆိုင်ရာ သီးခြားခွဲထားရန်အတွက် ဒီဇိုင်းထုတ်ထားသည်။. Relay များနှင့် PLC output module များသည် ရိုးရှင်းသော on/off switch ကဲ့သို့ လုပ်ဆောင်သည်- ၎င်းတို့သည် သီးခြား ပါဝါအရင်းအမြစ်သည် load သို့ ရောက်ရှိခြင်းရှိမရှိကို ထိန်းချုပ်သော်လည်း ၎င်းတို့ကိုယ်တိုင် ထိုပါဝါကို မပေးပါ။ ဤသည်မှာ dry contactဖြစ်သည်- switching လုပ်ဆောင်ချက်ကို control voltage မှ လျှပ်စစ်ပိုင်းဆိုင်ရာ သီးခြားခွဲထားသည်။.
ဤအရာများကို ရောနှောလိုက်ပါက သင်လိုအပ်သည့်နေရာတွင် ပါဝါမရှိခြင်း (ပြင်ပထောက်ပံ့မှုမရှိဘဲ dry contact သို့ load ကို ချိတ်ဆက်ခြင်း) သို့မဟုတ် သင်မမျှော်လင့်ထားသည့်နေရာတွင် အန္တရာယ်ရှိသော ဗို့အားတုံ့ပြန်မှု (dry switching အတွက် ဒီဇိုင်းထုတ်ထားသော input သို့ wet contact ကို ပြန်လည်ထည့်သွင်းခြင်း) ရှိလိမ့်မည်။.
လောင်းကြေးများ မြင့်မားသည်- မသင့်လျော်သော contact အသုံးပြုမှုသည် ရပ်တန့်ချိန်ကိုသာ ဖြစ်စေသည်မဟုတ်—၎င်းသည် ဈေးကြီးသော PLC I/O card များကို ပျက်စီးစေနိုင်သည်၊ signal ဆူညံသံကို ထုတ်ပေးသော ground loop များကို ဖန်တီးနိုင်သည် သို့မဟုတ် control နှင့် power circuit များအကြား galvanic isolation လိုအပ်သော လျှပ်စစ်ကုဒ်များကို ချိုးဖောက်နိုင်သည်။.
အဓိကကွာခြားချက်ကို နားလည်ခြင်း- မီးဖိုချောင်မီး အလားတူဥပမာ
ဝါယာကြိုးတပ်ဆင်ခြင်းသို့ မ၀င်ရောက်မီ ရင်းနှီးကျွမ်းဝင်သော ဥပမာကို အသုံးပြု၍ ရှင်းလင်းသော စိတ်ကူးပုံစံကို တည်ဆောက်ကြပါစို့။.
dry contact သည် သင်၏မီးဖိုချောင်နံရံရှိ မီးခလုတ်နှင့်တူသည်။. ခလုတ်ကို နှိပ်လိုက်ပါက မျက်နှာကျက်မီးသည် ပွင့်လာမည်—သို့သော် ခလုတ်ကိုယ်တိုင်က မည်သည့်လျှပ်စစ်ကိုမျှ မထုတ်ပေးပါ။ ၎င်းသည် သင်၏လျှပ်စစ် panel မှ မီးချောင်းသို့ ပါဝါစီးဆင်းခြင်းရှိမရှိကို ရိုးရှင်းစွာ ထိန်းချုပ်သည်။ ခလုတ်သည် အခြားအရာတစ်ခု (သင်၏ အနိုင်အထက် panel) မှ ပါဝါပေးထားသော ဆားကစ်တစ်ခုရှိ စက်ပိုင်းဆိုင်ရာ တံတားတစ်ခုသာဖြစ်သည်။ သင်သည် ထိုခလုတ်ကို 120V AC မီးထွန်းခြင်း၊ 24V DC LED strip များ သို့မဟုတ် 480V motor starter ကို ထိန်းချုပ်ရန် ဝါယာကြိုးတပ်ဆင်နိုင်သည်—ခလုတ်သည် ပါဝါကို မပေးသောကြောင့် ဂရုမစိုက်ပါ။.
wet contact သည် built-in switch ပါသော ဘက်ထရီပါဝါသုံး LED ဓာတ်မီးနှင့်တူသည်။. ဘက်ထရီ (ပါဝါအရင်းအမြစ်) နှင့် switch နှစ်ခုလုံးသည် အိမ်တစ်ခုတည်းအတွင်း၌ ရှိသည်။ ခလုတ်ကို နှိပ်လိုက်ပါက ပေါင်းစပ်ပါဝါသည် LED သို့ ချက်ချင်းစီးဆင်းသွားသည်။ သင်သည် ဤ switch ကို အခြားဗို့အားကို ထိန်းချုပ်ရန် အသုံးမပြုနိုင်ပါ—၎င်းသည် ဘက်ထရီပေးသည့်အရာ (ဥပမာ 3V DC) နှင့် ချိတ်ဆက်ထားသည်။ ပါဝါထောက်ပံ့မှုနှင့် switching ယန္တရားကို ဆားကစ်တစ်ခုတည်းတွင် အမြဲတမ်းပေါင်းစပ်ထားသည်။.
စက်မှုအသုံးအနှုန်းများတွင်-
- Dry contact = voltage-free, potential-free, passive switching (လွှင် contacts, PLC outputs)
- Wet contact = powered output, active switching (proximity အများစု အာရုံခံကိရိယာများ, smart switch အချို့)
အဓိကမှတ်သားရန်အချက်- dry contact သည် ၎င်း switching လုပ်နေသော ဆားကစ်သို့ ပြင်ပပါဝါကို ပေးရန် သင့်အား လိုအပ်သည်။ wet contact တွင် ပါဝါ built-in ရှိပြီး load သို့ တိုက်ရိုက်ထောက်ပံ့ပေးသည်။ ဤအရာကို မှားယွင်းစွာလုပ်ဆောင်ပါက သင်၏ဆားကစ်သည် စတင်သည်နှင့် တစ်ပြိုင်နက် သေသွားမည်ဖြစ်သည်။.
3-ဆင့်နည်းလမ်း- ခွဲခြားသတ်မှတ်ခြင်း၊ ဝါယာကြိုးတပ်ဆင်ခြင်းနှင့် ပြဿနာဖြေရှင်းခြင်း
အဆင့် 1- Contact အမျိုးအစားကို စက္ကန့် 30 အတွင်း ခွဲခြားသတ်မှတ်ပါ (ဝါယာကြိုးအရေအတွက် စည်းမျဉ်း)
အင်ဂျင်နီယာအများစုသည် ရိုးရှင်းသော ဝါယာကြိုးအရေအတွက်က သင့်အား အဖြေကို ချက်ချင်းပေးနိုင်သည့်အခါ ဒေတာစာရွက်များကို ရှာဖွေရာတွင် အချိန်ကုန်ကြသည်။.
လျင်မြန်စွာ ခွဲခြားသတ်မှတ်ခြင်းနည်းလမ်း-
ကိရိယာတွင် ဝါယာကြိုး 3 ခုတိတိရှိပါက → ၎င်းသည် အမြဲလိုလို wet contact ဖြစ်သည်။.
- ဝါယာကြိုးနှစ်ခုသည် ကိရိယာကိုယ်တိုင်ကို ပါဝါပေးသည် (ဥပမာ +24V နှင့် 0V)
- တတိယဝါယာကြိုးသည် သင်၏ load သို့ တူညီသောဗို့အားကို ပေးသော switched output ဖြစ်သည်
- ဥပမာ- Brown (+24V supply), Blue (0V supply) နှင့် Black (switched +24V output) ပါသော PNP proximity sensor
ကိရိယာတွင် ဝါယာကြိုး 4 ခု သို့မဟုတ် ထို့ထက်ပို၍ရှိပါက → ၎င်းသည် များသောအားဖြင့် dry contact ဖြစ်သည်။.
- ဝါယာကြိုးနှစ်ခုသည် ကိရိယာ၏အတွင်းပိုင်းဆားကစ် (relay များအတွက် coil voltage) ကို ပါဝါပေးသည်
- နောက်ထပ် ဝါယာကြိုးနှစ်ခု သို့မဟုတ် ထို့ထက်ပို၍သည် လုံးဝသီးခြားဆားကစ်တစ်ခုကို switching လုပ်သော သီးခြား contact terminal များ (COM, NO, NC) ဖြစ်သည်
- ဥပမာ- တစ်ဖက်တွင် 24V AC coil terminal များပါရှိပြီး အခြားတစ်ဖက်တွင် 250V AC switching အတွက် အဆင့်သတ်မှတ်ထားသော dry contact terminal များ (COM, NO, NC) ပါသော control relay
ကိရိယာတွင် ဝါယာကြိုး 2 ခုသာရှိပါက → ၎င်းသည် သေချာပေါက် dry contact ဖြစ်သည်။.
- ဤအရာများသည် contact terminal များကိုယ်တိုင်ဖြစ်သည် (ပုံမှန်အားဖြင့် COM နှင့် NO သို့မဟုတ် NO နှင့် NC)
- switching ယန္တရားသည် ပိုကြီးသောကိရိယာတစ်ခု၏အတွင်းပိုင်းတွင်ရှိသည် (VFD သို့မဟုတ် process controller တွင် built-in relay output ကဲ့သို့)
- ဥပမာ- fault signaling အတွက် programmable relay terminal များပါသော VFD—“R1A” နှင့် “R1C” ဟု အမည်တပ်ထားသော screw terminal နှစ်ခုသာ”
Terminal အမှတ်အသား အရိပ်အမြွက်များ-
Dry contact များတွင် အောက်ပါကဲ့သို့ အမှတ်အသားများ ပါရှိလိမ့်မည်-
- COM (Common), NO (Normally Open), NC (Normally Closed)
- ဗို့အားအမှတ်အသားမပါသော C1, C2 (Contact 1, Contact 2)
- “ဒေတာစာရွက်တွင် ”Voltage-free output“ သို့မဟုတ် ”Potential-free relay"
Wet contact များတွင် အောက်ပါကဲ့သို့ အမှတ်အသားများ ပါရှိလိမ့်မည်-
- ဗို့အားသတ်မှတ်ချက်ပါသော OUT, OUTPUT သို့မဟုတ် LOAD (ဥပမာ “OUT 24V DC”)
- PNP သို့မဟုတ် NPN (transistor output အမျိုးအစားများ၊ နှစ်ခုလုံးသည် wet ဖြစ်သည်)
- “+24V Switched” သို့မဟုတ် “Power Output”
-အစွန်အဖျား#၁: PLC output module များသည် စတင်သူများအတွက် ထောင်ချောက်တစ်ခုဖြစ်သည်။ module spec တွင် “24V DC Output” ဟု ဖော်ပြထားလျှင်ပင် ၎င်းသည် 24V ကို ပေးသည်ဟု မဆိုလိုပါ။ ၎င်းသည် 24V ဆားကစ်များနှင့် တွဲဖက်အသုံးပြုနိုင်သည် ဟု ဆိုလိုသည်—သို့သော် သင်သည် ထိုဗို့အားကို သီးခြား common (COM) terminal မှတစ်ဆင့် ထောက်ပံ့ပေးရမည်ဖြစ်သည်။. စံ PLC output အားလုံးသည် dry contact များဖြစ်သည်။. ထူးခြားသော “အရင်းအမြစ်ရှာဖွေခြင်း” မော်ဂျူးများသည် ထုတ်လုပ်မှုစွမ်းအားကို ပေးစွမ်းနိုင်သည်ဟု တိတိကျကျ တံဆိပ်ကပ်ထားသော မော်ဂျူးများသာ ခြွင်းချက်ဖြစ်ပြီး ၎င်းတို့သည် ရှားပါးပြီး ဈေးကြီးပါသည်။.
အဆင့် ၂- မှန်ကန်စွာ ဝါယာကြိုးတပ်ဆင်ပါ—ပထမအကြိမ်တိုင်း၊ အကြိမ်တိုင်း
သင်သည် contact အမျိုးအစားကို ခွဲခြားသတ်မှတ်ပြီးပြီဆိုလျှင်၊ ဤတွင် မည်သည့် configuration ကိုမဆို အမှားအယွင်းမရှိဘဲ ဝါယာကြိုးတပ်ဆင်နည်းကို ဖော်ပြထားပါသည်။.
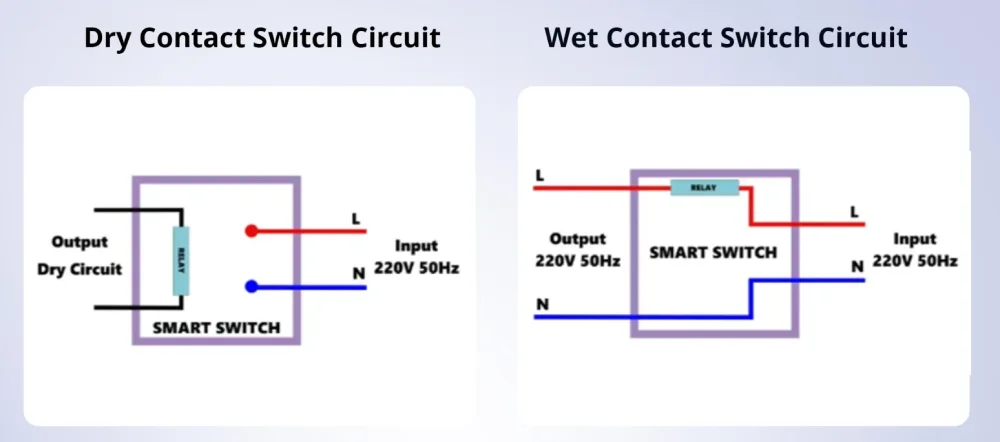
Dry Contact Wiring Architecture- ပြင်ပပါဝါစည်းမျဉ်း
dry contact တစ်ခုသည် ပြင်ပပါဝါအရင်းအမြစ်ကို အသုံးပြု၍ circuit တစ်ခုလုံးကို တည်ဆောက်ရန် လိုအပ်သည်။ ၎င်းကို loop တစ်ခုဖန်တီးခြင်းဟု မှတ်ယူပါ- ပါဝါအရင်းအမြစ် → dry contact → load → ပါဝါအရင်းအမြစ်သို့ ပြန်သွားပါ။.
PLC Input အတွက် Standard Dry Contact Wiring-
- သင်၏ ပြင်ပပါဝါထောက်ပံ့မှုကို ခွဲခြားသတ်မှတ်ပါ (များသောအားဖြင့် 24V DC panel ထောက်ပံ့မှု)
- အပေါင်း (+) ဘက်ကို ချိတ်ဆက်ပါ သင်၏ PLC input module ၏ “IN” သို့မဟုတ် “COM” terminal သို့ ပါဝါထောက်ပံ့မှု
- PLC input terminal မှ ဝါယာကြိုးတစ်ခုကို ဆွဲထုတ်ပါ (ဥပမာ၊ I0.0) သင်၏ dry contact ၏ တစ်ဖက်သို့ (ဥပမာ၊ sensor ၏ COM terminal)
- contact ၏ အခြားတစ်ဖက်ကို ချိတ်ဆက်ပါ (ဥပမာ၊ sensor ၏ NO terminal) ပါဝါထောက်ပံ့မှု၏ အနုတ် (−) ဘက်သို့ ပြန်သွားပါ (0V သို့မဟုတ် ground)
- dry contact ပိတ်သောအခါ၊, ၎င်းသည် circuit ကို ပြီးမြောက်စေသည်- +24V သည် COM မှ → ပိတ်ထားသော contact မှတဆင့် → PLC input မှတဆင့် → 0V သို့ စီးဆင်းပြီး input LED ကို ဖွင့်ပေးသည်
ရှောင်ရှားရန် အရေးကြီးသော အမှား- dry contact output (relay NO terminal ကဲ့သို့) သည် ပိတ်သောအခါတွင် ဗို့အားကို “ပေးလိမ့်မည်” ဟု ဘယ်သောအခါမှ မယူဆပါနှင့်။ ၎င်းသည် ပေးမည်မဟုတ်ပါ။ သင့်လျော်သော ပြင်ပပါဝါဝါယာကြိုးများမှတစ်ဆင့် ဗို့အားကို သင်ကိုယ်တိုင် ပေးရပါမည်။.
Load ကို မောင်းနှင်နေသော PLC Output အတွက် Standard Dry Contact Wiring-
- သင်၏ ပြင်ပပါဝါထောက်ပံ့မှု အပေါင်း (+) ကို ချိတ်ဆက်ပါ သင်၏ PLC output module ၏ “OUT COM” terminal သို့
- PLC output terminal မှ ဝါယာကြိုးတစ်ခုကို ဆွဲထုတ်ပါ (ဥပမာ၊ Q0.0) သင်၏ load ၏ တစ်ဖက်သို့ တိုက်ရိုက် (ဥပမာ၊ solenoid valve ၏ အပေါင်း terminal)
- load ၏ အခြားတစ်ဖက်ကို ချိတ်ဆက်ပါ (solenoid ၏ အနုတ် terminal) ပါဝါထောက်ပံ့မှု အနုတ် (−) သို့ ပြန်သွားပါ
- PLC သည် output Q0.0 ကို အသက်သွင်းသောအခါ၊, dry contact သည် ပိတ်ပြီး circuit ကို ပြီးမြောက်စေသည်- +24V → load → 0V၊ solenoid ကို စွမ်းအင်ပေးသည်
Key Takeaway- dry contact များဖြင့်၊ သင်သည် ပါဝါထောက်ပံ့မှု၏ circuit ဒီဇိုင်နာဖြစ်သည်။ dry contact သည် သင်၏ loop ရှိ switch တစ်ခုသာဖြစ်သည်။ အမြဲတမ်း လမ်းကြောင်းတစ်ခုလုံးကို ခြေရာခံပါ- ပါဝါအရင်းအမြစ် → contact → load → ပြန်သွားပါ။.
Wet Contact Wiring Architecture- တိုက်ရိုက်ချိတ်ဆက်မှု
wet contact များသည် ပါဝါကို တည်ဆောက်ထားသောကြောင့် ပိုမိုရိုးရှင်းပါသည်။ contact ပြောင်းသောအခါတွင် ထိုပေါင်းစပ်ပါဝါကို လက်ခံရရှိရန် load ကို ချိတ်ဆက်နေရုံသာဖြစ်သည်။.
Standard Wet Contact Wiring (PNP Sensor မှ PLC သို့)-
- sensor ကို ပါဝါပေးပါ ဝါယာကြိုးနှစ်ခုကို အသုံးပြု၍- Brown ကို +24V သို့၊ Blue ကို 0V သို့
- sensor ၏ output ဝါယာကြိုးကို ချိတ်ဆက်ပါ (PNP sensor တွင် အနက်ရောင်) PLC input terminal သို့ တိုက်ရိုက် (ဥပမာ၊ I0.0)
- PLC input common ကို ချိတ်ဆက်ပါ 0V သို့ (အတွင်းပိုင်းတွင် ground မထားပါက)
- sensor စတင်သောအခါ၊, ၎င်း၏ အတွင်းပိုင်း transistor သည် ပြောင်းလဲသွားပြီး sensor အတွင်း၌ ရှိနှင့်ပြီးသော +24V သည် အနက်ရောင်ဝါယာကြိုးမှ PLC input သို့ စီးဆင်းသည်—ပြင်ပပါဝါ loop မလိုအပ်ပါ
ဗို့အားလိုက်ဖက်မှုသတိပေးချက်- wet contact များတွင် သတ်မှတ်ထားသော အတွင်းပိုင်းဗို့အား (များသောအားဖြင့် 10-30V DC) ရှိသောကြောင့် load သည် ထိုဗို့အားအတိအကျအတွက် အဆင့်သတ်မှတ်ထားရမည်ဖြစ်သည်။ 12V DC load ကို 24V DC wet contact output သို့ ချိတ်ဆက်ခြင်းသည် load ကို ပျက်စီးစေလိမ့်မည်။ ဗို့အားသတ်မှတ်ချက်များကို အမြဲစစ်ဆေးပါ။.
-အစွန်အဖျား#၂: wet contact sensor များကို PLC များသို့ ချိတ်ဆက်သောအခါ၊ sourcing နှင့် sinking logic ကို အာရုံစိုက်ပါ။ PNP sensor များ (sourcing) သည် စတင်သောအခါ +24V ကို ထုတ်ပေးပြီး sinking PLC input များဖြင့် အလုပ်လုပ်သည်။ NPN sensor များ (sinking) သည် စတင်သောအခါ 0V ကို ထုတ်ပေးပြီး sourcing PLC input များဖြင့် အလုပ်လုပ်သည်။ ၎င်းတို့ကို လွဲမှားစွာ ချိတ်ဆက်ပါက၊ သင်သည် ပြောင်းပြန် logic သို့မဟုတ် signal လုံးဝမရရှိနိုင်ပါ။ ခေတ်မီ PLC အများစုသည် sinking input များကို အသုံးပြုသည် (PNP sensor များနှင့် တွဲဖက်အသုံးပြုနိုင်သည်)၊ သို့သော် အမြဲစစ်ဆေးပါ။.
အဆင့် ၃- ပရော်ဖက်ရှင်နယ်တစ်ဦးကဲ့သို့ ပြဿနာဖြေရှင်းပါ—ဗို့အားတိုင်းတာခြင်းနည်းစနစ်များ
မှန်ကန်သော ခွဲခြားသတ်မှတ်ခြင်းနှင့် ဝါယာကြိုးတပ်ဆင်ခြင်းများ ပြုလုပ်ထားသော်လည်း ပြဿနာများ ပေါ်ပေါက်လာသည်။ ၎င်းတို့ကို စနစ်တကျ မည်သို့ရှာဖွေရမည်ကို ဤတွင် ဖော်ပြထားပါသည်။.
Dry Contact ပြဿနာဖြေရှင်းခြင်း
ပြဿနာ- sensor/contact စတင်သော်လည်း PLC input သည် မဖွင့်ပါ။
ရောဂါရှာဖွေရေး အဆင့်များ-
- PLC input terminal နှင့် COM တစ်လျှောက် ဗို့အားကို တိုင်းတာပါ contact ပိတ်ထားသောအခါ။ သင်သည် သင်၏ ထောက်ပံ့ဗို့အား (ဥပမာ၊ 24V DC) ကို ဖတ်သင့်သည်။ 0V ကို ဖတ်ပါက၊ ပြင်ပပါဝါသည် input သို့ မရောက်ရှိပါ။.
- dry contact တစ်လျှောက် ဆက်တိုက်ရှိမရှိ စစ်ဆေးပါ စတင်ထားသော အခြေအနေတွင်။ circuit ကို စွမ်းအင်မပေးထားဘဲ၊ ပိတ်ထားသောအခါ သုညအနီးရှိ ohms ကို တိုင်းတာသင့်သည်။ အဆုံးမရှိ ခုခံမှုကို ဖတ်ပါက၊ contact သည် ပွင့်နေသည် (စက်ပိုင်းဆိုင်ရာ ချို့ယွင်းမှု သို့မဟုတ် သံချေးတက်ခြင်း)။.
- ပြင်ပပါဝါထောက်ပံ့မှုကို စစ်ဆေးပါ ဗို့အားကို အမှန်တကယ် ပေးနေခြင်း ရှိမရှိ။ 24V ထောက်ပံ့မှုတွင် ခလုတ်တိုက်ထားသော breaker သို့မဟုတ် လွင့်စင်သွားသော fuse သည် ထိုအရင်းအမြစ်ကို အသုံးပြုထားသော circuit အားလုံးကို ပျက်စီးစေလိမ့်မည်။.
-အစွန်အဖျား#၃: အဖြစ်အများဆုံး dry contact ဝါယာကြိုးအမှားမှာ အဘယ်နည်း။ load return path ကို 0V သို့ ချိတ်ဆက်ရန် မေ့သွားခြင်း။ အင်ဂျင်နီယာများသည် အပေါင်းဘက်ကို မှန်ကန်စွာ ဝါယာကြိုးတပ်ဆင်သော်လည်း အနုတ်ဘက်ကို လွတ်ထားခဲ့သည်။ loop တစ်ခုလုံးကို အတည်ပြုရန် voltmeter ကို အသုံးပြုပါ- load ၏ အနုတ် terminal နှင့် ပါဝါထောက်ပံ့မှု၏ 0V rail ကြားတွင် 0V ကို တိုင်းတာသင့်သည်။ ဤနေရာတွင် မည်သည့်ဗို့အားမဆို return path ပျက်စီးနေသည်ဟု ဆိုလိုသည်။.
ပြဿနာ- ကြားဖြတ်စတင်ခြင်း၊ ဆူညံသံ သို့မဟုတ် မှားယွင်းသော signal များ
အဓိကအကြောင်းရင်း- dry contact များသည် ထိန်းချုပ်မှုနှင့် ပါဝါ circuit များကို ရုပ်ပိုင်းဆိုင်ရာအရ ခွဲထုတ်ထားသော်လည်း ရှည်လျားသော ဝါယာကြိုးများသည် အနီးအနားရှိ မော်တာများ သို့မဟုတ် VFD များမှ လျှပ်စစ်သံလိုက်ဝင်ရောက်စွက်ဖက်မှု (EMI) ကို ရရှိနိုင်သည်။.
ဖြေရှင်းချက်:
- twisted-pair shielded cable ကို အသုံးပြုပါ dry contact ဝါယာကြိုးအတွက်၊ shield ကို panel အဆုံးတွင်သာ ground ထားပါ (နှစ်ဖက်စလုံးတွင် မဟုတ်ပါ—၎င်းသည် ground loop ကို ဖန်တီးသည်)
- ferrite core တစ်ခုထည့်ပါ မြင့်မားသော ကြိမ်နှုန်းဆူညံသံကို ဖယ်ရှားရန် PLC အနီးရှိ cable သို့
- ပြင်းထန်ပါက၊ optoisolator သို့မဟုတ် signal conditioner ကို တပ်ဆင်ပါ dry contact နှင့် PLC input အကြားတွင် လျှပ်စစ်ပိုင်းဆိုင်ရာ သီးခြားခွဲထုတ်မှုကို ပိုမိုပေးစွမ်းနိုင်ရန်
Wet Contact ပြဿနာဖြေရှင်းခြင်း
ပြဿနာ- sensor output သည် မှန်ကန်သော ဗို့အားကို ဖတ်သော်လည်း load သည် အသက်မဝင်ပါ။
ရောဂါရှာဖွေရေး အဆင့်များ-
- Measure the wet contact’s output current capability in the datasheet. Most sensor outputs are rated for only 100-200mA. If your load draws more (e.g., a large indicator light or relay coil), the sensor’s internal transistor is in current-limiting or has failed.
- ဖြေရှင်းချက်: Add an interposing relay. Use the wet contact sensor output to drive a small relay coil (50mA), and use that relay’s dry contacts to switch the higher-current load with external power.
-အစွန်အဖျား#၄: Wet contact sensors have a “voltage drop” specification (typically 2-3V). This means when the sensor is triggered and outputting, you won’t measure the full supply voltage—you’ll measure 21-22V instead of 24V. This is normal and won’t affect most DC loads, but it can cause issues with sensitive electronics expecting a clean 24V. Factor this drop into your design.
Problem: Wet contact overheats or fails prematurely
Root cause: Exceeding the output’s current or voltage rating. Wet contacts have strict electrical limits because the switching element (usually a transistor) is embedded in the same compact housing as the sensor circuitry.
ဖြေရှင်းချက်:
- Never exceed the rated output current (check datasheet for “Output Current” spec, usually 100-250mA for sensors)
- For higher loads, use the wet contact to trigger a relay or solid-state switch rated for the actual load current
- Ensure adequate heat dissipation—don’t mount sensors in enclosed, unventilated boxes if they’re switching near their current limit
Key Takeaway #3: Wet contacts sacrifice flexibility for simplicity. They’re perfect for low-power signaling (sensors to PLCs, status indicators), but they’re poor choices for directly driving high-current loads like motors, solenoids, or heaters. For those applications, use dry contact relays with appropriate external power supplies.
Application Selection Guide: When to Use Each Type
Choose Dry Contacts When:
- You need electrical isolation between control and load circuits (required by many safety standards like NFPA 79)
- Load voltage differs from control voltage (e.g., 24V DC PLC controlling a 120V AC solenoid)
- Long cable runs are involved, and you need noise immunity (dry contacts with proper shielding excel here)
- High-current loads require switching (use a dry contact relay rated for 10A, 20A, or higher)
- Multiple voltage systems coexist in one panel (dry contacts let you mix 24V DC sensors, 120V AC indicators, and 480V contactors)
Practical example: A PLC controlling an industrial oven. The PLC outputs are 24V DC dry contacts that drive 120V AC contactor coils, which in turn switch 480V three-phase power to heating elements. Each stage is electrically isolated for safety and code compliance.
Choose Wet Contacts When:
- Simplicity matters more than flexibility (residential/commercial HVAC controls, basic machinery)
- All devices operate at the same voltage (uniform 24V DC control system)
- Low-power signaling is the primary function (sensors communicating with PLCs or microcontrollers)
- Installation cost must be minimized (wet contacts require fewer power wires and less field wiring labor)
Practical example: A smart building system with dozens of occupancy sensors feeding a BACnet controller. All devices run on 24V DC, sensor outputs are 50mA max, and the simplified 3-wire connections (power, ground, signal) reduce installation time by 30% compared to dry contact wiring.
Standards, Safety, and Compliance Considerations
Electrical codes and safety standards often dictate which contact type you must use:
Dry Contact Requirements:
- IEC 60664-1 specifies minimum creepage and clearance distances for isolation between circuits—dry contacts must meet these spacing requirements
- အဆိုပါ ၅၀၈A for industrial control panels requires isolation between Class 1 (line voltage) and Class 2 (low voltage) circuits—dry contacts provide this inherently
- NFPA ၇၉ for industrial machinery mandates isolation between operator controls and power circuits in safety-critical applications
Wet Contact Applications:
- UL 60730 for automatic electrical controls (thermostats, HVAC controls) permits wet contacts in low-voltage, non-isolated circuits
- ISO 16750-2 for automotive electronics allows wet contact switching for in-vehicle 12V DC systems where isolation isn’t required
-အစွန်အဖျား#၅: When in doubt, default to dry contacts for industrial applications. They provide the electrical isolation that most codes require, and the added wiring complexity is a minor trade-off for legal compliance and enhanced safety. Wet contacts are best reserved for pre-engineered systems where the manufacturer has already validated the design for code compliance.
Conclusion: Master the Distinction, Eliminate the Guesswork
By applying this three-step method—identify the contact type using wire count and terminal labels, wire it according to the correct architecture, and troubleshoot using systematic voltage measurements—you’ll eliminate the most common source of control system wiring failures.
Here’s what you’ve gained:
- 30-second identification using the wire count rule, saving hours of datasheet searches
- First-time-right wiring by understanding whether to provide external power (dry) or rely on integrated power (wet)
- Rapid troubleshooting using voltage measurement techniques that pinpoint open circuits, isolation failures, and current overloads
- Confident specification knowing when to choose dry contacts (for isolation, flexibility, high current) versus wet contacts (for simplicity, low power, uniform voltage)
The next time you energize a control panel and every input LED lights up perfectly on the first try, you’ll know it’s because you understood one fundamental principle: dry contacts switch separate circuits, wet contacts provide integrated power—and you wired accordingly.
Ready to put this knowledge into practice? Download our free Dry vs. Wet Contact Wiring Checklist (includes terminal identification flowchart, voltage measurement procedure, and troubleshooting decision tree) to keep this guide at your fingertips during commissioning. When your next project demands flawless control system integration, you’ll wire it right—the first time.
