
ကွန်တက်တာတစ်ခုကို စနစ်တကျ စမ်းသပ်ရန်၊ အလွယ်ဆုံး စစ်ဆေးမှုများမှ စတင်ပါ- ပါဝါကို ဖြတ်တောက်ပါ၊ စက်ကို မျက်စိဖြင့် စစ်ဆေးပါ၊ ကွိုင်ဆားကစ်ကို အတည်ပြုပါ၊ ကွန်တက်ဆက်သွယ်မှုကို စစ်ဆေးပါ၊ ထို့နောက် မှန်ကန်သော ထိန်းချုပ်မှုအခြေအနေများအောက်တွင် ပြောင်းလဲခြင်းအပြုအမူကို အတည်ပြုပါ။ အများအားဖြင့်၊ မကောင်းသော ကွန်တက်တာတစ်ခုသည် အောက်ပါလက္ခဏာများထဲမှ တစ်ခု သို့မဟုတ် တစ်ခုထက်ပို၍ ပေါ်လာတတ်သည်-
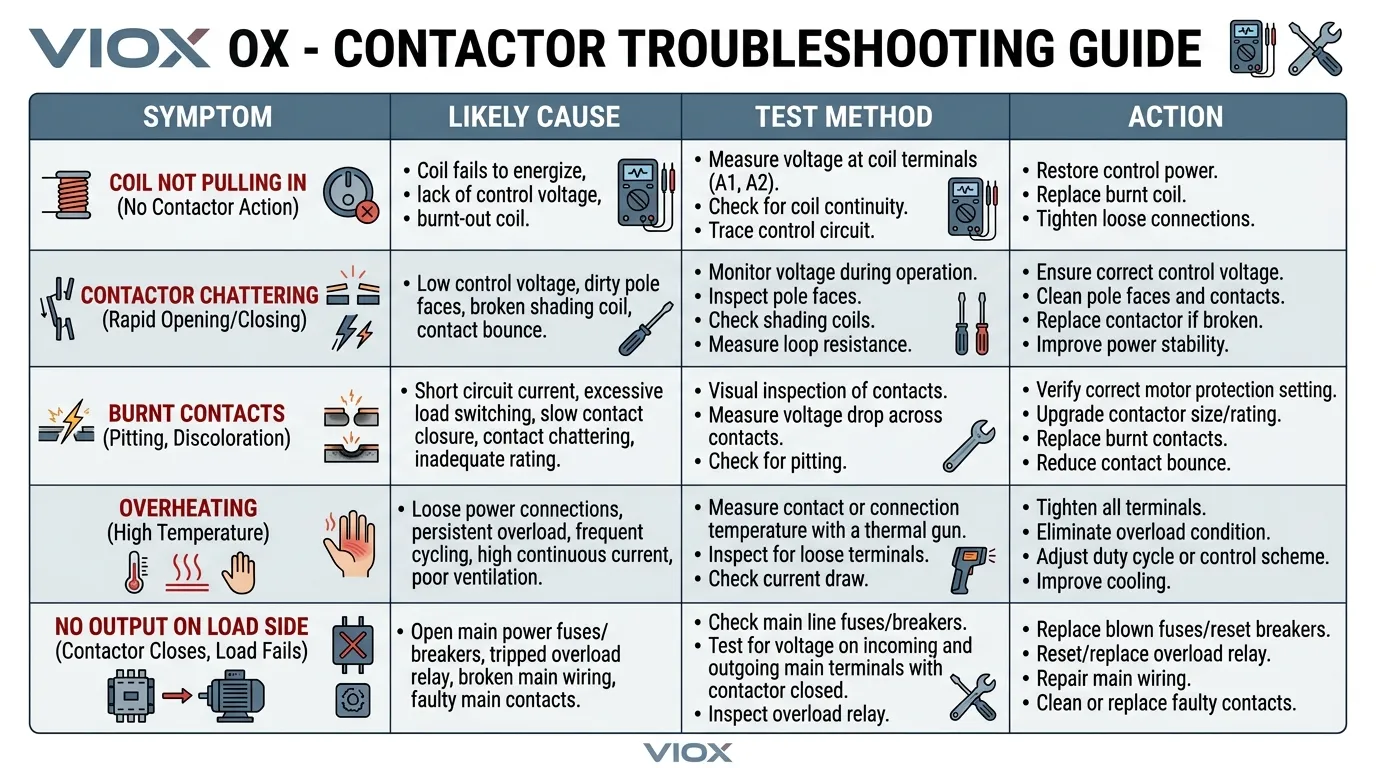
- ကွိုင်သည် မဆွဲဝင်ပါ။
- ကွန်တက်များသည် မှန်ကန်စွာ မပိတ် သို့မဟုတ် မဖွင့်ပါ။
- ကွန်တက်တာသည် ပုံမှန်မဟုတ်သော တုန်ခါမှု သို့မဟုတ် မြည်တမ်းမှုများ ဖြစ်ပေါ်သည်။
- ကွန်တက်များသည် အပူလွန်ကဲခြင်း၊ လောင်ကျွမ်းခြင်း သို့မဟုတ် ပြင်းထန်စွာ ဟောင်းနွမ်းခြင်းတို့ကို ပြသသည်။
- အထွက်ဘက်သည် ထိန်းချုပ်မှုအချက်ပြမှုကို မလိုက်နာပါ။
အဓိကအချက်မှာ အစားထိုးရန် တန်းမခုန်ဘဲ ကွန်တက်တာကို ယုတ္တိရှိသော အစီအစဉ်အတိုင်း စမ်းသပ်ရန်ဖြစ်သည်။.
သော့ထုတ်ယူမှုများ
- အမြဲတမ်း အောက်ပါတို့ဖြင့် စတင်ပါ လော့ခ်ချခြင်း/တဂ်ထုတ်ခြင်း ဗို့အားအတည်ပြုခြင်း။.
- ကောင်းမွန်သော ကွန်တက်တာ စမ်းသပ်မှုအစီအစဉ်မှာ- မျက်စိဖြင့်စစ်ဆေးခြင်း -> ကွိုင်စစ်ဆေးခြင်း -> ဆက်သွယ်မှု/ကွန်တက်စစ်ဆေးခြင်း -> ထိန်းချုပ်ထားသော လုပ်ဆောင်မှုစစ်ဆေးခြင်း.
- ကွိုင်ပြဿနာများ၊ ဟောင်းနွမ်းနေသော ကွန်တက်များ၊ အားနည်းသော ထိန်းချုပ်ဗို့အားနှင့် စက်ပိုင်းဆိုင်ရာ ကပ်ငြိခြင်းတို့သည် ပျက်ကွက်ရခြင်း၏ အဓိကအကြောင်းရင်းများဖြစ်သည်။.
- တစ်ခုတည်းသော တိုင်းတာမှုအပေါ် မမှီခိုပါနှင့်။ ကွန်တက်တာတစ်ခုသည် ကွိုင်ကောင်းသော်လည်း ပျက်စီးနေသော ကွန်တက်များ သို့မဟုတ် အားနည်းသော ရွေ့လျားမှုယန္တရားကြောင့် ပျက်ကွက်နိုင်သည်။.
- ကွန်တက်မျက်နှာပြင်များ ပျက်စီးနေပါက သို့မဟုတ် ရွေ့လျားနေသော တပ်ဆင်မှုသည် ယုံကြည်စိတ်ချရမှုမရှိပါက၊ အစားထိုးခြင်းသည် ပြုပြင်ခြင်းထက် ပို၍လက်တွေ့ကျသည်။.
သင်အမှန်တကယ် စမ်းသပ်နေသောအရာ
ကွန်တက်တာတစ်ခုသည် တစ်ခုတည်းသော စမ်းသပ်မှတ်မဟုတ်ပါ။ ၎င်းသည် ပျက်ကွက်နိုင်သော ဧရိယာများစွာရှိသော စက်တစ်ခုဖြစ်သည်။
- အဓိက coil
- အဓိက အဓိက ကွန်တက်များ
- အဓိက အရန်အဆက်အသွယ်များ
- အဓိက ရွေ့လျားမှုယန္တရား
- အဓိက terminal connections
- အဓိက ကွိုင်ကို ကျွေးမွေးသော ထိန်းချုပ်ဆားကစ်
ထို့ကြောင့် အသုံးဝင်သော စမ်းသပ်နည်းလမ်းတစ်ခုသည် အောက်ပါတို့ကို ခွဲထုတ်ရမည်-
- ကွိုင်ပျက်ကွက်ခြင်း
- ကွန်တက်ပျက်ကွက်ခြင်း
- ထိန်းချုပ်ထောက်ပံ့မှု ပျက်ကွက်ခြင်း
- စက်ပိုင်းဆိုင်ရာ ကပ်ငြိခြင်း
စက်တည်ဆောက်မှုဆိုင်ရာ နောက်ခံအချက်အလက်များ လိုအပ်ပါက၊ ကြည့်ပါ။ Contactor ဆိုတာ ဘာလဲ နှင့် Inside AC Contactor Components Design Logic.
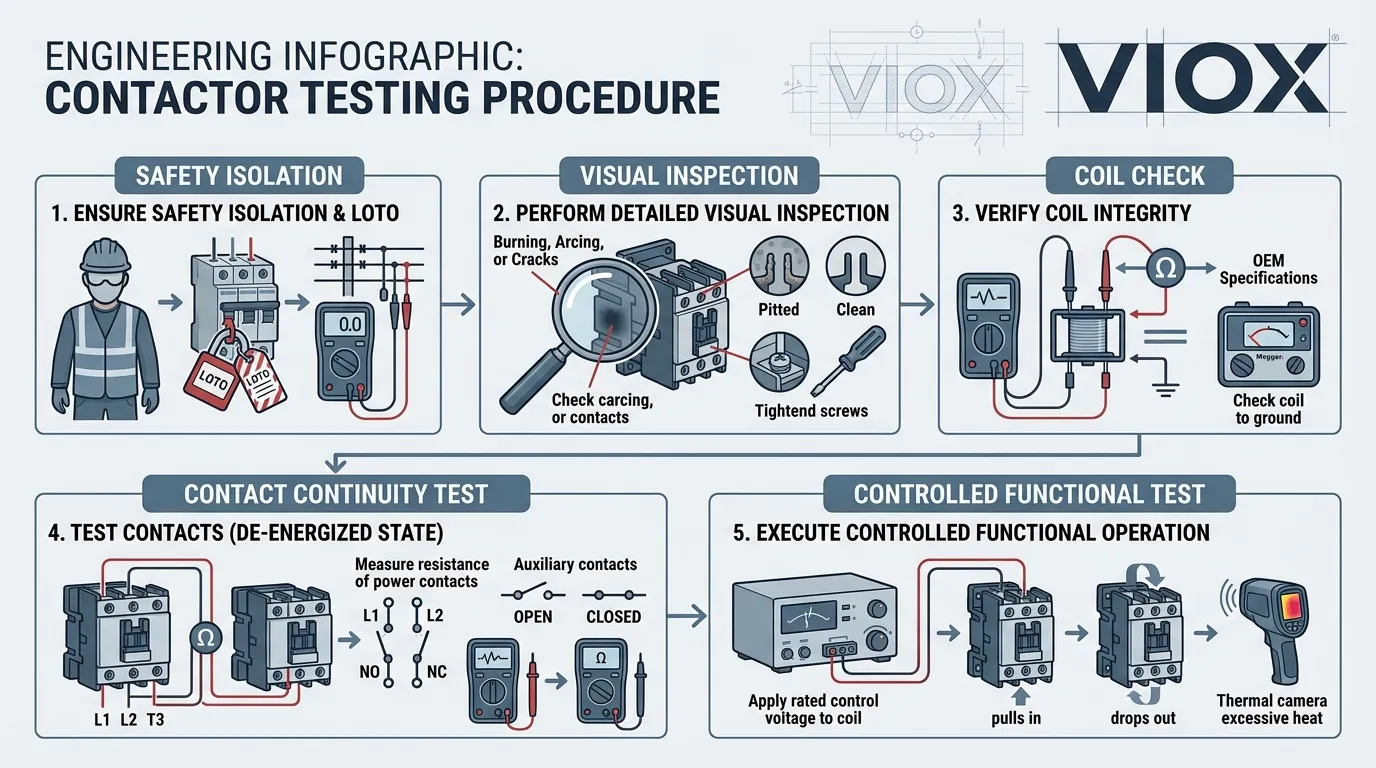
စမ်းသပ်ခြင်းမပြုမီ ဘေးကင်းရေး
မည်သည့်စမ်းသပ်မှုမပြုလုပ်မီ ဆားကစ်ကို ဘေးကင်းအောင် ပြုလုပ်ပါ။.
အနည်းဆုံး ဘေးကင်းရေးအဆင့်များ
- ထောက်ပံ့မှုကို ဖြတ်တောက်ပါ
- လော့ခ်ချခြင်း/တဂ်ထုတ်ခြင်းကို အသုံးပြုပါ
- သင့်လျော်သော မီတာဖြင့် ဗို့အားမရှိခြင်းကို အတည်ပြုပါ
- ရှိပါက သိုလှောင်ထားသော စွမ်းအင်ကို ထုတ်လွှတ်ပါ
- ဆိုက်၏ arc-flash နှင့် PPE လိုအပ်ချက်များကို လိုက်နာပါ
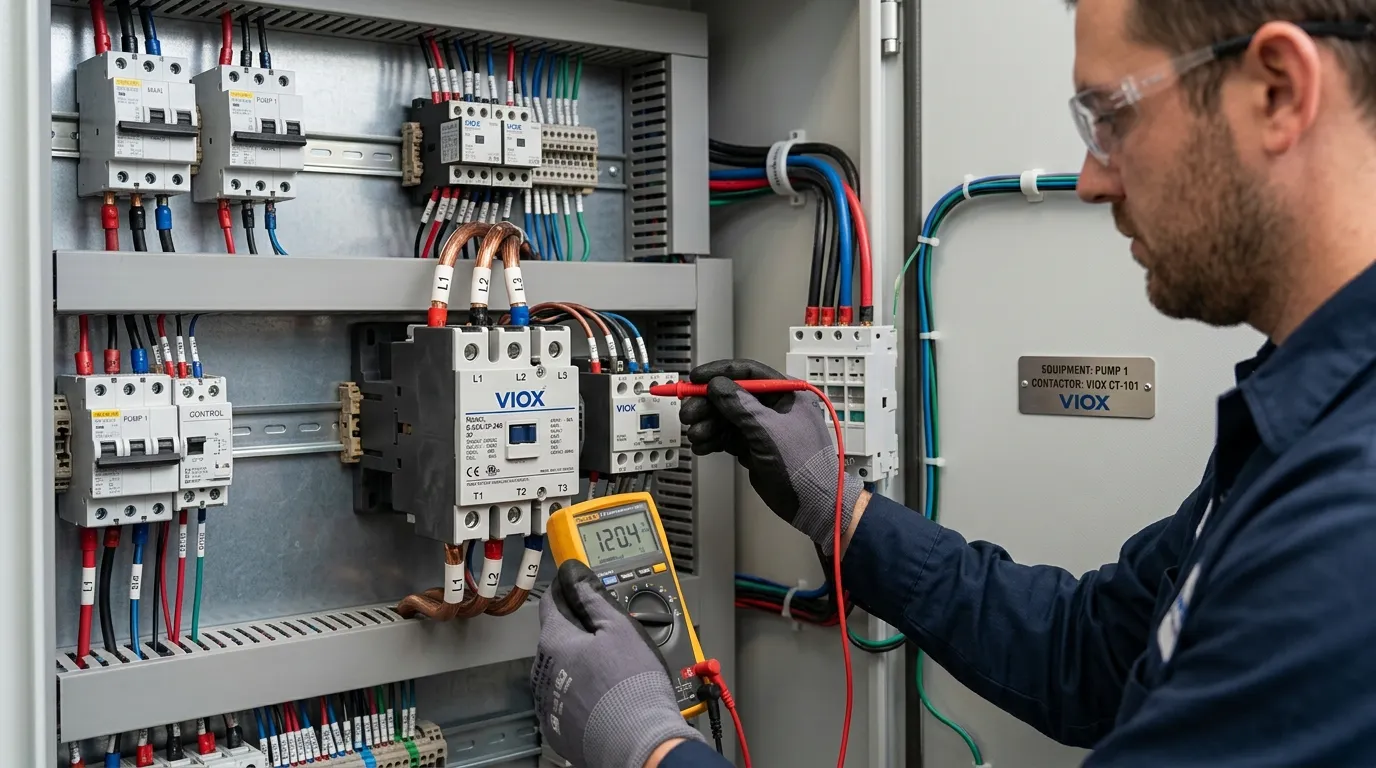
အားသွင်းထားသော လုပ်ဆောင်မှုစစ်ဆေးမှု လိုအပ်ပါက၊ အရည်အချင်းပြည့်မီသော ဝန်ထမ်းများကသာ ဆိုက်လုပ်ထုံးလုပ်နည်းအတိုင်း လုပ်ဆောင်သင့်သည်။.
လိုအပ်သောကိရိယာများ
တိကျသော ကိရိယာအစုံသည် ရောဂါရှာဖွေခြင်းသည် မည်မျှနက်ရှိုင်းစွာ သွားရန်လိုအပ်သည်အပေါ် မူတည်သော်လည်း လက်တွေ့ကျသော နယ်ပယ်တည်ဆောက်မှုတွင် အများအားဖြင့် ပါဝင်သည်-
- digital multimeter
- ဆက်သွယ်မှု သို့မဟုတ် ခုခံမှုလုပ်ဆောင်ချက်
- လျှပ်ကာစမ်းသပ်စုံစမ်းစစ်ဆေးမှုများ
- ထိန်းချုပ်မှုပုံကြမ်း သို့မဟုတ် ဝါယာကြိုးပုံ
- လျှပ်ကာအခြေအနေကို မေးခွန်းထုတ်သောအခါ လျှပ်ကာခုခံမှုစမ်းသပ်သူ
- ထိန်းချုပ်မှုလက်ရှိ သို့မဟုတ် လိုင်းလက်ရှိအပြုအမူကို စစ်ဆေးရန်လိုအပ်ပါက ကုပ်မီတာ
ရောဂါရှာဖွေပြီးနောက် ထုတ်ကုန်အကဲဖြတ်ရန်အတွက် VIOX ကိုကြည့်ပါ။ သတ္မွတ္အ Contactor ထုတ်ကုန်စာမျက်နှာ။.
အဆင့် ၁- လက္ခဏာဖြင့် စတင်ပါ
စက်ကို မထိတွေ့မီ အမှန်တကယ် တိုင်ကြားချက်ကို သတ်မှတ်ပါ။.
အဖြစ်များသော လက္ခဏာပုံစံများတွင်-
- ကွန်တက်တာသည် လုံးဝမဆွဲဝင်ပါ။
- ကွန်တက်တာသည် ဆွဲဝင်သော်လည်း ဝန်အားမတက်ပါ။
- ကွန်တက်တာသည် တုန်ခါသည်။
- ကွန်တက်တာသည် ပူလာသည်။
- ကွန်တက်တာသည် ကပ်နေဆဲဖြစ်သည်။
- ဝန်သည် ကြားဖြတ်၍ ကျဆင်းသွားသည်။
၎င်းသည် အရေးကြီးသည်၊ အဘယ်ကြောင့်ဆိုသော် မတူညီသော လက္ခဏာများသည် မတူညီသော စမ်းသပ်မှုဦးစားပေးများကို ညွှန်ပြသောကြောင့်ဖြစ်သည်။.
| လက္ခဏာ | ပထမဆုံးစစ်ဆေးရမည့်အရာ |
|---|---|
| ကွိုင်သည် မဆွဲဝင်ပါ။ | ထိန်းချုပ်ဗို့အားနှင့် ကွိုင်အခြေအနေ |
| ကွိုင်သည် ဆွဲဝင်သော်လည်း ဝန်သည် ပိတ်နေသည်။ | အဓိက ကွန်တက်များနှင့် လိုင်း/ဝန် ဆက်သွယ်မှု |
| တုန်ခါခြင်း သို့မဟုတ် မြည်တမ်းခြင်း | အားနည်းသော ထိန်းချုပ်ဗို့အား၊ မမှန်ကန်သော ကွိုင်အဆင့်သတ်မှတ်ချက်၊ စက်ပိုင်းဆိုင်ရာ ဟောင်းနွမ်းခြင်း |
| အပူလွန်ကဲခြင်း။ | ကွန်တက် ဟောင်းနွမ်းခြင်း၊ ဝန်ပိုအခြေအနေ၊ ချောင်နေသော ဂိတ်များ |
| ပိတ်မိနေခြင်း သို့မဟုတ် မယုံကြည်ရသော ထုတ်လွှတ်မှု | စက်ပိုင်းဆိုင်ရာ ပျက်စီးခြင်း သို့မဟုတ် ဂဟေဆက်ထားသော ထိတွေ့မှုများ |
အဆင့် ၂- အမြင်အာရုံ စစ်ဆေးခြင်းကို လုပ်ဆောင်ပါ
အမြင်အာရုံ စစ်ဆေးခြင်းသည် သိသာသော ချို့ယွင်းချက်ကို ဖမ်းယူရန် အမြန်ဆုံးနည်းလမ်းဖြစ်သည်။.
အောက်ပါတို့ကို စစ်ဆေးပါ:
- အက်ကွဲ သို့မဟုတ် အရည်ပျော်နေသောအိမ်
- အရောင်ပြောင်းခြင်း
- မီးလောင်သောအနံ့
- ချောင်နေသော terminals များ
- ကာဗွန် စုပုံခြင်း
- အပေါက်ဖြစ်နေသော သို့မဟုတ် ဂဟေဆက်ထားသော ထိတွေ့မှုများ
- ဖုန်မှုန့်၊ ဆီ သို့မဟုတ် ညစ်ညမ်းခြင်း
- ပျက်စီးနေသော အရန်လုပ်ကွက်များ
contactor အား ယခင်က မမှန်ကန်သော ကွိုင်ဗို့အား သို့မဟုတ် မမှန်ကန်သော အသုံးချမှုအတန်းအစားဖြင့် အစားထိုးထားခြင်း ရှိမရှိကိုလည်း စစ်ဆေးပါ။.
contactor သည် အလွန်အမင်း အပူလွန်ကဲခြင်း သို့မဟုတ် ရုပ်ပိုင်းဆိုင်ရာ ပျက်စီးပါက၊ လျှပ်စစ်စမ်းသပ်ခြင်းသည် သိသာထင်ရှားပြီးသားကိုသာ အတည်ပြုနိုင်ပါသည်။.
အဆင့် ၃- ကွိုင်ဆားကစ်ကို အတည်ပြုပါ
contactor သည် မဆွဲပါက၊ ပထမဆုံး အလေးအနက်ထား စမ်းသပ်မှုမှာ ကွိုင်ဆားကစ်ဖြစ်သည်။.
ဘာကိုစစ်ဆေးရမလဲ
- မှန်ကန်သော ထိန်းချုပ်ဗို့အားသည် ကွိုင် terminals များသို့ ရောက်ရှိနေပါသလား။
- ကွိုင်တွင် ဆက်တိုက်ရှိပါသလား။
- ကွိုင်သည် အမှန်တကယ် ထိန်းချုပ်စနစ် ဗို့အားနှင့် ကြိမ်နှုန်းအတွက် အဆင့်သတ်မှတ်ထားပါသလား။
လက်တွေ့ကျသော အစီအစဉ်
- ကွိုင် terminals များကို ခွဲခြားသတ်မှတ်ပါ၊ များသောအားဖြင့် အမှတ်အသားပြုထားသည်။
A1နှင့်A2. - စက်အမည်ပြားပေါ်ရှိ ကွိုင်အဆင့်သတ်မှတ်ချက်ကို ထိန်းချုပ်ဆားကစ်နှင့် နှိုင်းယှဉ်ပါ။.
- ပါဝါကို သီးခြားခွဲထုတ်ပြီး ကွိုင်၏ ဆက်တိုက် သို့မဟုတ် ခုခံမှုကို စစ်ဆေးပါ။.
- လုံခြုံပြီး ခွင့်ပြုပါက၊ အမိန့်ပေးသောအခါ ကွိုင်တွင် မှန်ကန်သော ထိန်းချုပ်ဗို့အား ပေါ်လာခြင်း ရှိမရှိကို အတည်ပြုပါ။.
ရလဒ်က ဘာကိုဆိုလိုသလဲ
- ဆက်တိုက်မရှိခြင်း ကွိုင်ပွင့်နေကြောင်း ညွှန်ပြနိုင်သည်။.
- မမျှော်လင့်ဘဲ နိမ့်သော ခုခံမှု ကွိုင်ပျက်စီးမှုကို အကြံပြုနိုင်သည်။.
- ကွိုင်တွင် ထိန်းချုပ်ဗို့အား မရှိခြင်း ပြဿနာသည် contactor အတွင်း၌မဟုတ်ဘဲ ထိန်းချုပ်ဆားကစ်တွင် အထက်ပိုင်းဖြစ်ကြောင်း ညွှန်ပြနိုင်သည်။.
ထို့ကြောင့် ကွိုင်အား လည်ပတ်ရန် အမှန်တကယ် ပြောနေခြင်း ရှိမရှိကို မစစ်ဆေးမီ “contactor မကောင်းဘူး” ဟု ဘယ်တော့မှ မယူဆသင့်ပါ။.
ပိုမိုကျယ်ပြန့်သော စက်ပစ္စည်း ကွဲပြားမှုများအတွက်၊ ကြည့်ပါ။ AC နှင့် DC Contactors- ၎င်းတို့၏ အမျိုးအစားများနှင့် လုပ်ဆောင်ချက်များကို နားလည်ခြင်း။.
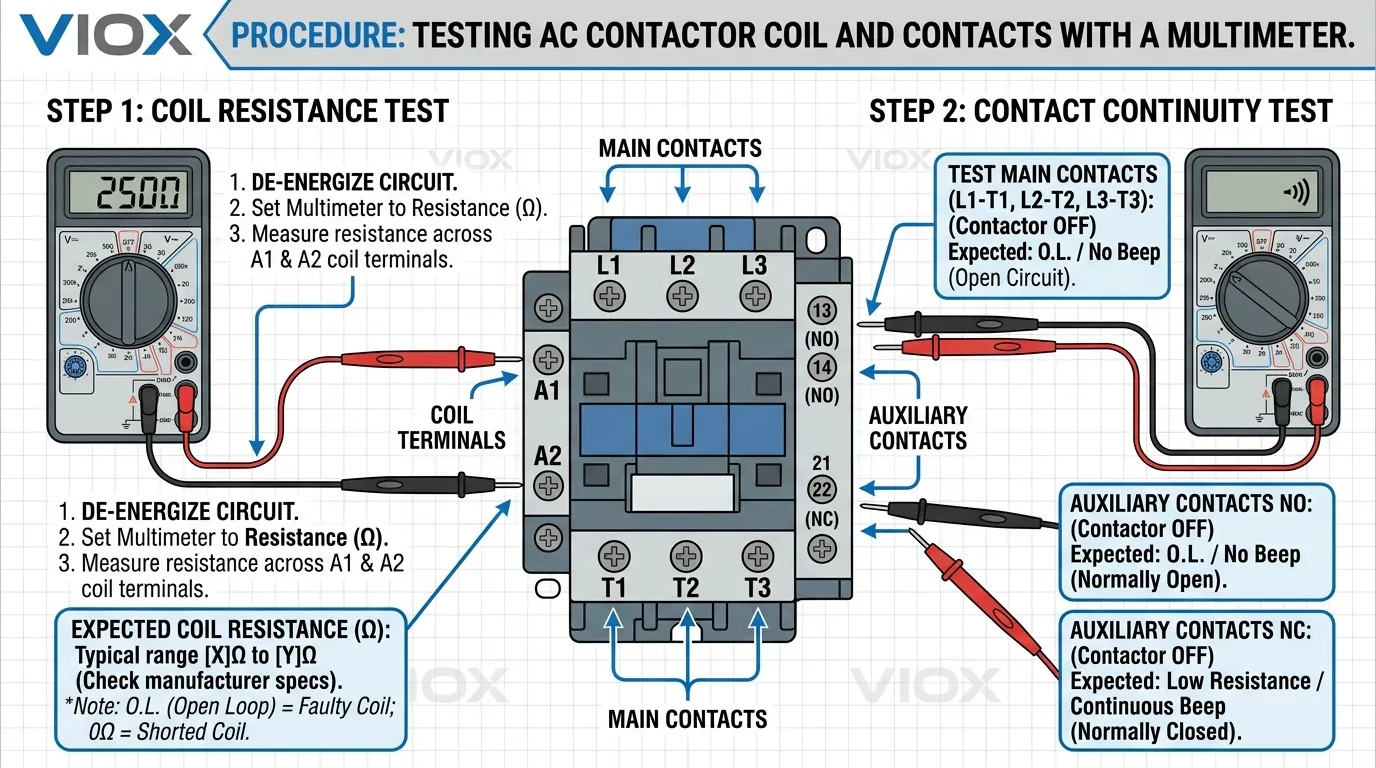
အဆင့် ၄- ပင်မ ထိတွေ့မှုများနှင့် အရန် ထိတွေ့မှုများကို စစ်ဆေးပါ
ကွိုင်သည် လည်ပတ်နေသော်လည်း ဝန်ဘက်သည် မှန်ကန်စွာ အလုပ်မလုပ်ပါက၊ ထိတွေ့မှုများသို့ ရွှေ့ပါ။.
contactor ကို စွမ်းအင်ဖြတ်တောက်ထားခြင်းဖြင့်
ထိတွေ့မှုအခြေအနေသည် ပုံမှန်အခြေအနေနှင့် ကိုက်ညီမှုရှိမရှိ စစ်ဆေးပါ-
- ပင်မပါဝါ ထိတွေ့မှုများသည် စံ contactor တွင် ပွင့်နေသင့်သည်။
- NO အရန် ထိတွေ့မှုများသည် ပွင့်နေသင့်သည်။
- NC အရန် ထိတွေ့မှုများသည် ပိတ်ထားသင့်သည်။
contactor ကို စွမ်းအင်ပေးထားခြင်းဖြင့်
ရှိမရှိ စစ်ဆေးပါ-
- ပင်မ ထိတွေ့မှုများသည် မှန်ကန်စွာ ပိတ်ပါသလား
- အရန် ထိတွေ့မှုများသည် အခြေအနေကို မှန်ကန်စွာ ပြောင်းလဲပါသလား
- ရည်ရွယ်ထားသော ထိတွေ့မှုလမ်းကြောင်းမှတဆင့် ဆက်တိုက်ရှိပါသလား
ဘာကိုရှာရမလဲ
- ထိတွေ့မှု ပိတ်ထားသင့်သောအခါ ဆက်တိုက်မရှိခြင်း
- မတည်ငြိမ်သော သို့မဟုတ် ကြားဖြတ် ဆက်တိုက်
- သိသာထင်ရှားသော အပေါက်ဖြစ်ခြင်း သို့မဟုတ် မီးလောင်ပျက်စီးခြင်း
- ထိတွေ့မှုများ ကပ်နေခြင်း သို့မဟုတ် ဂဟေဆက်နေခြင်း၏ လက္ခဏာများ
ရွေ့လျားယန္တရားသည် ဆွဲယူသော်လည်း ထိတွေ့မှုလမ်းကြောင်းသည် ညံ့ဖျင်းပါက၊ ပြဿနာသည် ကွိုင်ထက် ထိတွေ့မှု ဟောင်းနွမ်းခြင်း၊ ညစ်ညမ်းခြင်း သို့မဟုတ် ထိတွေ့မှု ပျက်စီးခြင်း ဖြစ်တတ်သည်။.
အဆင့် ၅- စက်ပိုင်းဆိုင်ရာ ရွေ့လျားမှုဆိုင်ရာ ပြဿနာများကို စစ်ဆေးပါ
ကွိုင်နှင့် ထိတွေ့မှုများသည် မီတာပေါ်တွင် ကျိုးကြောင်းဆီလျော်ပုံပေါ်နေလျှင်ပင် contactor သည် စက်ပိုင်းဆိုင်ရာအရ ချို့ယွင်းနိုင်သည်။.
စစ်ဆေးရန်-
- armature ရွေ့လျားမှု
- return spring လုပ်ဆောင်ချက်
- ကပ်ခြင်း သို့မဟုတ် ချည်နှောင်ခြင်း
- သံလိုက်လမ်းကြောင်းတွင် ညစ်ညမ်းခြင်း
- မပြည့်စုံသော ခရီး
အများအားဖြင့် တွေ့ရသော လက္ခဏာများ ပါဝင်သည်-
- အပြည့်အဝ မဆွဲဘဲ တဟုန်ထိုးမြည်ခြင်း
- တစ်စိတ်တစ်ပိုင်း ဆွဲခြင်း
- နှောင့်နှေးသော ထုတ်လွှတ်မှု
- ထပ်ခါထပ်ခါ တုန်ခါခြင်း
If the mechanism is not moving cleanly, contact readings can become misleading because the real fault is mechanical.
Step 6: Inspect Terminal Tightness and Heat Damage
Loose power or coil terminals can imitate a bad contactor.
အောက်ပါတို့ကို စစ်ဆေးပါ:
- overheated terminals
- discolored conductor ends
- loose screws or clamps
- damaged lugs
- insulation darkening near the contactor
Sometimes the contactor itself is still functional, but poor terminal connection has caused the symptom.
Step 7: Perform a Controlled Functional Test
If the device passes the basic dead tests and site conditions allow it, perform a controlled functional check.
During the functional check, verify:
- the coil receives the correct control command
- the contactor pulls in cleanly
- the load side follows the contactor state
- the contactor releases correctly
- there is no abnormal chattering, delay, or overheating trend
Do not treat this as a “just energize it and see” step. The purpose is to confirm whether the contactor operates correctly under the real control sequence.
Step 8: Decide Whether the Fault Is the Contactor or the Circuit Around It
This is where many technicians lose time.
A contactor may appear bad when the real problem is:
- missing control voltage
- faulty overload relay reset condition
- open interlock circuit
- PLC or control relay problem
- wrong coil voltage
- broken control transformer output
If the coil never gets the proper command, replacing the contactor will not solve the outage.
What the Results Mean
| Test Result | Likely Meaning | Typical Next Action |
|---|---|---|
| Coil has no continuity | Open or failed coil | Replace contactor or coil assembly if applicable |
| Coil is healthy but never receives command voltage | Upstream control fault | Troubleshoot control circuit |
| Coil pulls in but main contacts do not pass power reliably | Worn, burnt, or damaged contacts | ကွန်တက်တာကို အစားထိုးပါ။ |
| Main contacts work, but chatter occurs | Weak or unstable control supply, mechanical issue, wrong coil rating | Check control voltage and mechanism |
| Severe heat marks or welded contacts | Advanced wear or fault damage | ကွန်တက်တာကို အစားထိုးပါ။ |
| Terminals overheated but contactor otherwise functional | Loose or poor termination | Correct connection and inspect for damage |
When to Replace Instead of Repair
In practice, a contactor is usually replaced instead of repaired when:
- contacts are badly burnt or welded
- the moving mechanism is unreliable
- the coil is failed
- the housing is heat-damaged
- repeated faults have already occurred
Minor cleaning may help in limited cases, but heavily worn contactors are usually not worth trusting in service.
If you are at the replacement stage, compare against the VIOX သတ္မွတ္အ Contactor range and review the surrounding circuit design. In many motor-control systems, the contactor should also be considered together with the upstream protection. For that design context, see Contactor vs Circuit Breaker နှင့် Motor Power ကိုအခြေခံ၍ Contactors နှင့် Circuit Breakers ကိုရွေးချယ်နည်း.
A Smarter Testing Order for Field Work
If the goal is speed, this order usually works best:
- Confirm the complaint.
- Isolate and make the circuit safe.
- Perform visual inspection.
- Check coil continuity and coil command voltage.
- Check main and auxiliary contact behavior.
- Inspect terminal tightness and heat damage.
- Perform controlled live verification if required.
- Decide: contactor fault, surrounding control fault, or system fault.
That workflow is faster and more reliable than starting with deep measurements before checking the obvious.
Related Contactor Topics
- Contactor ဆိုတာ ဘာလဲ
- AC vs DC Contactors
- Inside AC Contactor Components Design Logic
- How to Choose the Right Surge Suppressor for a Contactor Coil
- AC Contactor Product Page
နိဂုံး
If you want to know how to test a contactor, the practical answer is to test it in layers: visual condition, coil condition, contact behavior, mechanical movement, terminal condition, and real operating response.
A good diagnosis does not stop at “the contactor does not work.” It identifies whether the real fault is:
- the coil
- the contacts
- the mechanism
- the control circuit
- or the surrounding installation
That is what turns contactor testing from guesswork into reliable troubleshooting.
အမြဲမေးလေ့ရှိသောမေးခွန်းများ
How do you test a contactor with a multimeter?
Use the multimeter to verify coil continuity, check whether the correct control voltage reaches the coil, and check continuity across the relevant contacts in both de-energized and energized conditions where safe and permitted.
How do I know if a contactor is bad?
Common signs include failure to pull in, burnt or pitted contacts, chattering, overheating, welded contacts, and a mismatch between the control signal and the output behavior.
Can a contactor test good on the coil but still be bad?
Yes. A contactor can have a healthy coil but still fail because of damaged contacts, mechanical sticking, loose terminals, or control-circuit problems.
What causes a contactor to chatter?
Chattering is often caused by weak or unstable control voltage, incorrect coil rating, mechanical wear, or contamination in the magnetic assembly.
Should I repair or replace a bad contactor?
If the device has severe contact damage, heat damage, a failed coil, or unreliable movement, replacement is usually the safer and more practical choice.
Do I need to remove the contactor to test it?
Not always. Many useful checks can be performed in place. However, some inspections become easier or more reliable when the device is isolated and removed from the circuit.
