
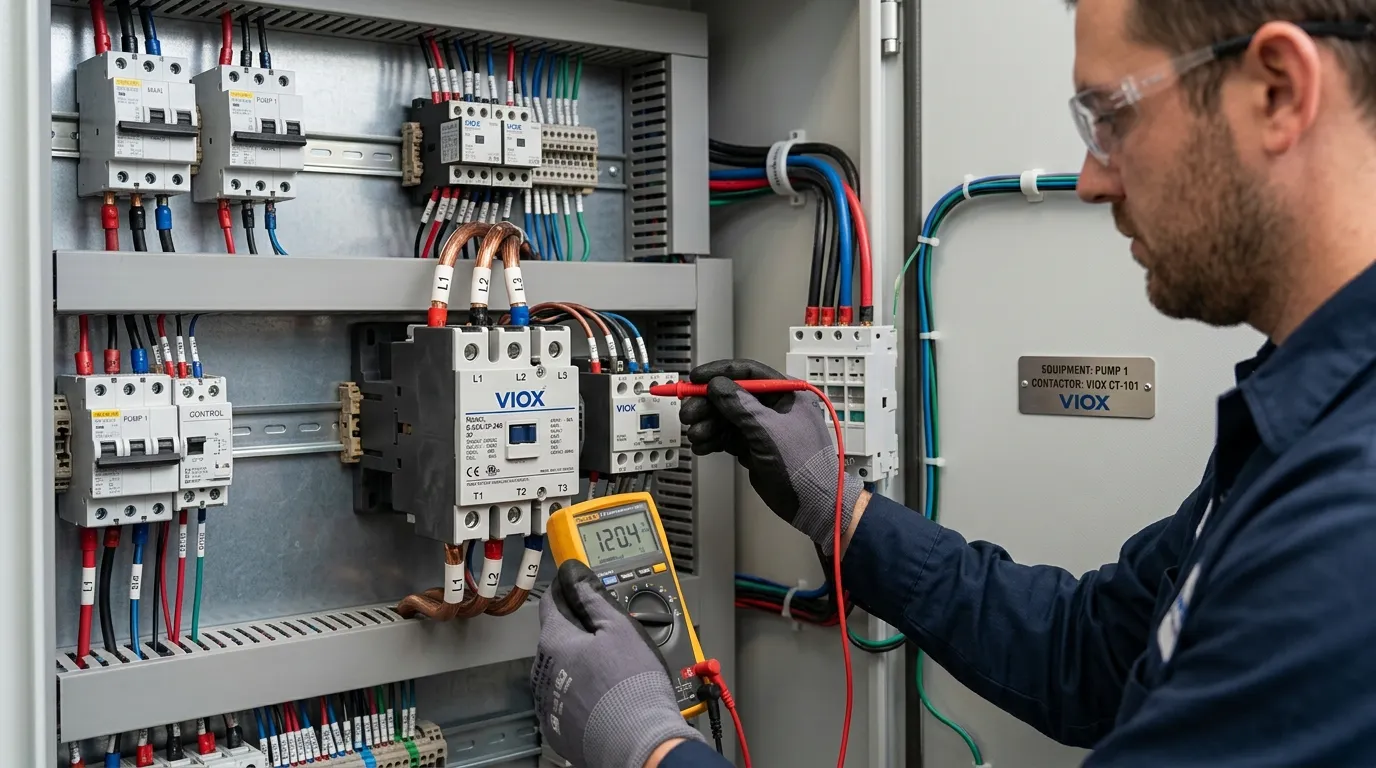
কন্টাক্টর সঠিকভাবে পরীক্ষা করার জন্য, প্রথমে সবচেয়ে সহজ পরীক্ষাগুলি দিয়ে শুরু করুন: পাওয়ার বিচ্ছিন্ন করুন, ডিভাইসটি দৃশ্যত পরিদর্শন করুন, কয়েল সার্কিট যাচাই করুন, কন্টাক্ট কন্টিনিউইটি পরীক্ষা করুন এবং তারপর সঠিক নিয়ন্ত্রণ পরিস্থিতিতে স্যুইচিং আচরণ নিশ্চিত করুন। বেশিরভাগ ক্ষেত্রে, একটি খারাপ কন্টাক্টর এই লক্ষণগুলির এক বা একাধিকের মাধ্যমে প্রকাশ পায়:
- কয়েল টানে না
- কন্টাক্টগুলি সঠিকভাবে বন্ধ বা খোলে না
- কন্টাক্টর অস্বাভাবিকভাবে কাঁপে বা গুঞ্জন করে
- কন্টাক্টগুলি অতিরিক্ত গরম, পোড়া বা গুরুতর ক্ষয় দেখায়
- আউটপুট সাইড কন্ট্রোল সিগন্যাল অনুসরণ করে না
মূল বিষয় হল সরাসরি প্রতিস্থাপনের দিকে না গিয়ে একটি লজিক্যাল ক্রমে কন্টাক্টর পরীক্ষা করা।.
কী Takeaways
- সর্বদা শুরু করুন লকআউট/ট্যাগআউট দিয়ে এবং ভোল্টেজ যাচাইকরণ করুন।.
- একটি ভাল কন্টাক্টর পরীক্ষার ক্রম হল: ভিজ্যুয়াল চেক -> কয়েল চেক -> কন্টিনিউইটি/কন্টাক্ট চেক -> নিয়ন্ত্রিত কার্যকরী চেক.
- কয়েলের সমস্যা, জীর্ণ কন্টাক্ট, দুর্বল কন্ট্রোল ভোল্টেজ এবং যান্ত্রিক আটকে যাওয়া ব্যর্থতার সবচেয়ে সাধারণ কারণ।.
- শুধুমাত্র একটি রিডিংয়ের উপর নির্ভর করবেন না। একটি কন্টাক্টরের একটি ভাল কয়েল থাকতে পারে এবং ক্ষতিগ্রস্ত কন্টাক্ট বা দুর্বল মুভিং মেকানিজমের কারণে এখনও ব্যর্থ হতে পারে।.
- যদি কন্টাক্ট সারফেসগুলি খারাপভাবে ক্ষতিগ্রস্ত হয় বা মুভিং অ্যাসেম্বলিটি ненадежный হয়, তবে মেরামত করার চেয়ে প্রতিস্থাপন করা সাধারণত বেশি практичный।.
আপনি আসলে কী পরীক্ষা করছেন
একটি কন্টাক্টর একটি একক পরীক্ষার বিন্দু নয়। এটি বেশ কয়েকটি ব্যর্থতা ক্ষেত্র সহ একটি ডিভাইস:
- প্রধান কন্টাক্ট কয়েল বলে
- প্রধান কন্টাক্ট প্রধান কন্টাক্ট
- প্রধান কন্টাক্ট সহায়ক কন্টাক্ট
- প্রধান কন্টাক্ট মুভিং মেকানিজম
- প্রধান কন্টাক্ট টার্মিনাল সংযোগ
- প্রধান কন্টাক্ট কয়েলকে খাওয়ানো কন্ট্রোল সার্কিট
इसीलिए একটি দরকারী পরীক্ষার পদ্ধতিকে আলাদা করতে হবে:
- কয়েল ব্যর্থতা
- কন্টাক্ট ব্যর্থতা
- কন্ট্রোল-সরবরাহ ব্যর্থতা
- যান্ত্রিক আটকে যাওয়া
আপনার যদি প্রথমে ডিভাইস নির্মাণের পটভূমি প্রয়োজন হয়, তাহলে দেখুন কন্টাক্টর কী? এবং AC কন্ট্রাক্টর কম্পোনেন্টস ডিজাইন লজিক.
পরীক্ষার আগে নিরাপত্তা
যেকোনো পরীক্ষার আগে, সার্কিটটিকে নিরাপদ করুন।.
ন্যূনতম নিরাপত্তা পদক্ষেপ
- সরবরাহ বিচ্ছিন্ন করুন
- লকআউট/ট্যাগআউট প্রয়োগ করুন
- একটি উপযুক্ত মিটার দিয়ে ভোল্টেজের অনুপস্থিতি যাচাই করুন
- উপস্থিত থাকলে সঞ্চিত শক্তি নির্গত করুন
- সাইটের আর্ক-ফ্ল্যাশ এবং পিপিই প্রয়োজনীয়তা অনুসরণ করুন
যদি পরে একটি এনার্জাইজড কার্যকরী চেকের প্রয়োজন হয়, তবে এটি শুধুমাত্র সাইটের পদ্ধতি অনুসরণ করে যোগ্য কর্মীদের দ্বারা করা উচিত।.
প্রয়োজনীয় সরঞ্জাম
সঠিক সরঞ্জাম সেট নির্ভর করে রোগ নির্ণয় কতটা গভীরে যেতে হবে তার উপর, তবে একটি ব্যবহারিক ফিল্ড সেটআপে সাধারণত অন্তর্ভুক্ত থাকে:
- ডিজিটাল মাল্টিমিটার
- কন্টিনিউইটি বা রেজিস্ট্যান্স ফাংশন
- ইনসুলেটেড টেস্ট প্রোব
- কন্ট্রোল স্কিম্যাটিক বা ওয়্যারিং ডায়াগ্রাম
- ইনসুলেশন রেজিস্ট্যান্স টেস্টার যখন ইনসুলেশন অবস্থা প্রশ্নবিদ্ধ হয়
- ক্ল্যাম্প মিটার যদি কন্ট্রোল কারেন্ট বা লাইন কারেন্ট আচরণ পরীক্ষা করার প্রয়োজন হয়
রোগ নির্ণয়ের পরে পণ্য মূল্যায়নের জন্য, VIOX দেখুন এসি Contactor পণ্য পৃষ্ঠা।.
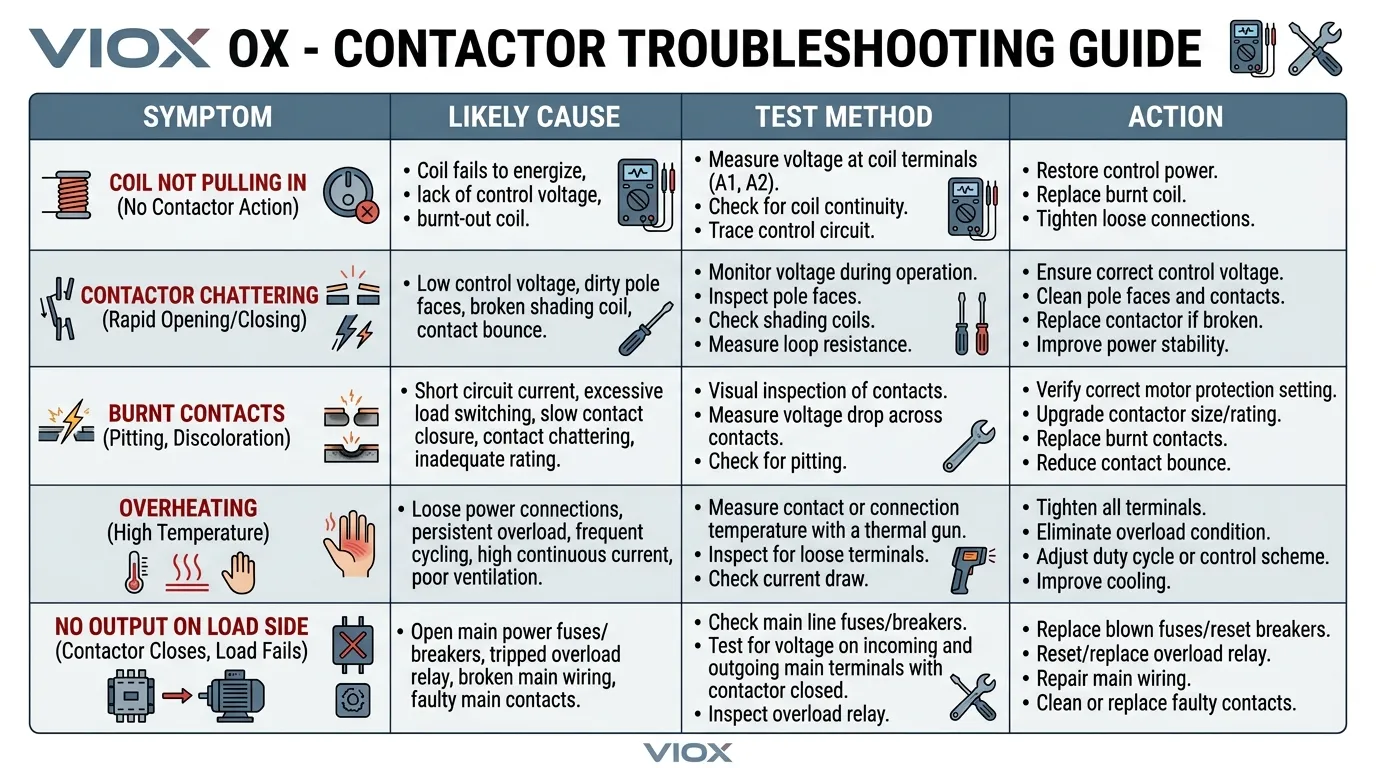
ধাপ 1: উপসর্গ দিয়ে শুরু করুন
ডিভাইসটি স্পর্শ করার আগে, আসল অভিযোগটি সংজ্ঞায়িত করুন।.
সাধারণ উপসর্গের মধ্যে রয়েছে:
- কন্টাক্টর একেবারেই টানে না
- কন্টাক্টর টানে কিন্তু লোড এনার্জাইজ হয় না
- কন্টাক্টর কাঁপে
- কন্টাক্টর গরম হয়ে যায়
- কন্টাক্টর আটকে থাকে
- লোড মাঝে মাঝে বন্ধ হয়ে যায়
এটি গুরুত্বপূর্ণ কারণ বিভিন্ন উপসর্গ বিভিন্ন পরীক্ষার অগ্রাধিকারের দিকে নির্দেশ করে।.
| লক্ষণ | প্রথমে যা পরীক্ষা করতে হবে |
|---|---|
| কয়েল টানে না | কন্ট্রোল ভোল্টেজ এবং কয়েলের অবস্থা |
| কয়েল টানে কিন্তু লোড বন্ধ থাকে | প্রধান কন্টাক্ট এবং লাইন/লোড কন্টিনিউইটি |
| কাঁপুনি বা গুঞ্জন | দুর্বল কন্ট্রোল ভোল্টেজ, ভুল কয়েল রেটিং, যান্ত্রিক ক্ষয় |
| অতিরিক্ত গরম | কন্টাক্ট পরিধান, ওভারলোড অবস্থা, ঢিলে টার্মিনাল |
| আটকে বন্ধ বা ненадежный রিলিজ | যান্ত্রিক ক্ষতি বা ঝালাই করা কন্টাক্ট |
ধাপ 2: একটি চাক্ষুষ পরিদর্শন করুন
চাক্ষুষ পরিদর্শন সুস্পষ্ট ব্যর্থতা ধরার দ্রুততম উপায়।.
যা যা দেখতে হবে:
- ফাটল বা গলে যাওয়া হাউজিং
- বিবর্ণতা
- পোড়া গন্ধ
- ঢিলে টার্মিনাল
- কার্বন বিল্ডআপ
- পিটেড বা ঝালাই করা কন্টাক্ট
- ধুলো, তেল বা দূষণ
- ক্ষতিগ্রস্থ সহায়ক ব্লক
এছাড়াও কন্টাক্টরটি পূর্বে ভুল কয়েল ভোল্টেজ বা ভুল অ্যাপ্লিকেশন ক্লাস দিয়ে প্রতিস্থাপন করা হয়েছে কিনা তা পরীক্ষা করুন।.
কন্টাক্টরটি খারাপভাবে অতিরিক্ত গরম হলে বা শারীরিকভাবে ক্ষতিগ্রস্থ হলে, গভীর বৈদ্যুতিক পরীক্ষা শুধুমাত্র যা ইতিমধ্যে সুস্পষ্ট তা নিশ্চিত করতে পারে।.
ধাপ 3: কয়েল সার্কিট যাচাই করুন
কন্টাক্টরটি না টানলে, প্রথম গুরুতর পরীক্ষাটি সাধারণত কয়েল সার্কিট।.
কি পরীক্ষা করতে হবে
- সঠিক কন্ট্রোল ভোল্টেজ কয়েল টার্মিনালে পৌঁছাচ্ছে কি?
- কয়েলের ধারাবাহিকতা আছে কি?
- কয়েলটি প্রকৃত কন্ট্রোল সিস্টেম ভোল্টেজ এবং ফ্রিকোয়েন্সির জন্য রেট করা হয়েছে কি?
ব্যবহারিক ক্রম
- কয়েল টার্মিনালগুলি সনাক্ত করুন, সাধারণত চিহ্নিত করা হয়
A1এবংA2. - ডিভাইসের নেমপ্লেটে কয়েলের রেটিং কন্ট্রোল সার্কিটের সাথে তুলনা করুন।.
- পাওয়ার বিচ্ছিন্ন করে, কয়েলের ধারাবাহিকতা বা প্রতিরোধ পরীক্ষা করুন।.
- যদি নিরাপদ এবং অনুমোদিত হয়, কমান্ড দেওয়া হলে কয়েলে সঠিক কন্ট্রোল ভোল্টেজ দেখা যায় কিনা তা নিশ্চিত করুন।.
ফলাফলের অর্থ কী
- কোন ধারাবাহিকতা নেই একটি খোলা কয়েল নির্দেশ করতে পারে।.
- অপ্রত্যাশিতভাবে কম প্রতিরোধ কয়েলের ক্ষতির পরামর্শ দিতে পারে।.
- কয়েলে কোন কন্ট্রোল ভোল্টেজ নেই সমস্যাটি কন্ট্রোল সার্কিটের উপরে, কন্টাক্টরের ভিতরে নয় তা নির্দেশ করতে পারে।.
এই কারণেই কয়েলটি আসলে কাজ করতে বলা হচ্ছে কিনা তা পরীক্ষা করার আগে “কন্টাক্টরটি খারাপ” কখনই ধরে নেওয়া উচিত নয়।.
বৃহত্তর ডিভাইস পার্থক্যের জন্য, দেখুন এসি বনাম ডিসি কন্টাক্টর: তাদের প্রকার এবং কার্যকারিতা বোঝা.
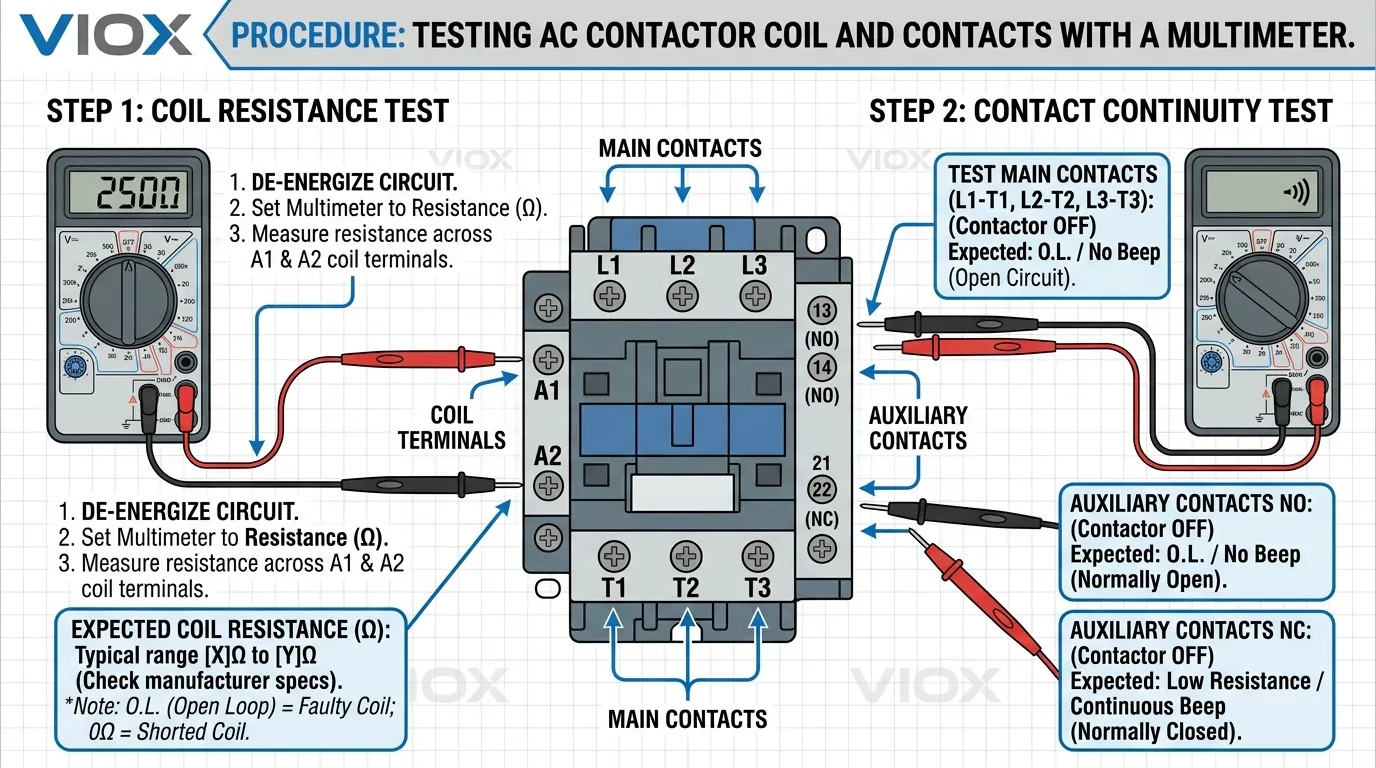
ধাপ 4: প্রধান কন্টাক্ট এবং সহায়ক কন্টাক্ট পরীক্ষা করুন
কয়েলটি কাজ করলে কিন্তু লোড সাইড সঠিকভাবে কাজ না করলে, কন্টাক্টে যান।.
কন্টাক্টর ডি-এনার্জাইজড করে
কন্টাক্টের অবস্থা স্বাভাবিক অবস্থার সাথে মেলে কিনা তা পরীক্ষা করুন:
- প্রধান পাওয়ার কন্টাক্ট একটি স্ট্যান্ডার্ড কন্টাক্টরে খোলা থাকা উচিত
- NO সহায়ক কন্টাক্ট খোলা থাকা উচিত
- NC সহায়ক কন্টাক্ট বন্ধ থাকা উচিত
কন্টাক্টর এনার্জাইজড করে
পরীক্ষা করুন:
- প্রধান কন্টাক্ট সঠিকভাবে বন্ধ হয় কিনা
- সহায়ক কন্টাক্ট সঠিকভাবে অবস্থা পরিবর্তন করে কিনা
- উদ্দিষ্ট কন্টাক্ট পথের মাধ্যমে ধারাবাহিকতা আছে কিনা
কি দেখতে হবে
- কন্টাক্ট বন্ধ থাকার কথা যখন কোন ধারাবাহিকতা নেই
- অস্থির বা বিরতিপূর্ণ ধারাবাহিকতা
- সুস্পষ্ট পিটিং বা পোড়া ক্ষতি
- কন্টাক্ট আটকে বা ঝালাই হওয়ার লক্ষণ
যদি চলমান প্রক্রিয়াটি টানে কিন্তু কন্টাক্ট পথ দুর্বল হয়, তবে সমস্যাটি প্রায়শই কয়েলের চেয়ে কন্টাক্ট পরিধান, দূষণ বা কন্টাক্ট ক্ষতির কারণে হয়।.
ধাপ 5: যান্ত্রিক আন্দোলনের সমস্যাগুলির জন্য পরীক্ষা করুন
কয়েল এবং কন্টাক্ট মিটারে যুক্তিসঙ্গত দেখালেও একটি কন্টাক্টর যান্ত্রিকভাবে ব্যর্থ হতে পারে।.
পরিদর্শন করুন:
- আর্মেচার আন্দোলন
- রিটার্ন স্প্রিং অ্যাকশন
- আটকে বা বাঁধাই
- চৌম্বকীয় পথে দূষণ
- অসম্পূর্ণ ভ্রমণ
সাধারণ ফিল্ড লক্ষণগুলির মধ্যে রয়েছে:
- সম্পূর্ণ পুল-ইন ছাড়া গুঞ্জন
- আংশিক পুল-ইন
- বিলম্বিত রিলিজ
- বার বার ঝনঝন শব্দ (chattering)
যদি মেকানিজমটি পরিষ্কারভাবে না নড়ে, তবে কন্টাক্ট রিডিং বিভ্রান্তিকর হতে পারে কারণ আসল ত্রুটিটি যান্ত্রিক।.
ধাপ ৬: টার্মিনালের টাইটনেস এবং তাপের ক্ষতি পরিদর্শন করুন
ঢিলে পাওয়ার বা কয়েল টার্মিনাল একটি খারাপ কন্ট্রাক্টরের মতো আচরণ করতে পারে।.
যা যা দেখতে হবে:
- অতিরিক্ত গরম হওয়া টার্মিনাল
- বিবর্ণ কন্ডাক্টর প্রান্ত
- ঢিলে স্ক্রু বা ক্ল্যাম্প
- ক্ষতিগ্রস্ত লগ
- কন্ট্রাক্টরের কাছাকাছি ইনসুলেশন কালো হয়ে যাওয়া
কখনও কখনও কন্ট্রাক্টর নিজেই কার্যকরী থাকে, তবে দুর্বল টার্মিনাল সংযোগের কারণে লক্ষণ দেখা যায়।.
ধাপ ৭: একটি নিয়ন্ত্রিত কার্যকরী পরীক্ষা করুন
যদি ডিভাইসটি বেসিক ডেড টেস্টে উত্তীর্ণ হয় এবং সাইটের পরিস্থিতি এটির অনুমতি দেয় তবে একটি নিয়ন্ত্রিত কার্যকরী পরীক্ষা করুন।.
কার্যকরী পরীক্ষার সময়, যাচাই করুন:
- কয়েল সঠিক কন্ট্রোল কমান্ড পায় কিনা
- কন্ট্রাক্টর পরিষ্কারভাবে পুল ইন করে কিনা
- লোড সাইড কন্ট্রাক্টরের অবস্থা অনুসরণ করে কিনা
- কন্ট্রাক্টর সঠিকভাবে রিলিজ করে কিনা
- কোনও অস্বাভাবিক ঝনঝন শব্দ, বিলম্ব বা অতিরিক্ত গরম হওয়ার প্রবণতা নেই কিনা
এটিকে “শুধু এনার্জাইজ করুন এবং দেখুন” পদক্ষেপ হিসাবে বিবেচনা করবেন না। উদ্দেশ্য হল কন্ট্রাক্টর আসল কন্ট্রোল সিকোয়েন্সের অধীনে সঠিকভাবে কাজ করে কিনা তা নিশ্চিত করা।.
ধাপ ৮: সিদ্ধান্ত নিন ত্রুটিটি কন্ট্রাক্টরের নাকি এর আশেপাশের সার্কিটের
এখানেই অনেক টেকনিশিয়ান সময় নষ্ট করেন।.
একটি কন্ট্রাক্টর খারাপ মনে হতে পারে যখন আসল সমস্যা হল:
- কন্ট্রোল ভোল্টেজের অভাব
- ত্রুটিপূর্ণ ওভারলোড রিলে রিসেট কন্ডিশন
- ওপেন ইন্টারলক সার্কিট
- পিএলসি বা কন্ট্রোল রিলে সমস্যা
- ভুল কয়েল ভোল্টেজ
- ভাঙা কন্ট্রোল ট্রান্সফরমার আউটপুট
যদি কয়েল সঠিক কমান্ড না পায়, তবে কন্ট্রাক্টর পরিবর্তন করে বিভ্রাট সমাধান হবে না।.
ফলাফলের অর্থ কী
| পরীক্ষার ফলাফল | সম্ভাব্য অর্থ | সাধারণ পরবর্তী পদক্ষেপ |
|---|---|---|
| কয়েলের কোনো কন্টিনিউটি নেই | ওপেন বা ফেইলড কয়েল | কন্ট্রাক্টর বা কয়েল অ্যাসেম্বলি প্রতিস্থাপন করুন যদি প্রযোজ্য হয় |
| কয়েল ভালো কিন্তু কখনও কমান্ড ভোল্টেজ পায় না | আপস্ট্রিম কন্ট্রোল ফল্ট | কন্ট্রোল সার্কিট সমস্যা সমাধান করুন |
| কয়েল পুল ইন করে কিন্তু প্রধান কন্টাক্টগুলি নির্ভরযোগ্যভাবে পাওয়ার পাস করে না | জীর্ণ, পোড়া বা ক্ষতিগ্রস্ত কন্টাক্ট | কন্ট্রাক্টর প্রতিস্থাপন করুন |
| প্রধান কন্টাক্ট কাজ করে, কিন্তু ঝনঝন শব্দ হয় | দুর্বল বা অস্থির কন্ট্রোল সাপ্লাই, যান্ত্রিক সমস্যা, ভুল কয়েল রেটিং | কন্ট্রোল ভোল্টেজ এবং মেকানিজম পরীক্ষা করুন |
| মারাত্মক তাপের চিহ্ন বা ঝালাই করা কন্টাক্ট | উন্নত পরিধান বা ত্রুটির কারণে ক্ষতি | কন্ট্রাক্টর প্রতিস্থাপন করুন |
| টার্মিনাল অতিরিক্ত গরম কিন্তু কন্ট্রাক্টর অন্যথায় কার্যকরী | ঢিলে বা দুর্বল টার্মিনেশন | সংযোগ সংশোধন করুন এবং ক্ষতির জন্য পরিদর্শন করুন |
কখন মেরামত করার পরিবর্তে প্রতিস্থাপন করতে হবে
বাস্তবে, একটি কন্ট্রাক্টর সাধারণত মেরামত করার পরিবর্তে প্রতিস্থাপন করা হয় যখন:
- কন্টাক্টগুলি খারাপভাবে পুড়ে যায় বা ঝালাই করা হয়
- চলমান মেকানিজমটি ненадежный
- কয়েল ফেইল করে
- হাউজিং তাপ-ক্ষতিগ্রস্ত হয়
- বারবার ত্রুটি ইতিমধ্যে ঘটেছে
ছোটখাটো পরিচ্ছন্নতা সীমিত ক্ষেত্রে সাহায্য করতে পারে, তবে ভারীভাবে জীর্ণ কন্ট্রাক্টরগুলি সাধারণত সার্ভিসে বিশ্বাস করার মতো নয়।.
আপনি যদি প্রতিস্থাপন পর্যায়ে থাকেন তবে VIOX এর সাথে তুলনা করুন এসি Contactor পরিসীমা এবং আশেপাশের সার্কিট ডিজাইন পর্যালোচনা করুন। অনেক মোটর-কন্ট্রোল সিস্টেমে, কন্ট্রাক্টরকে আপস্ট্রিম সুরক্ষার সাথে একসাথে বিবেচনা করা উচিত। সেই ডিজাইন কনটেক্সটের জন্য, দেখুন কন্ট্রাক্টর বনাম সার্কিট ব্রেকার এবং মোটর পাওয়ারের উপর ভিত্তি করে কন্টাক্টর এবং সার্কিট ব্রেকার কীভাবে নির্বাচন করবেন.
ফিল্ড ওয়ার্কের জন্য একটি স্মার্ট টেস্টিং অর্ডার
যদি লক্ষ্য গতি হয়, তবে এই অর্ডারটি সাধারণত সবচেয়ে ভাল কাজ করে:
- অভিযোগ নিশ্চিত করুন।.
- বিচ্ছিন্ন করুন এবং সার্কিট নিরাপদ করুন।.
- চাক্ষুষ পরিদর্শন করুন।.
- কয়েলের ধারাবাহিকতা এবং কয়েল কমান্ড ভোল্টেজ পরীক্ষা করুন।.
- প্রধান এবং সহায়ক কন্টাক্টের আচরণ পরীক্ষা করুন।.
- টার্মিনালের দৃঢ়তা এবং তাপের কারণে ক্ষতি পরিদর্শন করুন।.
- প্রয়োজনে নিয়ন্ত্রিত লাইভ যাচাইকরণ করুন।.
- সিদ্ধান্ত নিন: কন্ট্রাক্টর ফল্ট, আশেপাশের কন্ট্রোল ফল্ট, নাকি সিস্টেম ফল্ট।.
সুস্পষ্ট বিষয়গুলো পরীক্ষা করার আগে গভীর পরিমাপ দিয়ে শুরু করার চেয়ে এই ওয়ার্কফ্লো দ্রুত এবং আরও নির্ভরযোগ্য।.
সম্পর্কিত কন্ট্রাক্টর বিষয়
- কন্টাক্টর কী?
- এসি বনাম ডিসি কন্ট্রাক্টর
- AC কন্ট্রাক্টর কম্পোনেন্টস ডিজাইন লজিক
- কন্ট্রাক্টর কয়েলের জন্য সঠিক সার্জ সাপ্রেসর কীভাবে নির্বাচন করবেন
- এসি কন্ট্রাক্টর প্রোডাক্ট পেজ
উপসংহার
আপনি যদি জানতে চান কিভাবে একটি কন্ট্রাক্টর পরীক্ষা করতে হয়, এর ব্যবহারিক উত্তর হল স্তরগুলিতে এটি পরীক্ষা করা: চাক্ষুষ অবস্থা, কয়েলের অবস্থা, কন্টাক্টের আচরণ, যান্ত্রিক নড়াচড়া, টার্মিনালের অবস্থা এবং বাস্তব অপারেটিং প্রতিক্রিয়া।.
একটি ভাল রোগ নির্ণয় “কন্ট্রাক্টর কাজ করছে না” এই কথাতেই থেমে থাকে না। এটি সনাক্ত করে যে আসল ত্রুটি হল:
- কয়েল
- কন্টাক্ট
- প্রক্রিয়া
- কন্ট্রোল সার্কিট
- অথবা আশেপাশের ইনস্টলেশন
এটিই কন্ট্রাক্টর টেস্টিংকে অনুমান থেকে নির্ভরযোগ্য সমস্যা সমাধানে পরিণত করে।.
প্রায়শই জিজ্ঞাসিত প্রশ্নাবলী
মাল্টিমিটার দিয়ে কিভাবে একটি কন্ট্রাক্টর পরীক্ষা করবেন?
কয়েলের ধারাবাহিকতা যাচাই করতে মাল্টিমিটার ব্যবহার করুন, কয়েলে সঠিক কন্ট্রোল ভোল্টেজ পৌঁছাচ্ছে কিনা তা পরীক্ষা করুন এবং যেখানে নিরাপদ ও অনুমোদিত, সেখানে ডি-এনার্জাইজড এবং এনার্জাইজড উভয় অবস্থায় প্রাসঙ্গিক কন্টাক্টগুলির মধ্যে ধারাবাহিকতা পরীক্ষা করুন।.
How do I know if a contactor is bad?
সাধারণ লক্ষণগুলির মধ্যে রয়েছে পুল করতে ব্যর্থতা, পোড়া বা গর্তযুক্ত কন্টাক্ট, ঝনঝন শব্দ, অতিরিক্ত গরম হওয়া, ওয়েল্ডেড কন্টাক্ট এবং কন্ট্রোল সিগন্যাল এবং আউটপুট আচরণের মধ্যে অমিল।.
Can a contactor test good on the coil but still be bad?
Yes. A contactor can have a healthy coil but still fail because of damaged contacts, mechanical sticking, loose terminals, or control-circuit problems.
What causes a contactor to chatter?
চ্যাটারিং প্রায়শই দুর্বল বা অস্থির কন্ট্রোল ভোল্টেজ, ভুল কয়েল রেটিং, যন্ত্রাংশের ঘর্ষণ, অথবা ম্যাগনেটিক অ্যাসেম্বলিতে দূষণের কারণে হয়ে থাকে।.
Should I repair or replace a bad contactor?
If the device has severe contact damage, heat damage, a failed coil, or unreliable movement, replacement is usually the safer and more practical choice.
Do I need to remove the contactor to test it?
Not always. Many useful checks can be performed in place. However, some inspections become easier or more reliable when the device is isolated and removed from the circuit.
