
คำตอบด่วน: การตั้งค่าสวิตช์ตั้งเวลาแบบมีหมุดเกี่ยวข้องกับการใส่หมุดตั้งเวลาลงบนหน้าปัดนาฬิกา 24 ชั่วโมงเพื่อสร้างตารางเวลาเปิด/ปิด, การเชื่อมต่อสวิตช์เข้ากับวงจรไฟฟ้าของคุณตามรหัสไฟฟ้าในท้องถิ่น และการทดสอบตารางเวลาที่ตั้งโปรแกรมไว้เพื่อให้แน่ใจว่าทำงานได้อย่างถูกต้อง.
สวิตช์ตั้งเวลาแบบมีหมุดให้การควบคุมตารางเวลาทางกลที่เชื่อถือได้สำหรับไฟ พัดลม อุปกรณ์สระว่ายน้ำ และอุปกรณ์ไฟฟ้าอื่นๆ โดยไม่ต้องมีการตั้งโปรแกรมดิจิทัลหรือแบตเตอรี่สำรอง.
สวิตช์ตั้งเวลาแบบมีหมุดคืออะไร
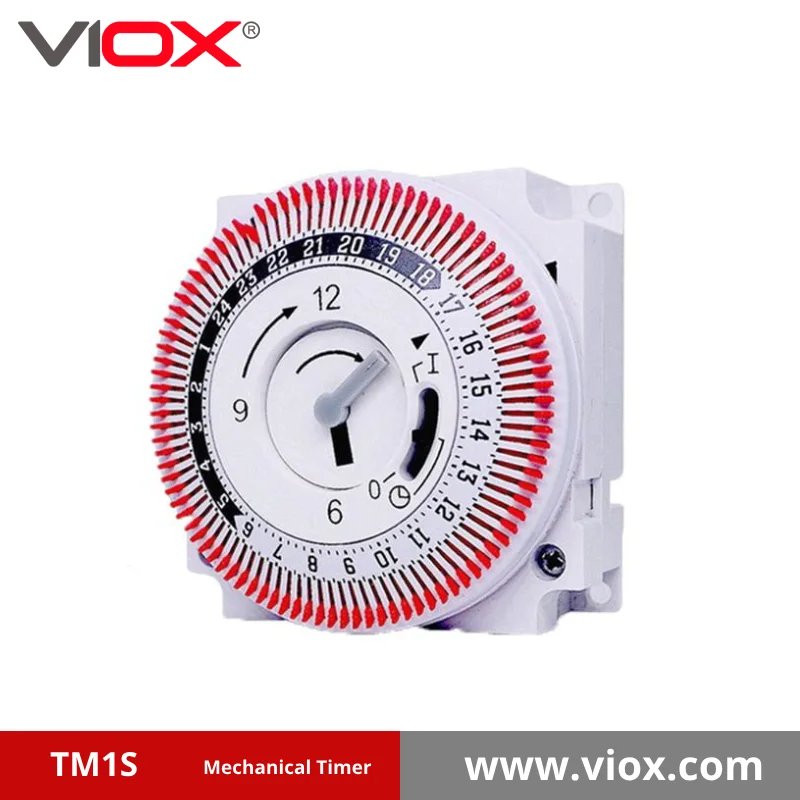
สวิตช์ตั้งเวลาแบบมีหมุด (เรียกอีกอย่างว่า ตัวตั้งเวลาแบบกลไก สวิตช์ หรือ ตัวตั้งเวลาแบบหมุด) เป็นอุปกรณ์ควบคุมไฟฟ้าที่ใช้หมุดจริงที่ใส่ไว้รอบหน้าปัดนาฬิกา 24 ชั่วโมงที่หมุนได้ เพื่อเปิดและปิดวงจรไฟฟ้าโดยอัตโนมัติตามเวลาที่กำหนดไว้ล่วงหน้า.
ส่วนประกอบหลัก:
- หน้าปัดนาฬิกา 24 ชั่วโมง ที่หมุนอย่างต่อเนื่อง
- หมุดตั้งเวลา (โดยปกติจะเป็นพลาสติก) ที่เปิดใช้งานสวิตช์
- สวิตช์ควบคุมด้วยตนเอง สำหรับการควบคุมการเปิด/ปิดทันที
- ขั้วต่อไฟฟ้า สำหรับการเชื่อมต่อวงจร
- ขายึด สำหรับการติดตั้งกล่องไฟฟ้า
การเปรียบเทียบประเภทสวิตช์ตั้งเวลา
| คุณสมบัติ | สวิตช์ตั้งเวลาแบบหมุด | สวิตซ์ตั้งเวลาแบบดิจิตอล | สวิตช์ตั้งเวลาอัจฉริยะ |
|---|---|---|---|
| วิธีการตั้งโปรแกรม | หมุดจริงบนหน้าปัด | อินเทอร์เฟซปุ่ม/LCD | แอปสมาร์ทโฟน |
| ข้อกำหนดด้านพลังงาน | ไม่มี (กลไก) | ต้องมีแบตเตอรี่สำรอง | ต้องมีการเชื่อมต่อ Wi-Fi |
| ความแม่นยำ | ช่วงเวลา 15-30 นาที | ช่วงเวลา 1 นาที | ช่วงเวลา 1 นาที |
| ความทนทาน | 15-20 ปี | 5-10 ปี | 3-7 ปี |
| ค่าใช้จ่าย | $15-40 | $25-60 | $40-120 |
| ความซับซ้อนในการติดตั้ง | การเดินสายพื้นฐาน | การเดินสายพื้นฐาน + การตั้งโปรแกรม | ต้องมีการตั้งค่าขั้นสูง |
กระบวนการติดตั้งทีละขั้นตอน
ข้อกำหนดด้านความปลอดภัยก่อนเริ่มต้น
⚠️ คำเตือนด้านความปลอดภัย: ปิดไฟที่เบรกเกอร์วงจรก่อนเริ่มงานไฟฟ้าเสมอ ใช้เครื่องทดสอบแรงดันไฟฟ้าแบบไม่สัมผัสเพื่อตรวจสอบว่าปิดไฟแล้ว หากคุณไม่สะดวกกับงานไฟฟ้า ให้จ้างช่างไฟฟ้าที่มีใบอนุญาต.
เครื่องมือที่จำเป็น:
- เครื่องตัดสายไฟ
- ไขควง (ปากแบนและปากแฉก)
- น็อตสาย
- เครื่องทดสอบแรงดันไฟฟ้าแบบไม่สัมผัส
- เทปพันสายไฟ
ขั้นตอนการติดตั้ง
ขั้นตอนที่ 1: ปิดไฟและถอดสวิตช์เก่าออก
- ปิดเบรกเกอร์วงจรที่ควบคุมตำแหน่งสวิตช์
- ถอดแผ่นปิดสวิตช์และสวิตช์ที่มีอยู่ออกจากกล่องไฟฟ้า
- ทดสอบสายไฟด้วยเครื่องทดสอบแรงดันไฟฟ้าเพื่อยืนยันว่าปิดไฟแล้ว
- ถ่ายภาพการเชื่อมต่อสายไฟที่มีอยู่เพื่อใช้อ้างอิง
ขั้นตอนที่ 2: ระบุการกำหนดค่าสายไฟ
| การตั้งค่าสายไฟ | รายละเอียด | การเชื่อมต่อตัวตั้งเวลา |
|---|---|---|
| ระบบสองสาย | สายไฟ (สีดำ) และสายนิวทรัล (สีขาว) | สายไฟไปยัง LINE, สายโหลดไปยัง LOAD |
| ระบบสามสาย | สายไฟ, สายนิวทรัล และสายดิน | สายดินไปยังสกรูสีเขียว, สายไฟไปยัง LINE |
| สวิตช์วนรอบ | สายไฟและสายไฟสวิตช์ | ต้องเพิ่มสายนิวทรัล |
ขั้นตอนที่ 3: เชื่อมต่อสายสวิตช์ตั้งเวลา
- เชื่อมต่อสายไฟขาเข้า (โดยปกติจะเป็นสีดำ) เข้ากับขั้วต่อ LINE
- เชื่อมต่อสายโหลดขาออกเข้ากับขั้วต่อ LOAD
- เชื่อมต่อสายนิวทรัลเข้าด้วยกันด้วยน็อตสายไฟ (ถ้ามี)
- เชื่อมต่อสายดินเข้ากับสกรูดินสีเขียว
- ยึดการเชื่อมต่อทั้งหมดด้วยน็อตสายไฟและเทปพันสายไฟ
ขั้นตอนที่ 4: ติดตั้งสวิตช์ตั้งเวลาในกล่องไฟฟ้า
- พับสายไฟอย่างระมัดระวังเข้าไปในกล่องไฟฟ้า
- จัดตำแหน่งสวิตช์ตั้งเวลาให้ตรงกับรูยึด
- ยึดด้วยสกรูที่ให้มา
- ติดตั้งฝาครอบแผ่นปิดสวิตช์
ขั้นตอนที่ 5: คืนค่าพลังงานและทดสอบ
- เปิดเบรกเกอร์อีกครั้ง
- ตรวจสอบว่าสวิตช์ตั้งเวลารับพลังงาน (เข็มนาฬิกาควรเริ่มเดิน)
- ทดสอบฟังก์ชันการแทนที่ด้วยตนเอง
- ตั้งโปรแกรมการตั้งค่าตัวจับเวลาเริ่มต้น
การตั้งโปรแกรมสวิตช์ตั้งเวลาแบบ Pin ของคุณ
ทำความเข้าใจหน้าปัดนาฬิกา
หน้าปัด 24 ชั่วโมงแสดงถึงหนึ่งวันเต็ม โดยแต่ละส่วนมักจะแสดงถึง 15 หรือ 30 นาที ขึ้นอยู่กับรุ่นตัวจับเวลาของคุณ.
คุณสมบัติหน้าปัดนาฬิกา:
- 12 AM (เที่ยงคืน) ที่ด้านบนของหน้าปัด
- 6 AM ที่ด้านขวา
- 12 PM (เที่ยงวัน) ที่ด้านล่าง
- 6 PM ที่ด้านซ้าย
กระบวนการตั้งโปรแกรม Pin
ขั้นตอนที่ 1: ตั้งเวลาปัจจุบัน
- หมุนหน้าปัดเพื่อให้เวลาปัจจุบันตรงกับตัวชี้
- ปล่อยให้มอเตอร์ซิงโครไนซ์ (อาจใช้เวลาหลายนาที)
- ตรวจสอบความถูกต้องของเวลากับนาฬิกา
ขั้นตอนที่ 2: ใส่ Timing Pins
- สำหรับเวลาเปิด (ON): ใส่ pins ที่ขอบด้านนอกของส่วนหน้าปัดที่คุณต้องการให้เปิดอุปกรณ์
- สำหรับเวลาปิด (OFF): ถอด pins ออกหรือปล่อยให้ส่วนต่างๆ ว่างเปล่าในที่ที่คุณต้องการให้อุปกรณ์ปิด
- โดยทั่วไปแต่ละ pin จะแสดงถึง: 15-30 นาทีของเวลาเปิด (ON)
ขั้นตอนที่ 3: ตัวอย่างการตั้งโปรแกรมทั่วไป
| ความต้องการตารางเวลา | กลยุทธ์การวาง Pin |
|---|---|
| ไฟส่องสว่างภูมิทัศน์ | ใส่ pins ตั้งแต่ 6 PM ถึง 11 PM และ 5 AM ถึง 7 AM |
| ปั๊มสระว่ายน้ำ | ใส่ pins สำหรับช่วงเวลา 6 ชั่วโมง (6 AM-12 PM, 6 PM-12 AM) |
| ไฟรักษาความปลอดภัย | ใส่ pins ตั้งแต่เวลาพระอาทิตย์ตกดินถึงพระอาทิตย์ขึ้น |
| ของประดับตกแต่งวันหยุด | ใส่ pins ตั้งแต่ 5 PM ถึง 10 PM ทุกวัน |
Troubleshooting ปัญหาเหมือนกัน
ตัวจับเวลาทำงานไม่ถูกต้อง
ปัญหา:
อุปกรณ์ไม่เปิด/ปิดตามเวลาที่ตั้งโปรแกรมไว้
วิธีแก้ไข:
- ตรวจสอบว่า pins ถูกใส่เข้าไปจนสุดและวางอย่างแน่นหนา
- ตรวจสอบว่าเวลาของนาฬิกาตรงกับเวลาจริง
- ตรวจสอบให้แน่ใจว่าการแทนที่ด้วยตนเองอยู่ในตำแหน่ง “AUTO”
- ทดสอบด้วยตำแหน่ง pin ที่แตกต่างกันเพื่อแยกปัญหาการจับเวลา
ปัญหา:
นาฬิกาเดินเร็วหรือช้า
วิธีแก้ไข:
- ตรวจสอบแรงดันไฟฟ้าที่ตัวจับเวลา (ควรตรงกับแรงดันไฟฟ้าที่กำหนด)
- เปลี่ยนตัวจับเวลาหากกลไกนาฬิกาผิดพลาด
- ตรวจสอบการเชื่อมต่อไฟฟ้าที่ถูกต้อง
ปัญหาทางไฟฟ้า
ปัญหา:
ตัวจับเวลาไม่ได้รับพลังงาน
วิธีแก้ไข:
- ตรวจสอบตำแหน่งเบรกเกอร์
- ตรวจสอบว่าการเชื่อมต่อสายไฟแน่นหนา
- ทดสอบพลังงานที่เข้ามาด้วยเครื่องทดสอบแรงดันไฟฟ้า
- ตรวจสอบการเชื่อมต่อที่หลวมในกล่องไฟฟ้า
เกณฑ์การเลือกสวิตช์ตั้งเวลา
ข้อกำหนดทางไฟฟ้าที่ต้องพิจารณา
| Specification | ช่วงมาตรฐาน | แนวทางการคัดเลือก |
|---|---|---|
| Voltage ระดับความชื่นชอบ | 120V หรือ 240V | ต้องตรงกับแรงดันไฟฟ้าของวงจรของคุณ |
| ปัจจุบันระดับความชื่นชอบ | 15A, 20A, 30A | ต้องเกินกระแสไฟที่เชื่อมต่อ |
| ประเภทมอเตอร์ | ซิงโครนัส (Synchronous) | แม่นยำกว่าแบบไขลาน (More accurate than spring-wound) |
| ติดต่อระดับความชื่นชอบ | โหลดความต้านทานเทียบกับโหลดเหนี่ยวนำ (Resistive vs. Inductive) | โหลดเหนี่ยวนำสำหรับมอเตอร์/หลอดฟลูออเรสเซนต์ (Inductive for motors/fluorescents) |
เมื่อใดควรเลือกใช้ตัวตั้งเวลาแบบหมุด (Pin Timers) (When to Choose Pin Timers)
การใช้งานที่ดีที่สุด: (Best Applications:)
- ควบคุมไฟส่องสว่างภายนอกอาคาร (Outdoor lighting control)
- อุปกรณ์สระว่ายน้ำและสปา
- พัดลมระบายอากาศ (Ventilation fans)
- ระบบชลประทานภูมิทัศน์ (Landscape irrigation systems)
- การแสดงไฟประดับเทศกาล (Holiday decoration displays)
ข้อดีของตัวตั้งเวลาแบบหมุด: (Advantages of Pin Timers:)
- ไม่มีการตั้งโปรแกรมสูญหายระหว่างไฟดับ (No programming to lose during power outages)
- การทำงานที่เรียบง่ายและใช้งานง่าย (Simple, intuitive operation)
- อายุการใช้งานยาวนาน (โดยทั่วไป 15-20 ปี) (Long service life (15-20 years typical))
- ต้นทุนต่ำกว่าทางเลือกแบบดิจิทัล (Lower cost than digital alternatives)
- ไม่จำเป็นต้องเปลี่ยนแบตเตอรี่ (No battery replacement needed)
การปฏิบัติตามรหัสและข้อควรพิจารณาด้านความปลอดภัย
ข้อกำหนดตามกฎหมายไฟฟ้า
แนวทางปฏิบัติของ National Electrical Code (NEC): (National Electrical Code (NEC) Guidelines:)
- สวิตช์ตั้งเวลาต้องได้รับการรับรองจาก UL หรือห้องปฏิบัติการทดสอบที่คล้ายกัน (Timer switches must be listed by UL or similar testing laboratory)
- การติดตั้งต้องเป็นไปตามคำแนะนำของผู้ผลิต (Installation must follow manufacturer’s instructions)
- ต้องมีขนาดสายไฟที่เหมาะสมสำหรับโหลดที่เชื่อมต่อ (Proper wire sizing for connected loads required)
- อาจต้องมีการป้องกัน GFCI สำหรับการใช้งานกลางแจ้ง (GFCI protection may be required for outdoor applications)
ข้อควรพิจารณาเกี่ยวกับรหัสท้องถิ่น: (Local Code Considerations:)
- บางเขตอำนาจศาลกำหนดให้ต้องมีใบอนุญาตสำหรับการติดตั้งสวิตช์ตั้งเวลา (Some jurisdictions require permits for timer switch installation)
- อาจต้องใช้ช่างไฟฟ้าที่มีใบอนุญาตสำหรับการใช้งานบางประเภท (Licensed electrician may be required for certain applications)
- การติดตั้งภายนอกอาคารมักจะต้องมีกล่องหุ้มที่ทนทานต่อสภาพอากาศ (Outdoor installations often require weatherproof enclosures)
แนวทางปฏิบัติที่ดีที่สุดด้านความปลอดภัย
🔒 รายการตรวจสอบความปลอดภัย: (SAFETY CHECKLIST:)
- ✓ ปิดไฟที่เบรกเกอร์เสมอก่อนทำการติดตั้ง (✓ Always turn off power at breaker before installation)
- ✓ ใช้ขั้วต่อสายไฟที่เหมาะสมกับการใช้งาน (✓ Use proper wire connectors rated for application)
- ✓ ตรวจสอบว่าการเชื่อมต่อทั้งหมดแน่นหนาก่อนเปิดไฟ (✓ Verify all connections are secure before restoring power)
- ✓ ทดสอบการป้องกัน GFCI ทุกเดือน หากมี (✓ Test GFCI protection monthly if applicable)
- ✓ กำหนดการตรวจสอบการติดตั้งภายนอกอาคารประจำปี (✓ Schedule annual inspection of outdoor installations)
เคล็ดลับจากผู้เชี่ยวชาญเพื่อประสิทธิภาพที่ดีที่สุด
💡 คำแนะนำจากผู้เชี่ยวชาญ:
- เลือกแบรนด์ที่มีคุณภาพ (Choose quality brands) เช่น Intermatic, Leviton หรือ Woods เพื่อการทำงานที่เชื่อถือได้ (like Intermatic, Leviton, or Woods for reliable operation)
- กำหนดขนาดให้เหมาะสม – ตัวตั้งเวลาควรจัดการโหลดที่เชื่อมต่อได้อย่างน้อย 125% (– timer should handle at least 125% of connected load)
- พิจารณาการป้องกันไฟกระชาก (Consider surge protection) สำหรับโหลดอิเล็กทรอนิกส์และไฟ LED (for electronic loads and LED lighting)
- วางแผนสำหรับการขยาย – ติดตั้งตัวตั้งเวลาที่มีความจุมากขึ้นหากมีโหลดในอนาคต (– install larger capacity timer if future loads possible)
- บันทึกการตั้งค่า (Document settings) – ถ่ายภาพตำแหน่งหมุดเพื่อใช้อ้างอิงในอนาคต (– take photos of pin positions for future reference)
การบำรุงรักษาและอายุการใช้งาน
ตารางการบำรุงรักษาตามปกติ
| ความถี่ | งานบำรุงรักษา | ดประสงค์ |
|---|---|---|
| จำเดือน | ตรวจสอบความแม่นยำของนาฬิกา (Check clock accuracy) | ตรวจสอบให้แน่ใจว่าการจับเวลาถูกต้อง (Ensure proper timing) |
| Quarterly | ทำความสะอาดหน้าปัดและหมุด (Clean dial and pins) | ป้องกันการผูกมัดทางกล (Prevent mechanical binding) |
| ทุกปีเดินตรง | ทดสอบการแทนที่ด้วยตนเอง (Test manual override) | ตรวจสอบการทำงานในกรณีฉุกเฉิน (Verify emergency operation) |
| ทุกๆ สองปี (Bi-annually) | ตรวจสอบการเชื่อมต่อ (Inspect connections) | ป้องกันปัญหาทางไฟฟ้า (Prevent electrical problems) |
เมื่อใดควรเปลี่ยนสวิตช์ตั้งเวลา (When to Replace Timer Switch)
ตัวบ่งชี้การเปลี่ยน:
- นาฬิกาวิ่งเร็วหรือช้าอย่างต่อเนื่องแม้จะมีแรงดันไฟฟ้าที่เหมาะสม (Clock consistently runs fast or slow despite proper voltage)
- หมุดไม่อยู่ในตำแหน่งที่ปลอดภัย (Pins don’t stay securely in position)
- การแทนที่ด้วยตนเองทำงานไม่ถูกต้อง (Manual override doesn’t function properly)
- ความเสียหายที่มองเห็นได้ที่หน้าปัดหรือตัวเรือน (Visible damage to dial or housing)
- หน้าสัมผัสทางไฟฟ้าแสดงสัญญาณของการไหม้หรือการกัดกร่อน (Electrical contacts show signs of burning or pitting)
คำถามที่ถูกถามบ่อย
สวิตช์ตั้งเวลาแบบหมุดมีความแม่นยำเพียงใด (How accurate are pin timer switches?)
โดยทั่วไป สวิตช์ตั้งเวลาแบบหมุดจะรักษาความแม่นยำได้ภายใน 1-2 นาทีต่อวัน เมื่อติดตั้งและบำรุงรักษาอย่างเหมาะสม ทำให้เหมาะสำหรับการใช้งานจับเวลาในที่พักอาศัยและเชิงพาณิชย์ส่วนใหญ่ (Pin timer switches typically maintain accuracy within 1-2 minutes per day when properly installed and maintained, making them suitable for most residential and commercial timing applications.).
ฉันสามารถใช้สวิตช์ตั้งเวลาแบบหมุดกับไฟ LED ได้หรือไม่ (Can I use a pin timer switch with LED lights?)
ได้ แต่ตรวจสอบให้แน่ใจว่าตัวตั้งเวลาได้รับการจัดอันดับสำหรับประเภทของไดรเวอร์ LED ที่ใช้ ไฟ LED บางดวงที่มีไดรเวอร์อิเล็กทรอนิกส์อาจต้องใช้ตัวตั้งเวลาที่ได้รับการจัดอันดับเฉพาะสำหรับโหลดอิเล็กทรอนิกส์ (Yes, but ensure the timer is rated for the type of LED driver used. Some LED fixtures with electronic drivers may require timers specifically rated for electronic loads.).
อะไรคือความแตกต่างระหว่างพิกัดโหลดความต้านทานและโหลดเหนี่ยวนำ (What’s the difference between resistive and inductive load ratings?)
โหลดความต้านทาน (ไฟหลอดไส้, เครื่องทำความร้อน) มีกระแสเริ่มต้นต่ำกว่า ในขณะที่โหลดเหนี่ยวนำ (มอเตอร์, ไฟฟลูออเรสเซนต์) มีกระแสเริ่มต้นสูงกว่า ซึ่งต้องใช้หน้าสัมผัสตัวตั้งเวลาที่ได้รับการจัดอันดับเป็นพิเศษ (Resistive loads (incandescent lights, heaters) have lower startup current, while inductive loads (motors, fluorescent lights) have higher startup current requiring specially rated timer contacts.).
สวิตช์ตั้งเวลาแบบหมุดมีอายุการใช้งานนานเท่าใด (How long do pin timer switches last?)
โดยทั่วไป ตัวตั้งเวลาแบบหมุดกลไกคุณภาพดีจะมีอายุการใช้งาน 15-20 ปี เมื่อติดตั้งและบำรุงรักษาอย่างเหมาะสม ซึ่งนานกว่าสวิตช์ตั้งเวลาแบบดิจิทัลอย่างมาก (Quality mechanical pin timers typically last 15-20 years with proper installation and maintenance, significantly longer than digital timer switches.).
ตัวตั้งเวลาแบบหมุดสามารถทำงานได้ในช่วงที่ไฟฟ้าดับหรือไม่ (Can pin timers work during power outages?)
ตัวตั้งเวลาแบบหมุดยังคงรักษาเวลาไว้ได้ในช่วงที่ไฟฟ้าดับสั้นๆ เนื่องจากใช้กลไกนาฬิกา แต่ไฟฟ้าดับเป็นเวลานานจะต้องรีเซ็ตเวลาเมื่อไฟฟ้ากลับมา (Pin timers continue keeping time during brief power outages since they use mechanical clockwork, but extended outages will require time reset when power returns.).
ตัวตั้งเวลาแบบหมุดสามารถใช้งานได้กับระบบบ้านอัจฉริยะหรือไม่?
ตัวตั้งเวลาแบบหมุดแบบดั้งเดิมทำงานโดยอิสระจากระบบบ้านอัจฉริยะ แต่ผู้ผลิตบางรายนำเสนอรูปแบบไฮบริดที่ผสมผสานความน่าเชื่อถือทางกลไกเข้ากับตัวเลือกการเชื่อมต่ออัจฉริยะ.
สรุป
การตั้งสวิตช์ตั้งเวลาด้วยหมุดช่วยให้ควบคุมการตั้งเวลาในระยะยาวได้อย่างน่าเชื่อถือสำหรับอุปกรณ์ไฟฟ้าของคุณ โดยไม่ต้องมีความซับซ้อนของการเขียนโปรแกรมดิจิทัล การปฏิบัติตามขั้นตอนการติดตั้งที่เหมาะสม การทำความเข้าใจเทคนิคการตั้งโปรแกรมหมุด และการรักษากฎเกณฑ์ คุณจะสามารถควบคุมอัตโนมัติที่เชื่อถือได้อย่างยาวนานหลายทศวรรษ.
เกี่ยวข้องกัน
ทำความเข้าใจประเภทของสวิตช์ตั้งเวลา
