

Keranjang belanja anda: 8×200W panel solar. Satu pengawal cas MPPT. Satu kotak penyambung PV $150.
Thread Reddit mengatakan anda sangat memerlukannya. Video YouTube mengatakan ia adalah pembaziran wang untuk persediaan anda. Halaman produk pengeluar secara agresif tidak komited. Anda $150 jauh dari menekan “checkout,” dan anda tidak tahu sama ada anda akan membeli komponen penting atau setara solar dengan lapisan bawah pada kereta terpakai.
Jawapan Pantas: Anda memerlukan kotak penyambung PV apabila anda mempunyai lebih banyak rentetan selari daripada yang pengawal cas anda ada terminal input. Untuk kebanyakan sistem solar RV dengan 2-3 panel atau pendawaian siri, anda tidak memerlukannya.
Inilah kebenarannya: Kebanyakan pemilik RV membeli kotak penyambung yang mereka tidak perlukan—atau melangkauinya apabila ia sebenarnya membantu. Perbezaannya bergantung pada cara anda mendawai panel anda, bukan berapa banyak panel yang anda ada.
Mari kita fikirkan di kem mana anda berada.
Apa Sebenarnya Kotak Penyambung PV Lakukan (Dan Apa Yang Tidak)
Singkirkan bahasa pemasaran, dan kotak penyambung PV adalah kotak simpang kalis cuaca dengan bar bas di dalam.
Itu sahaja.
Ia pada dasarnya adalah titik pertemuan untuk wayar yang menjadi terlalu popular untuk bahagian VIP dua terminal pengawal cas anda.
Bar bas—jalur logam yang berjalan melalui kotak—memberi anda titik sambungan tunggal. Pelbagai wayar positif bertemu di sana. Pelbagai wayar negatif juga. Semuanya bergabung menjadi satu output positif dan satu output negatif, yang kemudiannya berjalan ke pengawal cas anda.
Apa yang ia lakukan: Menukarkan 8 wayar (4 positif, 4 negatif dari 4 rentetan selari) menjadi 2 wayar (1 positif, 1 negatif ke pengawal anda).
Apa yang tidak dilakukannya: Meningkatkan kuasa. Mengawal voltan. Melindungi daripada lonjakan (melainkan anda menambah pemutus litar, yang memerlukan kos tambahan). Memperbaiki konfigurasi pendawaian yang buruk secara ajaib.
Kotak penyambung menyelesaikan tepat satu masalah: “Saya mempunyai lebih banyak wayar daripada yang pengawal cas saya ada terminal skru.” Jika anda tidak mempunyai masalah itu, anda tidak memerlukan kotak ini.
Tetapi inilah “Perangkap Kotak Penyambung”—menambah komponen pada mana-mana sistem elektrik menambah rintangan. Lebih banyak titik sambungan bermakna lebih banyak tempat untuk penurunan voltan, kakisan, dan kegagalan. Kotak $150 yang terletak di atas bumbung anda? Ia menambah kira-kira 0.1-0.2 ohm rintangan merentasi semua sambungan terminal tersebut.
Untuk sistem 12V yang menolak 40 amp, anda melihat kira-kira 3-5% kehilangan kuasa daripada rintangan (berbeza dengan kualiti sambungan dan tolok wayar). Itu kuasa yang telah anda jana, kini memanaskan tembaga dan bukannya mengecas bateri anda.
Jadi soalannya bukan “Haruskah saya membeli kotak penyambung?” Ia adalah “Adakah masalah yang diselesaikan oleh kotak ini melebihi masalah yang diciptakannya?”
Tiga Senario Di Mana Anda TIDAK Memerlukan Kotak Penyambung
Kebanyakan sistem solar RV termasuk dalam salah satu kategori ini. Jika sistem anda termasuk, simpan $150 anda.
Senario 1: Panel Anda Didawai dalam Siri (2-4 Panel)
Apabila anda mendawai panel solar dalam siri, anda menyambungkan positif ke negatif, positif ke negatif, gaya rantai daisy. Empat panel dalam siri mencipta tepat dua wayar: satu positif dari panel pertama, satu negatif dari panel terakhir.
Dua wayar muat ke dalam mana-mana pengawal cas yang dibuat dalam dekad yang lalu. Tidak diperlukan kotak penyambung.
Output? Empat panel 200W (setiap satu kira-kira 18V Vmp, 11A Imp pada Keadaan Ujian Standard) yang didawai dalam siri memberi anda 72V pada 11A. Pengawal MPPT (Penjejakan Titik Kuasa Maksimum) anda menyukai voltan tinggi—penukaran yang lebih cekap, keperluan tolok wayar yang lebih nipis, kehilangan rintangan yang lebih rendah dalam jangka masa yang panjang.
Tetapi (dan ini adalah tetapi yang besar), pendawaian siri mempunyai kelemahan yang membawa maut untuk bumbung RV: “Pembunuh Teduhan.” Satu panel yang berlorek mencekik keseluruhan rentetan. Kita akan kembali kepada ini.
Senario 2: Anda Mempunyai Tatasusunan Selari Kecil (Maksimum 2-3 Panel)
Semak spesifikasi pengawal cas anda sekarang. Kebanyakan pengawal MPPT mempunyai 2-4 terminal input—bermakna mereka boleh menerima 2-4 wayar berasingan tanpa sebarang kotak simpang.
Tiga panel 200W yang didawai selari? Itu 3 wayar positif dan 3 wayar negatif. Jika pengawal anda mempunyai 3+ terminal pada setiap sisi, pasangkannya terus. Sifar komponen tambahan. Sifar titik sambungan tambahan. Sifar penurunan voltan daripada kotak penyambung yang anda tidak perlukan.
Siri Rover Renogy? Empat terminal. Victron SmartSolar? Empat terminal. EPEver Tracer? Empat terminal.
Anda baru sahaja menjimatkan $150. Itu 75% daripada kos panel 200W yang lain. Diri masa depan anda berterima kasih kepada anda atas kesederhanaan apabila anda menyelesaikan masalah pada tengah malam di tempat letak kereta Walmart.
Senario 3: Anda Menggunakan Konfigurasi Siri-Selari (2s2p, 2s4p)
Di sinilah “Peraturan 2-dalam-Siri” masuk—salah satu rahsia yang paling dijaga dalam konfigurasi solar RV.
Daripada mendawai kesemua 8 panel selari (yang akan mencipta 8 larian wayar yang berasingan dan pasti memerlukan kotak penyambung), anda mendawainya dalam pasangan dahulu. Dua panel dalam siri mencipta satu rentetan. Lakukan itu empat kali, dan anda mempunyai empat rentetan. (Nota: 2s4p bermakna 2 panel dalam siri, kemudian 4 rentetan selari—kami akan menerangkan ini sepenuhnya sebentar lagi.)
Sekarang anda hanya menyelarikan empat sambungan dan bukannya lapan. Konfigurasi 2s4p anda (2 panel dalam siri, 4 rentetan selari) bermakna hanya 4 wayar positif dan 4 wayar negatif perlu bersatu.
Untuk 4 rentetan? Anda mungkin masih memerlukan kotak penyambung. Tetapi untuk 2s2p (empat panel kesemuanya sebagai dua rentetan 2 panel)? Kebanyakan pengawal cas boleh mengendalikan itu secara langsung dengan terminal terbina dalam mereka.
专业提示: Peraturan 2-dalam-Siri mengimbangi kecekapan voltan dengan toleransi teduhan. Satu panel yang berlorek hanya membunuh 50% rentetan itu, bukan keseluruhan tatasusunan anda.
Apabila Kotak Penyambung Sebenarnya Menyelesaikan Masalah
Kotak penyambung menjadi penting apabila fizik pendawaian selari bertembung dengan batasan pengawal cas anda.
Anda Mempunyai 4+ Rentetan Selari (Atau 4+ Panel Individu Selari)
Katakan anda telah memutuskan pendawaian selari adalah penting untuk persediaan anda (kita akan membincangkan mengapa dalam bahagian seterusnya). Lapan panel 200W selari bermakna lapan wayar positif dan lapan wayar negatif—semuanya cuba ditamatkan pada pengawal cas anda.
Pengawal anda mempunyai dua terminal skru. Mungkin empat jika anda bernasib baik.
Secara fizikal, anda tidak boleh memuatkan lapan wayar 10-tolok ke dalam dua titik terminal. Baiklah, anda boleh, tetapi ia akan kelihatan seperti kebakaran elektrik yang menunggu untuk berlaku, dan sambungan anda akan cukup longgar untuk arka di bawah beban.
Di sinilah kotak penyambung mendapat tempatnya. Dan mengelakkan “Perangkap Kotak Penyambung” bermakna menggunakannya hanya apabila batasan fizikal ini memerlukannya.
Kotak menyediakan bar bas—jalur tembaga tebal—di mana kesemua lapan wayar positif bersambung melalui terminal individu. Sama untuk yang negatif. Kemudian satu wayar 6AWG tebal berjalan dari setiap bar bas ke pengawal cas anda.
Matematiknya: Lapan panel pada 11A setiap satu = 88A arus gabungan. Itu memerlukan wayar 4AWG minimum (dengan andaian larian 10 kaki, toleransi penurunan voltan 3%). Kotak penyambung anda mengumpulkan semua arus itu ke dalam satu konduktor yang bersaiz betul untuk mengendalikannya.
Panel Anda Bertaburan di Lokasi “Tetris Bumbung”
Inilah realiti bumbung RV: Ia tidak rata. Ia tidak berbentuk segi empat sama. Dan ia pasti tidak kosong.
Anda ada:
- Unit AC (3×3 kaki hartanah utama, hilang)
- Ventilasi bumbung (empat daripadanya, semuanya di tempat yang menyusahkan)
- Tingkap langit (betul-betul di tengah, sudah tentu)
- Sambungan gelongsor keluar (tidak boleh dipasang di situ kecuali anda suka air masuk)
- Tepi melengkung (panel tidak bengkok)
Jadi lapan panel anda berakhir di empat lokasi: dua di sini, tiga di sana, dua di tepi tangga, satu panel sunyi di atas bilik tidur. Selamat datang ke Tetris Bumbung.
Setiap lokasi berjarak 10-20 kaki. Menjalankan lapan wayar 10AWG berasingan dari lokasi bertaburan sehingga ke pengawal cas anda (mungkin dipasang di ruang bawah tanah) bermakna 100+ kaki wayar tembaga mahal menjalar di atas bumbung anda.
Atau: Pasang kotak penyambung yang dipasang di bumbung. Sambungkan panel anda ke lokasi kotak terdekat (laluan pendek, tolok yang lebih kecil boleh diterima). Kemudian jalankan 两次 wayar tebal dari kotak ke pengawal anda.
Kotak penyambung menjadi titik pengagregatan pusat anda, memudahkan pendawaian bumbung anda dan mengurangkan jumlah tembaga yang diperlukan.
Anda Merancang untuk Pengembangan Masa Depan
Bermula dengan empat panel tetapi mahu pilihan untuk menambah empat lagi tahun depan? Kotak penyambung bersaiz betul (dinilai untuk 6-8 input rentetan) memberi anda terminal kosong yang sedia untuk pengembangan.
Alternatifnya? Mengoyakkan pendawaian pengawal cas anda, menambah penyambung cabang di tengah laluan, atau menggantikan keseluruhan abah-abah wayar anda kerana anda mengecilkannya pada mulanya.
Untuk $150, kotak penyambung memberi anda ruang kepala. Sama ada ia berbaloi bergantung pada sejauh mana pasti anda tentang pengembangan masa depan. Jika jawapan anda ialah “mungkin suatu hari nanti,” mungkin tidak berbaloi. Jika jawapan anda ialah “pasti menambah 400W musim bunga depan,” sangat berbaloi.
Konfigurasi Yang Sebenarnya Penting: Siri vs Selari untuk Bumbung RV
Inilah yang tidak diberitahu oleh sesiapa kepada anda di hadapan: Soalan kotak penyambung adalah sekunder.
Soalan utamanya ialah bagaimana anda menyambungkan panel anda bersama-sama—kerana itu menentukan sama ada anda memerlukan kotak penyambung, tolok wayar yang anda perlukan, dan sama ada anda benar-benar mendapat output kuasa yang anda bayar.
Dan untuk solar RV, jawapan “jelas” daripada solar kediaman (sentiasa siri!) selalunya sangat salah.
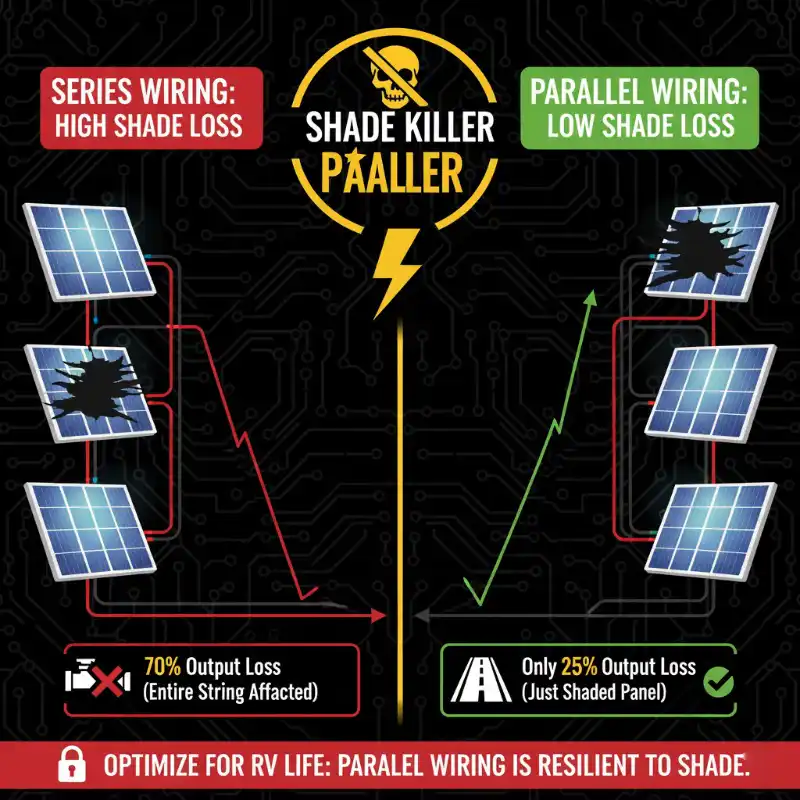
Mengapa “Pembunuh Teduhan” Merosakkan Konfigurasi Siri
Pendawaian siri menyambungkan panel positif-ke-negatif dalam rantai. Faedah elektrik adalah mudah: voltan bertambah, manakala arus kekal malar.
Empat panel 18V dalam siri? Anda mendapat output 72V. Voltan yang lebih tinggi itu bermakna pengawal MPPT anda boleh berfungsi dengan lebih cekap, dan anda boleh menggunakan wayar yang lebih nipis (kerana ampere yang lebih rendah = kurang tembaga diperlukan untuk penghantaran kuasa yang sama).
Kedengaran sempurna.
Sehingga dahan pokok menaungi satu panel.
Dalam konfigurasi siri, arus dihadkan oleh pautan terlemah. Fikirkan ia seperti paip air: jika satu bahagian mengecil kepada separuh diameter, keseluruhan aliran paip jatuh untuk memadankan sekatan itu.
Apabila satu panel dalam rentetan siri anda dinaungi—walaupun sebahagiannya—output arusnya jatuh daripada 11A kepada mungkin 4A. Setiap panel lain dalam rentetan? Masih bermandikan cahaya matahari penuh, tetapi dicekik hingga 4A kerana ia dirantai bersama. Rentetan 800W anda baru sahaja menjadi rentetan 290W.
Data dunia sebenar daripada ujian solar RV menunjukkan bahawa menaungi hanya dua sel pada satu panel (kira-kira 3% daripada kawasan panel) boleh mengurangkan jumlah output rentetan siri sebanyak kira-kira 26%. Menaungi separuh panel? Anda melihat kehilangan output 50-60% merentasi keseluruhan rentetan.
Ini adalah “Pembunuh Teduhan” dalam tindakan—dan itulah sebabnya nasihat solar kediaman (di mana panel diletakkan di atas bumbung yang menghadap ke selatan tanpa halangan) gagal dengan teruk untuk RV.
RV anda diletakkan di bawah pokok. Unit AC anda menaungi panel semasa sudut matahari tertentu. Ventilasi bumbung itu menghasilkan bayang-bayang selama dua jam setiap pagi. RV jiran anda menghalang matahari apabila anda berkemas di tapak perkhemahan.
Pendawaian siri mengubah setiap bayang-bayang menjadi titik cekik seluruh sistem.
Mengapa Selari ialah “Keutamaan Solar RV” (Walaupun Voltan Lebih Rendah)
Pendawaian selari menyambungkan semua terminal positif bersama-sama dan semua terminal negatif bersama-sama. Voltan kekal malar (18V daripada setiap panel = output 18V), manakala arus bertambah.
Empat panel 200W selari? Anda mendapat 18V pada 44A (4×11A).
Pertukaran elektrik: Voltan yang lebih rendah bermakna pengawal cas anda tidak boleh beroperasi dengan cekap, dan anda memerlukan wayar yang lebih tebal untuk mengendalikan ampere yang lebih tinggi tanpa penurunan voltan. Untuk penghantaran kuasa yang sama, anda membelanjakan lebih banyak untuk tembaga.
Tetapi inilah yang anda peroleh: pengasingan teduhan.
Apabila satu panel dalam konfigurasi selari dinaungi, hanya panel itu output jatuh. Tiga panel lain terus menghasilkan kuasa penuh, tidak terjejas sama sekali. Menaungi satu panel daripada empat? Anda kehilangan 25% daripada output tatasusunan anda, bukan 70%.
Itulah perbezaan antara tiba di kem dengan bateri pada cas 60% berbanding cas 20%. Antara menjalankan peti sejuk anda semalaman berbanding menjatah kuasa.
Untuk solar RV, di mana teduhan separa adalah peraturan dan bukannya pengecualian, toleransi teduhan pendawaian selari melebihi ketidakcekapan elektriknya.
专业提示: Jika anda menjalankan sistem 12V, pendawaian selari membolehkan anda menggunakan pengawal cas PWM yang kurang mahal dan bukannya MPPT, yang berpotensi menjimatkan $100-150. Voltan sudah sepadan dengan bank bateri anda, jadi anda tidak memerlukan keajaiban penukaran voltan MPPT. Walaupun sejujurnya, jika anda mengoptimumkan pada tahap ini, anda mungkin membeli MPPT juga. Ia seperti membeli kereta sport dan kemudian berdebat tentang petrol biasa berbanding premium.
Penyelesaian Goldilocks: Siri-Selari (2s2p, 2s4p)
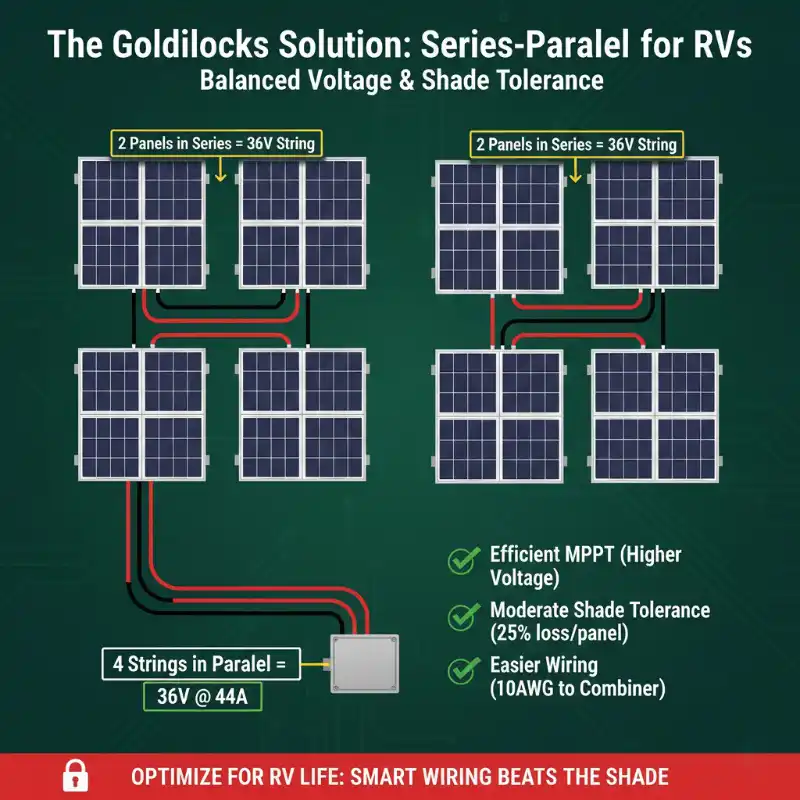
Bagaimana jika anda mahukan kecekapan voltan siri dan toleransi teduhan selari?
Masukkan konfigurasi siri-selari—panel yang didawai dalam kumpulan siri kecil, kemudian kumpulan itu diselarikan bersama.
Konfigurasi RV yang paling biasa ialah “Peraturan 2-dalam-Siri”: Dawaikan panel berpasangan (2 dalam siri), kemudian selarikan pasangan itu.
Empat panel menjadi dua rentetan (2s2p):
- Rentetan 1: Panel A → Panel B (36V, 11A)
- Rentetan 2: Panel C → Panel D (36V, 11A)
- Digabungkan: 36V, 22A ke pengawal
Lapan panel menjadi empat rentetan (2s4p):
- Empat pasang, setiap satu mengeluarkan 36V pada 11A
- Digabungkan: 36V, 44A ke pengawal
Mengapa ini berfungsi untuk RV:
Peningkatan voltan (36V berbanding 18V) membolehkan pengawal MPPT anda beroperasi dengan lebih cekap daripada selari lurus. Anda boleh menggunakan wayar 10AWG dan bukannya 6AWG, menjimatkan wang dan memudahkan pemasangan di atas bumbung yang sempit.
Toleransi teduhan bertambah baik dengan ketara berbanding siri penuh. Jika satu panel terlindung, hanya pasangannya dalam rentetan siri terjejas—iaitu 25% daripada tatasusunan anda, bukan 100%. Tiga rentetan lain terus menghasilkan kuasa penuh.
Anda mendapat 75% daripada manfaat elektrik siri dengan 75% toleransi teduhan selari. Anda tidak berkompromi—anda mengoptimumkan secara strategik untuk keadaan sebenar yang akan dihadapi oleh RV anda, bukan keadaan teori yang hanya wujud dalam helaian data panel solar.
Untuk kebanyakan pemasangan RV dengan 4-8 panel, ini adalah titik optimum.
Soalan kotak penyambung? Dengan 2s4p (empat rentetan selari), anda mungkin memerlukannya. Dengan 2s2p (dua rentetan), pengawal cas anda mungkin boleh mengendalikannya secara langsung.
Cara Mendawai 8×200W Panel di 4 Lokasi Bumbung (Rangka Kerja Keputusan Langkah demi Langkah)
Mari selesaikan senario tepat anda: 8 panel berjumlah 1,600W, bertaburan di 4 lokasi di bumbung anda kerana fizik dan geometri bumbung RV membenci anda.
Inilah cara untuk mengkonfigurasi ini untuk output dunia sebenar maksimum.
Langkah 1: Peta Teka-teki Tetris Bumbung Anda
Sebelum menyentuh wayar, dokumentasikan reka letak anda:
Inventori lokasi:
- Lokasi 1 (depan): 2 panel
- Lokasi 2 (tengah-kiri): 2 panel
- Lokasi 3 (belakang-kiri): 3 panel
- Lokasi 4 (belakang-kanan): 1 panel
Penilaian risiko teduhan:
- Depan: Unit AC meneduhi satu panel 9-11 pagi
- Tengah-kiri: Bayang-bayang bolong bumbung 7-9 pagi
- Belakang-kiri: Bersih, tetapi perkhemahan pokok mungkin
- Belakang-kanan: Risiko teduhan minimum
Jarak larian wayar:
- Setiap lokasi ke pengawal cas: 15-25 kaki
- Antara lokasi: 8-15 kaki
Pemetaan ini memberitahu anda semua yang anda perlu tahu tentang kebolehlaksanaan konfigurasi. Lokasi dengan masalah teduhan yang diketahui harus diasingkan secara elektrik daripada lokasi dengan pendedahan matahari yang bersih. Itulah cara anda mengelakkan “Pembunuh Teduhan.”
Langkah 2: Pilih Strategi Konfigurasi Anda
Anda mempunyai tiga pilihan yang berdaya maju. Setiap satu mempunyai keperluan kotak penyambung yang berbeza.
Pilihan A: Empat Rentetan Siri 2-Panel Selari (2s4p) — Kotak Penyambung Diperlukan
Cara mendawai:
- Lokasi 1 (depan): Panel 1 → Panel 2 dalam siri = Rentetan 1 (36V, 11A)
- Lokasi 2 (tengah-kiri): Panel 3 → Panel 4 dalam siri = Rentetan 2 (36V, 11A)
- Lokasi 3 (belakang-kiri): Panel 5 → Panel 6 dalam siri = Rentetan 3 (36V, 11A)
- Lokasi 4 (belakang-kanan): Panel 7 → Panel 8 dalam siri = Rentetan 4 (36V, 11A)
- Pasang kotak penyambung di bumbung
- Jalankan semua 4 rentetan positif + 4 rentetan negatif ke bar bas kotak penyambung
- Satu pasangan wayar 6AWG dari kotak ke pengawal cas
Kebaikan:
- Toleransi teduhan maksimum: Satu panel yang teduh hanya membunuh 25% daripada satu rentetan = 12.5% daripada jumlah tatasusunan
- Konfigurasi rentetan seimbang (semua rentetan voltan/arus yang sama)
- “Peraturan 2-dalam-Siri” diikuti dengan sempurna
- Voltan sederhana (36V) baik untuk kecekapan MPPT
- Larian wayar dari panel ke kotak boleh menjadi 10AWG (kos lebih rendah)
Narapidana:
- Memerlukan kotak penyambung ($150)
- Arus gabungan: 44A (memerlukan 6AWG atau 4AWG ke pengawal bergantung pada jarak)
- Pendawaian paling kompleks (8 larian wayar ke kotak)
Sebaliknya, apabila abang ipar anda bertanya “mengapa ia begitu rumit,” anda boleh dengan yakin menjelaskan bahawa anda telah mengoptimumkan untuk toleransi teduhan. Dia akan mengangguk dan berundur perlahan-lahan.
Terbaik untuk: Pengguna RV yang kerap berkhemah di tempat teduh separa (pokok, tapak perkhemahan yang padat) dan mahukan daya tahan maksimum.
Pilihan B: Dua Rentetan Siri 4-Panel Selari (4s2p) — Kotak Penyambung Mungkin Tidak Diperlukan
Cara mendawai:
- Lokasi 1+2 (depan dan tengah-kiri): 4 panel dalam siri = Rentetan 1 (72V, 11A)
- Lokasi 3+4 (bahagian belakang): 4 panel dalam siri = Rentetan 2 (72V, 11A)
- Sambungkan Rentetan 1 dan Rentetan 2 selari
- Jika pengawal cas anda mempunyai 4 terminal: sambungan terus (tiada kotak)
- Jika hanya 2 terminal: kotak penyambung kecil atau penyambung cabang
Kebaikan:
- Voltan lebih tinggi (72V) = kecekapan MPPT maksimum + tolok wayar paling nipis
- Hanya 2 sambungan selari (mungkin melangkau kotak penyambung)
- Topologi pendawaian yang lebih mudah
- Kos tembaga lebih rendah (boleh menggunakan 10AWG untuk keseluruhan larian pada tahap arus ini)
Narapidana:
- Kerentanan teduhan lebih tinggi: Satu panel yang teduh menjejaskan keseluruhan rentetan 4 panel = 50% daripada output tatasusunan
- Masalah teduhan unit AC depan kini memberi kesan kepada 4 panel, bukan 2
- Melanggar “Peraturan 2-dalam-Siri” (meningkatkan risiko teduhan)
- Mesti mengesahkan pengawal cas boleh mengendalikan 72V (semak penarafan VOC)
Amaran Cuaca Sejuk: Voltan panel meningkat apabila suhu menurun. Lembaran spesifikasi pengawal cas anda menyatakan “Input maks 100V.” Pagi Disember yang sejuk di ketinggian 7,000 kaki? Panel anda mentertawakan lembaran spesifikasi. Mereka akan menolak 85V+ dan mencabar pengawal anda untuk bersaing.
Terbaik untuk: Pengguna RV yang kebanyakannya "boondock" di bawah cahaya matahari penuh (padang pasir, tanah BLM terbuka) dengan kebimbangan teduhan yang minimum. Jika anda berkhemah di tapak perkhemahan yang dibangunkan dengan kuasa pantai dan hanya menggunakan solar sebagai sandaran, ini berkesan. Jika anda seorang "boondocking" yang tulen yang mengelakkan tapak perkhemahan seperti perangkap pelancong, kekalkan dengan Pilihan A.
Pilihan C: Pengawal Cas Berasingan untuk Bahagian Bumbung Berasingan — Tiada Kotak Penggabung
Cara mendawai:
- Pengawal 1 (depan): Mengendalikan 4 panel dari Lokasi 1+2 (dua rentetan siri 2-panel selari = 2s2p)
- Pengawal 2 (belakang): Mengendalikan 4 panel dari Lokasi 3+4 (dua rentetan siri 2-panel selari = 2s2p)
- Setiap pengawal bersambung terus ke bank bateri
- Tiada kotak penggabung diperlukan
Kebaikan:
- Pencemaran silang teduhan sifar: Teduhan AC depan hanya mempengaruhi output pengawal depan
- Pengoptimuman muktamad: setiap pengawal menjejaki panelnya secara bebas
- Tiada kotak penggabung diperlukan (menjimatkan $150)
- Boleh menggunakan sudut/kecondongan panel yang berbeza setiap bahagian
- Redundansi terbina dalam: jika satu pengawal gagal, anda masih mempunyai 800W
Narapidana:
- Kos: Dua pengawal MPPT = $200-400+ bergantung pada model (Victron SmartSolar 100/30 ×2 = ~$360)
- Kerumitan pemasangan berganda (dua set sambungan, dua sistem pemantauan)
- Mengambil lebih banyak ruang pemasangan di ruang elektrik
- Memerlukan saiz wayar bank bateri yang teliti (kedua-dua pengawal memberi makan bank yang sama)
Anggap ia seperti membeli dua alat berkualiti sederhana dan bukannya satu alat mewah. Redundansi mempunyai nilai apabila anda berada 200 batu dari kedai solar terdekat.
Terbaik untuk: Pengguna RV dengan corak teduhan yang kompleks di bahagian bumbung yang berbeza, atau mereka yang mahukan output maksimum mutlak tanpa mengira kos. Ini ialah pendekatan “profesional”.
Langkah 3: Pengiraan Tolok Wayar & Susut Voltan
Untuk sebarang konfigurasi, pastikan susut voltan di bawah 3% daripada voltan sistem untuk mengelakkan pembaziran kuasa yang telah anda jana.
Formula: Susut Voltan = (2 × Panjang Wayar × Arus × Rintangan Wayar) / 1000
Ya, anda boleh menggunakan kalkulator dalam talian. Tetapi memahami formula bermakna anda akan tahu dengan tepat mengapa nasihat rakan anda “ia berkesan pada RV saya” mungkin menenggelamkan sistem anda.
Rintangan wayar (ohm setiap 1000 kaki):
- 10AWG: 1.0 ohm
- 8AWG: 0.628 ohm
- 6AWG: 0.395 ohm
- 4AWG: 0.249 ohm
Contoh untuk Pilihan A (2s4p dengan kotak penggabung):
- Voltan sistem: 36V (Vmp nominal)
- Arus gabungan: 44A
- Larian wayar dari kotak penggabung ke pengawal: 20 kaki
- Sasaran: <3% susut voltan = <1.08V susut
Menggunakan wayar 6AWG:
- Susut = (2 × 20 × 44 × 0.395) / 1000 = 0.695V susut
- Peratusan = 0.695V / 36V = 1.93% ✓ Boleh diterima
0.695V yang anda hilang itu? Dalam sistem 12V, rintangan yang sama akan menjadi 6% daripada voltan anda hilang untuk memanaskan tembaga dan bukannya mengecas bateri. Matematik penting.
Menggunakan wayar 8AWG:
- Susut = (2 × 20 × 44 × 0.628) / 1000 = 1.11V susut
- Peratusan = 1.11V / 36V = 3.08% ✗ Marginal (tetapi cukup dekat untuk kebanyakan pemasangan)
专业提示: Untuk larian dari panel individu ke kotak penggabung yang dipasang di bumbung (jarak yang lebih pendek, arus yang lebih rendah setiap rentetan), 10AWG biasanya mencukupi. Tolok berat (6AWG/4AWG) hanya diperlukan untuk larian terakhir dari kotak ke pengawal di mana semua arus berkumpul.
Langkah 4: Matriks Keputusan Kotak Penggabung (Jawapan Akhir)
Untuk senario 8-panel, 4-lokasi anda:
JIKA anda memilih Pilihan A (2s4p): → YA, beli kotak penggabung
- Anda mempunyai 4 rentetan selari (8 wayar jumlah)
- Pengawal cas anda mempunyai maksimum 2-4 terminal
- Kemustahilan fizikal untuk menyambung tanpa titik pengagregatan
- $150 itu wajar
JIKA anda memilih Pilihan B (4s2p): → MUNGKIN TIDAK (semak pengawal anda)
- Anda mempunyai 2 rentetan selari (4 wayar jumlah)
- Kebanyakan pengawal MPPT boleh mengendalikan ini dengan terminal terbina dalam
- Semak pengawal khusus anda: 4 terminal tersedia? Kemudian tiada kotak diperlukan
- Jika hanya 2 terminal, gunakan penyambung cabang (~$20) dan bukannya kotak penggabung penuh (~$150)
JIKA anda memilih Pilihan C (pengawal berasingan): → Tiada kotak penggabung diperlukan
- Setiap pengawal mengendalikan konfigurasi 2s2p sendiri (2 rentetan selari setiap pengawal)
- Sambungan terus ke terminal setiap pengawal
- Jimat $150; anda sudah membelanjakannya untuk pengawal kedua
Semakan akhir kos-faedah:
Kotak penggabung ($150) + wayar 6AWG ($80 untuk larian 25 kaki) = $230
VS.
Penyambung cabang ($20) + wayar 6AWG ($80) = $100
Untuk Pilihan B, anda menjimatkan $130 dengan melangkau kotak.
Untuk Pilihan A, anda need organisasi dan kepadatan sambungan yang disediakan oleh kotak—$150 bukanlah pilihan.
Untuk Pilihan C, anda sudah membelanjakan $200+ untuk pengawal kedua, yang menghapuskan keperluan untuk sebarang perkakasan penggabung.
Soalan $150 Dijawab
Kembali ke troli beli-belah anda. Lapan panel. Satu pengawal cas. Kotak penggabung $150 itu.
Berikut ialah rangka kerja keputusan anda:
Semak konfigurasi pendawaian anda dahulu. Jika anda membuat pendawaian secara bersiri atau hanya menggunakan 2-3 rentetan selari, kebanyakan pengawal cas boleh mengendalikan sambungan secara terus. Tidak perlu kotak. Klik “simpan untuk kemudian” dan gerakkan $150 itu ke arah wayar yang lebih baik atau lebih kapasiti panel.
Kira rentetan selari anda yang kedua. Empat atau lebih rentetan selari? Realiti fizikal menuntut pengagregatan. Kotak penggabung berfungsi dengan memberikan anda titik sambungan yang betul dan bukannya sarang tikus wayar yang berebut ruang terminal.
Pertimbangkan susun atur bumbung anda yang ketiga. Jika panel anda bertaburan di seluruh “Tetris Bumbung” lokasi dan anda menggunakan pendawaian selari, kotak penggabung yang dipasang di bumbung memudahkan larian wayar anda secara dramatik. Larian yang lebih pendek ke kotak (wayar yang lebih nipis boleh diterima) ditambah satu larian tolok berat ke pengawal anda mengalahkan menjalankan lapan wayar berat yang berasingan sepanjang jarak penuh.
Nilaikan corak teduhan yang terakhir. Ini menentukan sama ada anda patut menggunakan konfigurasi selari yang memerlukan kotak penggabung di tempat pertama. Teduhan separa yang kerap? Pendawaian selari atau siri-selari (2s2p) dengan “Peraturan 2-dalam-Siri” melindungi anda daripada “Pembunuh Teduhan.” Boondocking matahari penuh? Pendawaian siri mungkin membolehkan anda melangkau kotak sepenuhnya sambil memperoleh kecekapan elektrik.
Kotak penggabung terbaik ialah yang anda tidak perlukan—kerana anda membuat pendawaian dengan bijak dari awal. Yang kedua terbaik ialah yang benar-benar menyelesaikan masalah pengagregatan arus selari anda tanpa bertukar menjadi “Perangkap Kotak Penyambung” komponen yang tidak perlu yang menambahkan rintangan.
Sebelum mengklik “beli” pada apa-apa: Buka manual pengawal cas anda. Kira terminal input. Kira kiraan rentetan selari anda. Kemudian buat keputusan.
Kadangkala jawapan yang betul ialah komponen yang lebih sedikit, bukan lebih banyak.
Ringkasan Petua Pro Akhir
- Peraturan 2-dalam-Siri: Wayar panel berpasangan (2 dalam siri), kemudian selarikan pasangan tersebut untuk konfigurasi RV yang optimum
- Pembunuh Teduhan: Pendawaian siri mengubah satu panel teduh menjadi titik cekik seluruh sistem—elakkan untuk RV dengan teduhan separa
- Kiraan Terminal > Kiraan Panel: Anda memerlukan kotak penggabung apabila rentetan selari melebihi terminal pengawal, bukan apabila anda mencapai nombor panel ajaib
- Matematik Jatuh Voltan: Kekalkan penurunan di bawah 3% voltan sistem; gunakan kalkulator tolok wayar, bukan tekaan
- Perancangan Tetris Bumbung: Peta corak teduhan dan lokasi panel 抵达 memilih konfigurasi siri vs selari
- Voltan Cuaca Sejuk: Voltan panel meningkat apabila suhu menurun—sahkan penarafan VOC maksimum pengawal anda sebelum menggunakan rentetan siri yang panjang
Spesifikasi terminal pengawal cas anda menentukan sama ada anda memerlukan kotak penggabung. Semak spesifikasi tersebut dahulu, konfigurasikan yang kedua, beli komponen yang terakhir.
