
Jawaban Cepat: Menyetel sakelar pengatur waktu dengan pin melibatkan penyisipan pin pengatur waktu di sekitar dial jam 24 jam untuk membuat jadwal hidup/mati, menghubungkan sakelar ke sirkuit listrik mengikuti kode kelistrikan setempat, dan menguji jadwal terprogram untuk pengoperasian yang tepat.
Sakelar pengatur waktu dengan pin menawarkan kontrol penjadwalan mekanis yang andal untuk lampu, kipas angin, peralatan kolam renang, dan perangkat listrik lainnya tanpa memerlukan pemrograman digital atau baterai cadangan.
Apa itu Sakelar Timer dengan Pin?
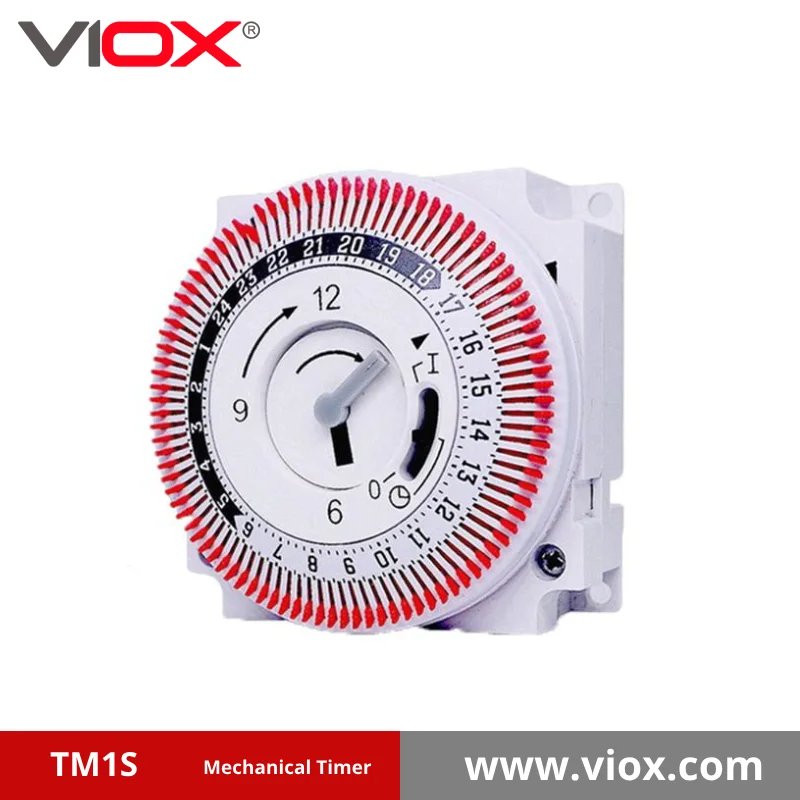
Sakelar pengatur waktu dengan pin (juga disebut pengatur waktu mekanis Sakelar atau pengatur waktu pin) adalah perangkat kontrol listrik yang menggunakan pin fisik yang disisipkan di sekitar dial jam 24 jam yang berputar untuk secara otomatis menghidupkan dan mematikan sirkuit listrik pada waktu yang telah ditentukan sebelumnya.
Komponen Utama:
- Dial jam 24 jam yang berputar terus menerus
- Pin pengatur waktu (biasanya plastik) yang mengaktifkan sakelar
- Sakelar penggantian manual untuk kontrol hidup/mati segera
- Terminal listrik untuk koneksi sirkuit
- Braket pemasangan untuk pemasangan kotak listrik
Perbandingan Jenis Sakelar Timer
| Fitur | Sakelar Pengatur Waktu Pin | Sakelar Pengatur Waktu Digital | Sakelar Pengatur Waktu Cerdas |
|---|---|---|---|
| Metode Pemrograman | Pin fisik pada dial | Antarmuka tombol/LCD | Aplikasi telepon pintar |
| Persyaratan Daya | Tidak ada (mekanis) | Diperlukan baterai cadangan | Diperlukan koneksi Wi-Fi |
| Presisi | Interval 15-30 menit | Interval 1 menit | Interval 1 menit |
| Daya tahan | 15-20 tahun | 5-10 tahun | 3-7 tahun |
| Biaya | $15-40 | $25-60 | $40-120 |
| Kompleksitas Instalasi | Pengkabelan dasar | Pengkabelan dasar + pemrograman | Diperlukan pengaturan lanjutan |
Proses Instalasi Langkah demi Langkah
Persyaratan Keselamatan Sebelum Memulai
⚠️ PERINGATAN KESELAMATAN: Selalu matikan daya pada pemutus arus sebelum memulai pekerjaan kelistrikan. Gunakan penguji tegangan non-kontak untuk memastikan daya telah mati. Jika Anda tidak nyaman dengan pekerjaan kelistrikan, gunakan jasa teknisi listrik berlisensi.
Alat yang dibutuhkan:
- Pengupas kawat
- Obeng (kepala pipih dan Phillips)
- Mur kawat
- Penguji tegangan non-kontak
- Pita listrik
Langkah-langkah Instalasi
Langkah 1: Matikan Daya dan Lepaskan Sakelar Lama
- Matikan pemutus sirkuit yang mengontrol lokasi sakelar
- Lepaskan pelat sakelar dan sakelar yang ada dari kotak listrik
- Uji kabel dengan penguji tegangan untuk memastikan daya mati
- Ambil foto sambungan kabel yang ada untuk referensi
Langkah 2: Identifikasi Konfigurasi Kabel
| Pengaturan Kabel | Deskripsi | Koneksi Pengatur Waktu |
|---|---|---|
| Sistem Dua Kawat | Panas (hitam) dan netral (putih) | Panas ke LINE, beban kawat ke LOAD |
| Sistem Tiga Kawat | Panas, netral, dan tanah | Tanah ke sekrup hijau, panas ke LINE |
| Sakelar Loop | Panas dan beralih panas | Membutuhkan penambahan kabel netral |
Langkah 3: Hubungkan Kabel Sakelar Pengatur Waktu
- Hubungkan kabel panas masuk (biasanya berwarna hitam) ke terminal LINE
- Hubungkan kabel beban keluar ke terminal BEBAN
- Hubungkan kabel netral dengan mur kawat (jika ada)
- Hubungkan kabel ground ke sekrup ground hijau
- Amankan semua sambungan dengan mur kawat dan pita listrik
Langkah 4: Pasang Sakelar Timer di Kotak Listrik
- Lipat kabel dengan hati-hati ke dalam kotak listrik
- Sejajarkan sakelar pengatur waktu dengan lubang pemasangan
- Amankan dengan sekrup yang disediakan
- Pasang penutup pelat sakelar
Langkah 5: Pulihkan Daya dan Uji
- Nyalakan kembali pemutus arus
- Verifikasi sakelar pengatur waktu menerima daya (jam harus mulai bergerak)
- Uji fungsi penggantian manual
- Pengaturan pengatur waktu awal program
Memprogram Sakelar Pengatur Waktu Pin Anda
Memahami Dial Jam
Jam 24 jam mewakili satu hari penuh, dengan setiap segmen biasanya mewakili 15 atau 30 menit, tergantung model pengatur waktu Anda.
Fitur Pelat Jam:
- Jam 12 malam di bagian atas dial
- Jam 6 pagi di sisi kanan
- Jam 12 siang di bawah
- Jam 6 sore di sisi kiri
Proses Pemrograman Pin
Langkah 1: Atur Waktu Saat Ini
- Putar tombol putar sehingga waktu saat ini sejajar dengan penunjuk
- Biarkan motor melakukan sinkronisasi (mungkin memerlukan waktu beberapa menit)
- Verifikasi keakuratan waktu dengan jam atau arloji
Langkah 2: Masukkan Pin Waktu
- Untuk waktu AKTIF: Masukkan pin di tepi luar segmen dial tempat Anda ingin perangkat menyala
- Untuk waktu OFF: Hapus pin atau biarkan segmen kosong di tempat Anda ingin perangkat dimatikan
- Setiap pin biasanya mewakili: 15-30 menit waktu ON
Langkah 3: Contoh Pemrograman Umum
| Jadwalkan Kebutuhan | Strategi Penempatan Pin |
|---|---|
| Pencahayaan Lanskap | Masukkan pin dari jam 6 sore sampai jam 11 malam dan jam 5 pagi sampai jam 7 pagi |
| Pompa Kolam Renang | Masukkan pin untuk blok 6 jam (06.00-12.00, 18.00-00.00) |
| Pencahayaan Keamanan | Masukkan pin dari waktu matahari terbenam hingga matahari terbit |
| Dekorasi Liburan | Masukkan pin setiap hari dari jam 5 sore sampai jam 10 malam |
Mengatasi Masalah Umum
Timer Tidak Beroperasi dengan Benar
Masalah:
Perangkat tidak menyala/mati pada waktu yang diprogram
Solusi:
- Pastikan pin dimasukkan sepenuhnya dan ditempatkan dengan aman
- Periksa apakah waktu jam sesuai dengan waktu sebenarnya
- Pastikan penggantian manual berada pada posisi “OTOMATIS”
- Uji dengan posisi pin yang berbeda untuk mengisolasi masalah waktu
Masalah:
Jam berjalan cepat atau lambat
Solusi:
- Periksa tegangan pada pengatur waktu (harus sesuai dengan tegangan pengenal)
- Ganti pengatur waktu jika mekanisme jam rusak
- Verifikasi sambungan listrik yang benar
Masalah Listrik
Masalah:
Timer tidak menerima daya
Solusi:
- Periksa posisi pemutus sirkuit
- Verifikasi bahwa koneksi kabel aman
- Uji daya masuk dengan penguji tegangan
- Periksa sambungan yang longgar di kotak listrik
Kriteria Pemilihan Sakelar Pengatur Waktu
Spesifikasi Listrik yang Perlu Dipertimbangkan
| Spesifikasi | Rentang Standar | Pedoman Seleksi |
|---|---|---|
| Peringkat Tegangan | 120V atau 240V | Harus sesuai dengan tegangan sirkuit Anda |
| Peringkat Saat Ini | 15A, 20A, 30A | Harus melebihi arus beban yang terhubung |
| Jenis Motor | Sinkronis | Lebih akurat daripada pegas luka |
| Peringkat Kontak | Resistif vs. Induktif | Induktif untuk motor/lampu fluoresen |
Kapan Memilih Pin Timer
Aplikasi Terbaik:
- Kontrol pencahayaan luar ruangan
- Peralatan kolam renang dan spa
- Kipas ventilasi
- Sistem irigasi lanskap
- Pajangan dekorasi liburan
Keuntungan dari Pin Timer:
- Tidak ada program yang hilang saat listrik padam
- Pengoperasian yang sederhana dan intuitif
- Umur pakai panjang (umumnya 15-20 tahun)
- Biaya lebih rendah daripada alternatif digital
- Tidak perlu mengganti baterai
Kepatuhan terhadap Kode Etik dan Pertimbangan Keselamatan
Persyaratan Kode Listrik
Pedoman Kode Listrik Nasional (NEC):
- Sakelar pengatur waktu harus terdaftar oleh UL atau laboratorium pengujian serupa
- Pemasangan harus mengikuti petunjuk pabrik
- Ukuran kabel yang tepat untuk beban yang terhubung diperlukan
- Perlindungan GFCI mungkin diperlukan untuk aplikasi luar ruangan
Pertimbangan Kode Lokal:
- Beberapa yurisdiksi memerlukan izin untuk pemasangan sakelar pengatur waktu
- Teknisi listrik berlisensi mungkin diperlukan untuk aplikasi tertentu
- Instalasi di luar ruangan seringkali memerlukan penutup tahan cuaca
Praktik Terbaik Keselamatan
🔒 DAFTAR PERIKSA KESELAMATAN:
- ✓ Selalu matikan daya pada pemutus arus sebelum pemasangan
- ✓ Gunakan konektor kabel yang sesuai dengan aplikasinya
- ✓ Pastikan semua koneksi aman sebelum memulihkan daya
- ✓ Uji perlindungan GFCI setiap bulan jika berlaku
- ✓ Jadwalkan inspeksi tahunan untuk instalasi luar ruangan
Tips Ahli untuk Performa Optimal
💡 Rekomendasi Profesional:
- Pilih merek yang berkualitas seperti Intermatic, Leviton, atau Woods untuk pengoperasian yang andal
- Ukuran yang tepat – timer harus menangani setidaknya 125% beban yang terhubung
- Pertimbangkan proteksi lonjakan arus untuk beban elektronik dan pencahayaan LED
- Rencana ekspansi – pasang timer berkapasitas lebih besar jika memungkinkan untuk memuat di masa mendatang
- Pengaturan dokumen – ambil foto posisi pin untuk referensi di masa mendatang
Pemeliharaan dan Umur Panjang
Jadwal Pemeliharaan Rutin
| Frekuensi | Tugas Pemeliharaan | Tujuan |
|---|---|---|
| Bulanan | Periksa akurasi jam | Pastikan waktu yang tepat |
| Triwulanan | Bersihkan dial dan pin | Mencegah pengikatan mekanis |
| Setiap tahun | Penggantian manual pengujian | Verifikasi operasi darurat |
| Dua kali setahun | Periksa koneksi | Mencegah masalah kelistrikan |
Kapan Harus Mengganti Sakelar Timer
Indikator Penggantian:
- Jam terus berjalan cepat atau lambat meskipun tegangannya tepat
- Pin tidak tetap aman pada posisinya
- Penggantian manual tidak berfungsi dengan benar
- Kerusakan yang terlihat pada dial atau housing
- Kontak listrik menunjukkan tanda-tanda terbakar atau berlubang
Pertanyaan yang Sering Diajukan
Seberapa akurat sakelar pengatur waktu pin?
Sakelar pengatur waktu pin biasanya mempertahankan keakuratan dalam 1-2 menit per hari jika dipasang dan dirawat dengan benar, membuatnya cocok untuk sebagian besar aplikasi pengaturan waktu perumahan dan komersial.
Bisakah saya menggunakan sakelar pengatur waktu pin dengan lampu LED?
Ya, tetapi pastikan pengatur waktu tersebut sesuai dengan jenis driver LED yang digunakan. Beberapa perlengkapan LED dengan driver elektronik mungkin memerlukan pengatur waktu yang dirancang khusus untuk beban elektronik.
Apa perbedaan antara peringkat beban resistif dan induktif?
Beban resistif (lampu pijar, pemanas) memiliki arus awal yang lebih rendah, sementara beban induktif (motor, lampu fluoresensi) memiliki arus awal yang lebih tinggi sehingga memerlukan kontak pengatur waktu dengan peringkat khusus.
Berapa lama sakelar pengatur waktu pin bertahan?
Pengatur waktu pin mekanis berkualitas biasanya bertahan 15-20 tahun dengan pemasangan dan perawatan yang tepat, jauh lebih lama daripada sakelar pengatur waktu digital.
Apakah pengatur waktu pin dapat berfungsi saat listrik padam?
Pengatur waktu pin akan terus mencatat waktu selama pemadaman listrik singkat karena menggunakan mesin jam mekanis, tetapi pemadaman listrik yang lama akan memerlukan pengaturan ulang waktu saat listrik kembali menyala.
Apakah pengatur waktu pin berfungsi dengan sistem rumah pintar?
Pengatur waktu pin tradisional beroperasi secara independen dari sistem rumah pintar, tetapi beberapa produsen menawarkan model hibrida yang menggabungkan keandalan mekanis dengan opsi konektivitas pintar.
Kesimpulan
Memasang sakelar pengatur waktu dengan pin memberikan kontrol penjadwalan yang andal dan jangka panjang untuk perangkat listrik Anda tanpa kerumitan pemrograman digital. Dengan mengikuti prosedur pemasangan yang tepat, memahami teknik pemrograman pin, dan menjaga kepatuhan kode, Anda dapat mencapai kontrol otomatis yang andal selama puluhan tahun.
