
Răspuns rapid: Setting a timer switch with pins involves inserting timing pins around a 24-hour clock dial to create on/off schedules, connecting the switch to your electrical circuit following local electrical codes, and testing the programmed schedule for proper operation.
Timer switches with pins offer reliable, mechanical scheduling control for lights, fans, pool equipment, and other electrical devices without requiring digital programming or backup batteries.
What Is a Timer Switch with Pins?
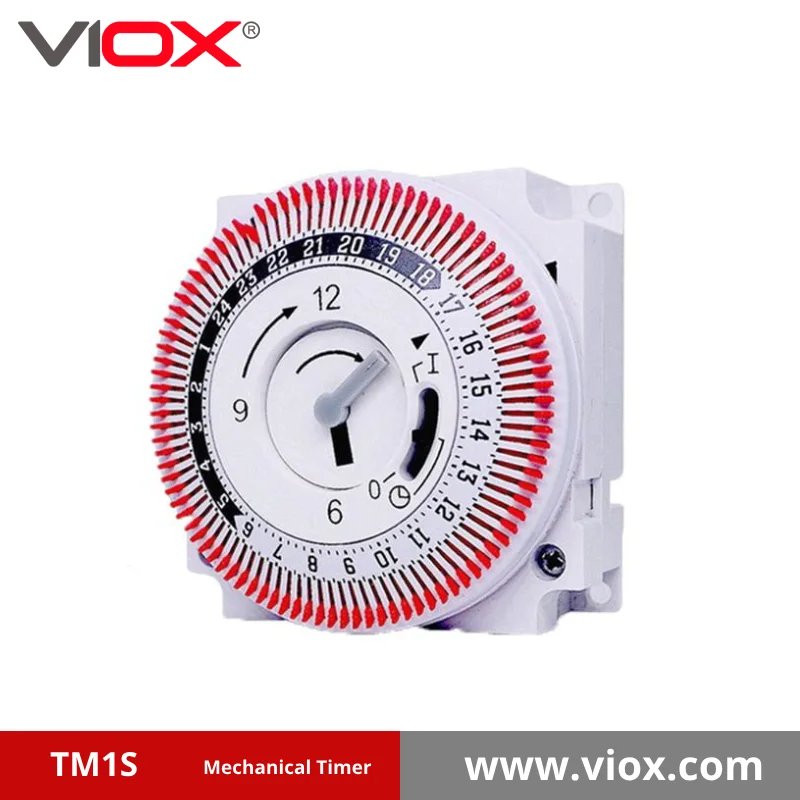
A timer switch with pins (also called a mechanical timer switch or pin timer) is an electrical control device that uses physical pins inserted around a rotating 24-hour clock dial to automatically turn electrical circuits on and off at predetermined times.
Componente cheie:
- 24-hour clock dial that rotates continuously
- Timing pins (usually plastic) that activate the switch
- Manual override switch for immediate on/off control
- Electrical terminals for circuit connections
- Mounting bracket for electrical box installation
Timer Switch Types Comparison
| Caracteristică | Pin Timer Switch | Comutator temporizator digital | Smart Timer Switch |
|---|---|---|---|
| Programming Method | Physical pins on dial | Button/LCD interface | Smartphone app |
| Power Requirements | None (mechanical) | Battery backup needed | Wi-Fi connection required |
| Precizie | 15-30 minute intervals | 1-minute intervals | 1-minute intervals |
| Durabilitate | 15-20 de ani | 5-10 ani | 3-7 ani |
| Costuri | $15-40 | $25-60 | $40-120 |
| Complexitatea instalării | Basic wiring | Basic wiring + programming | Advanced setup required |
Procesul de instalare pas cu pas
Safety Requirements Before Starting
⚠️ SAFETY WARNING: Always turn off power at the circuit breaker before beginning electrical work. Use a non-contact voltage tester to verify power is off. If you’re not comfortable with electrical work, hire a licensed electrician.
Unelte necesare:
- Dezizolator de sârmă
- Screwdrivers (flathead and Phillips)
- Piulițe de sârmă
- Tester de tensiune fără contact
- Bandă electrică
Etape de instalare
Step 1: Turn Off Power and Remove Old Switch
- Switch off the circuit breaker controlling the switch location
- Remove the existing switch plate and switch from the electrical box
- Test wires with voltage tester to confirm power is off
- Take a photo of existing wire connections for reference
Step 2: Identify Wire Configurations
| Wire Setup | Descriere | Timer Connection |
|---|---|---|
| Two-Wire System | Hot (black) and neutral (white) | Hot to LINE, load wire to LOAD |
| Three-Wire System | Hot, neutral, and ground | Ground to green screw, hot to LINE |
| Switch Loop | Hot and switched hot | Requires neutral wire addition |
Step 3: Connect Timer Switch Wires
- Connect the incoming hot wire (usually black) to the LINE terminal
- Connect the outgoing load wire to the LOAD terminal
- Connect neutral wires together with wire nuts (if present)
- Connect ground wire to green ground screw
- Secure all connections with wire nuts and electrical tape
Step 4: Mount Timer Switch in Electrical Box
- Carefully fold wires into electrical box
- Align timer switch with mounting holes
- Secure with provided screws
- Install switch plate cover
Step 5: Restore Power and Test
- Turn circuit breaker back on
- Verify timer switch receives power (clock should start moving)
- Test manual override function
- Program initial timer settings
Programming Your Pin Timer Switch
Understanding the Clock Dial
The 24-hour dial represents a full day, with each segment typically representing 15 or 30 minutes depending on your timer model.
Clock Dial Features:
- 12 AM (midnight) at top of dial
- 6 AM at right side
- 12 PM (noon) at bottom
- 6 PM at left side
Pin Programming Process
Step 1: Set Current Time
- Rotate the dial so the current time aligns with the pointer
- Allow the motor to synchronize (may take several minutes)
- Verify time accuracy with a clock or watch
Step 2: Insert Timing Pins
- For ON times: Insert pins at the outer edge of dial segments where you want the device to turn on
- For OFF times: Remove pins or leave segments empty where you want the device to turn off
- Each pin typically represents: 15-30 minutes of ON time
Step 3: Common Programming Examples
| Schedule Need | Pin Placement Strategy |
|---|---|
| Landscape Lighting | Insert pins from 6 PM to 11 PM and 5 AM to 7 AM |
| Pool Pump | Insert pins for 6-hour blocks (6 AM-12 PM, 6 PM-12 AM) |
| Security Lighting | Insert pins from sunset to sunrise times |
| Holiday Decorations | Insert pins from 5 PM to 10 PM daily |
Depanarea problemelor comune
Timer Not Operating Correctly
Problemă:
Device doesn’t turn on/off at programmed times
Soluții:
- Verify pins are fully inserted and securely placed
- Check that clock time matches actual time
- Ensure manual override is in “AUTO” position
- Test with different pin positions to isolate timing issues
Problemă:
Clock runs fast or slow
Soluții:
- Check voltage at timer (should match rated voltage)
- Replace timer if clock mechanism is faulty
- Verify proper electrical connections
Electrical Issues
Problemă:
Timer doesn’t receive power
Soluții:
- Check circuit breaker position
- Verify wire connections are secure
- Test incoming power with voltage tester
- Inspect for loose connections in electrical box
Timer Switch Selection Criteria
Electrical Specifications to Consider
| Specificații | Standard Range | Ghiduri de selecție |
|---|---|---|
| Tensiune Nominală | 120V or 240V | Must match your circuit voltage |
| Rating curent | 15A, 20A, 30A | Must exceed connected load amperage |
| Motor Type | Synchronous | More accurate than spring-wound |
| Contact Rating | Resistive vs. Inductive | Inductive for motors/fluorescents |
When to Choose Pin Timers
Best Applications:
- Outdoor lighting control
- Echipamente pentru piscine și spa
- Ventilation fans
- Landscape irrigation systems
- Holiday decoration displays
Advantages of Pin Timers:
- No programming to lose during power outages
- Simple, intuitive operation
- Long service life (15-20 years typical)
- Lower cost than digital alternatives
- No battery replacement needed
Respectarea codurilor și considerații privind siguranța
Electrical Code Requirements
National Electrical Code (NEC) Guidelines:
- Timer switches must be listed by UL or similar testing laboratory
- Installation must follow manufacturer’s instructions
- Proper wire sizing for connected loads required
- GFCI protection may be required for outdoor applications
Local Code Considerations:
- Some jurisdictions require permits for timer switch installation
- Licensed electrician may be required for certain applications
- Outdoor installations often require weatherproof enclosures
Safety Best Practices
🔒 SAFETY CHECKLIST:
- ✓ Always turn off power at breaker before installation
- ✓ Use proper wire connectors rated for application
- ✓ Verify all connections are secure before restoring power
- ✓ Test GFCI protection monthly if applicable
- ✓ Schedule annual inspection of outdoor installations
Sfaturi de la experți pentru performanță optimă
💡 Recomandări profesionale:
- Choose quality brands like Intermatic, Leviton, or Woods for reliable operation
- Size properly – timer should handle at least 125% of connected load
- Consider surge protection for electronic loads and LED lighting
- Plan de extindere – install larger capacity timer if future loads possible
- Document settings – take photos of pin positions for future reference
Întreținere și longevitate
Program de întreținere de rutină
| Frecvența | Sarcină de întreținere | Scop |
|---|---|---|
| Lunar | Check clock accuracy | Ensure proper timing |
| Trimestrial | Clean dial and pins | Prevent mechanical binding |
| Anual | Test manual override | Verify emergency operation |
| Bi-annually | Inspect connections | Prevent electrical problems |
When to Replace Timer Switch
Indicatori de înlocuire:
- Clock consistently runs fast or slow despite proper voltage
- Pins don’t stay securely in position
- Manual override doesn’t function properly
- Visible damage to dial or housing
- Electrical contacts show signs of burning or pitting
Întrebări Frecvente
How accurate are pin timer switches?
Pin timer switches typically maintain accuracy within 1-2 minutes per day when properly installed and maintained, making them suitable for most residential and commercial timing applications.
Can I use a pin timer switch with LED lights?
Yes, but ensure the timer is rated for the type of LED driver used. Some LED fixtures with electronic drivers may require timers specifically rated for electronic loads.
What’s the difference between resistive and inductive load ratings?
Resistive loads (incandescent lights, heaters) have lower startup current, while inductive loads (motors, fluorescent lights) have higher startup current requiring specially rated timer contacts.
How long do pin timer switches last?
Quality mechanical pin timers typically last 15-20 years with proper installation and maintenance, significantly longer than digital timer switches.
Can pin timers work during power outages?
Pin timers continue keeping time during brief power outages since they use mechanical clockwork, but extended outages will require time reset when power returns.
Do pin timers work with smart home systems?
Traditional pin timers operate independently of smart home systems, but some manufacturers offer hybrid models that combine mechanical reliability with smart connectivity options.
Concluzie
Setting a timer switch with pins provides reliable, long-term scheduling control for your electrical devices without the complexity of digital programming. By following proper installation procedures, understanding pin programming techniques, and maintaining code compliance, you can achieve decades of dependable automated control.
Înrudite
Understanding Timer Switch Types
