
The $15,000 Problem Hiding in Your Electrical Panel

You walk into your facility Monday morning and notice something that’s been bothering you for months: every single light was on all weekend. Again. The HVAC system ran non-stop through two empty nights. The parking lot lights stayed lit until 9 AM—three hours past sunrise. You make a mental note to remind everyone to turn things off, knowing full well it won’t change anything.
Here’s the uncomfortable truth: Manual control of electrical loads doesn’t just fail occasionally—it fails predictably and expensively. A mid-sized facility with just 50 unnecessary hours of lighting per week at 2kW wastes $1,248 annually (at $0.12/kWh). Scale that across HVAC, pumps, and equipment, and you’re looking at $10,000-$15,000+ in completely avoidable energy costs. Add accelerated equipment wear from continuous operation, and the real cost doubles.
So how do you eliminate this waste without relying on perfect human behavior—and which automation solution actually fits your specific application?
Why Manual Control Always Fails: The Human Factor
The problem isn’t laziness or carelessness. It’s that manual control requires perfect consistency from imperfect humans operating in dynamic environments. Consider these failure modes:
Forgetting is inevitable. Even the most diligent employee will occasionally forget to flip that switch at closing time—especially on busy days, during staff changes, or when routines are disrupted.
Absence breaks the system. When the person who “always turns off the lights” is on vacation, out sick, or working remotely, loads run uncontrolled. No backup system exists.
Optimal timing is invisible. What time should parking lot lights turn on in December versus July? When is twilight actually dark enough? Humans guess; equipment runs too long or turns on too early.
Key Insight: Your electrical loads don’t care about your schedule complexity, memory, or presence. They need consistent, precise control based on time, light levels, or astronomical data. That’s exactly what timer switches deliver—but only if you select the right type for each application.
The Solution: Timer Switches Explained (And Why Type Selection Matters)

A timer switch is a control device that automatically switches electrical power on or off based on programmed schedules, ambient light levels, or calculated astronomical data (sunrise/sunset). Think of it as installing a tireless, perfectly consistent operator who never forgets, never calls in sick, and executes your schedule with precision.
But here’s where most selection processes fail: All timer switches automate control, but they use fundamentally different methods—and choosing the wrong type for your application creates new problems instead of solving old ones.
Let’s break down what you actually need to know.
Understanding the 4 Timer Switch Types
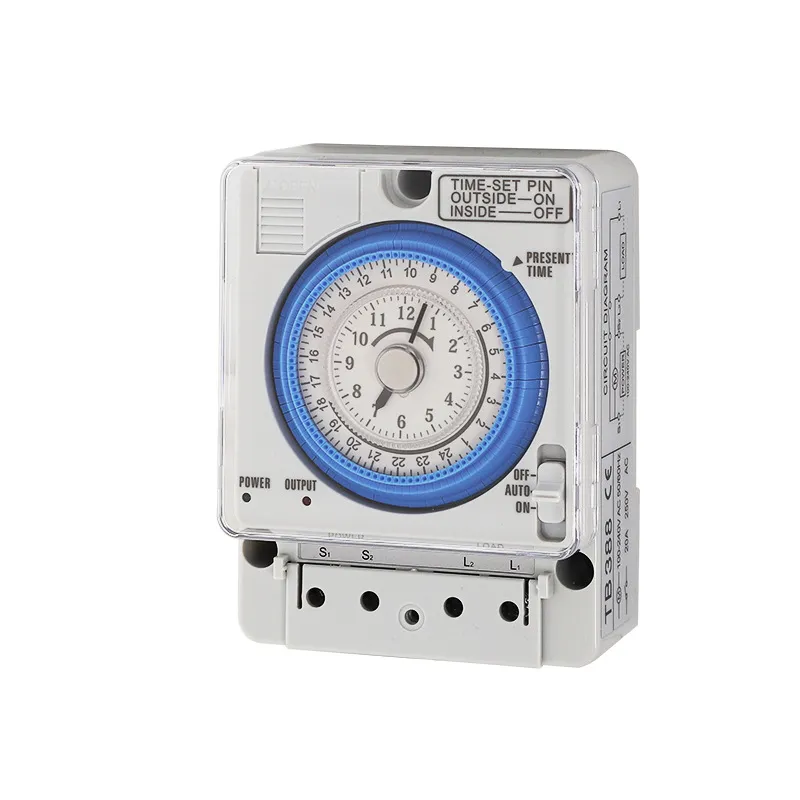
1. Mechanical Timer Switches
These use physical clockwork mechanisms—springs, gears, and pin trippers that physically open or close contacts. You set timing by positioning pins around a 24-hour dial wheel.
- Vislabāk piemērots: Simple, repetitive daily schedules in non-critical applications
- Fatal flaw: Zero memory. Every power outage requires complete reprogramming
- Precizitāte: ±15 minutes (quarter-hour increments)
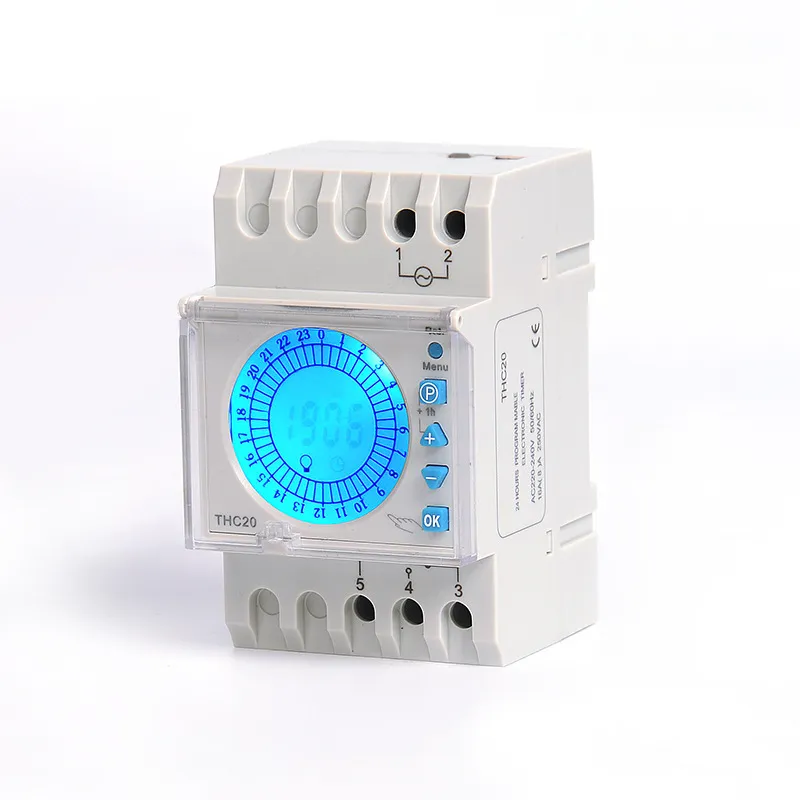
2. Digital Timer Switches
Built around a microcontroller with battery backup, these use electronic circuitry and digital displays. Programming happens via buttons; schedules store in memory.
- Vislabāk piemērots: Complex schedules requiring multiple on/off cycles or weekly patterns
- Key advantage: Battery maintains settings through power outages
- Precizitāte: Down to 1-minute precision
3. Astronomic Timer Switches
These calculate sunrise/sunset times based on GPS coordinates or manual location input, automatically adjusting throughout the year as daylight hours change.
- Vislabāk piemērots: Outdoor lighting that should align with natural day/night cycles
- Key advantage: Self-adjusting—no seasonal reprogramming needed
- Precizitāte: Within 1-2 minutes of actual sunrise/sunset
4. Photocell Timer Switches
Using optical sensors (photodetectors), these respond to actual ambient light levels rather than calculated or programmed times.
- Vislabāk piemērots: Applications where local conditions (weather, shadows, artificial light) matter more than clock time
- Watch out: Can be “fooled” by nearby artificial lighting or heavy cloud cover
- Response time: Typically adjustable delay (1-10 minutes) to prevent false triggering
Pro Tip #1: The biggest selection mistake is choosing a mechanical timer for anything beyond the simplest application. If a power outage means someone has to climb a ladder to reprogram your parking lot lighting timer, you’ve chosen wrong. Always invest the extra $20-40 for digital in critical applications.

The 3-Step Timer Switch Selection Framework
Step 1: Calculate Your True Cost of Manual Control (Build Your Business Case)
Before you can justify any timer switch purchase, you need to quantify what manual control is actually costing you. Here’s the simple formula:
Annual Waste Cost = (Load Watts ÷ 1000) × Unnecessary Hours/Day × 365 × $/kWh
Aprēķina piemērs: You have bathroom exhaust fans (200W total) that run 24/7 because there’s no automatic shutoff. They only need to run 2 hours daily.
- Wasted hours: 22 hours/day
- Annual cost: (200W ÷ 1000) × 22 hours × 365 days × $0.12/kWh = $192.72/year
- Timer switch cost: $25-45
- Payback period: 2-3 months
Pro Tip #2: Don’t just calculate one load. Audit every electrical load in your facility that runs on manual control or continuously. The cumulative waste is typically 3-5× worse than you estimate. I’ve seen facilities discover $800-1,200/month in addressable waste through a two-hour audit.
Now multiply that by equipment lifespan costs. Motors, fans, and lighting running continuously wear out 2-3× faster than those operating on proper duty cycles. Include replacement cost avoidance in your ROI calculation.
Step 2: Match Timer Type to Your Application Using the Decision Tree
Now that you know the cost of doing nothing, here’s how to select the right timer type. Ask these three questions in order:
Question 1: Does this load’s schedule need to vary by day of the week?
- No (same daily schedule): Mechanical or basic digital timer (if budget is tight, mechanical works for non-critical loads)
- Yes (weekday/weekend differences): Digital timer minimum—mechanical timers can’t do weekly programming
Question 2: What happens if the schedule drifts after a power outage?
- Nothing critical: Mechanical acceptable (if daily schedule from Q1)
- Safety, security, or cost implications: Digital minimum (battery backup is non-negotiable)
- Examples requiring digital: Emergency exit signs, security lighting, refrigeration defrost cycles, pool pumps, sump pumps
Question 3: Is this outdoor lighting that should align with daylight hours?
- Yes, and seasonal adjustment matters: Astronomic timer
- Yes, but local conditions (shadows, weather) affect needs: Photocell timer
- No (indoor or non-daylight-dependent): Stay with mechanical or digital based on Q1-Q2
Real-World Application Matrix:
| Pieteikums | Timer Type | Kāpēc |
|---|---|---|
| Bathroom exhaust fan | Digitālais | Prevents moisture; power outage can’t disrupt protection |
| Break room lights | Digitālais | Weekly schedule (weekday vs. weekend); critical for security appearance |
| Parking lot lights | Astronomic | Seasonal sunrise/sunset auto-adjustment eliminates reprogramming |
| Warehouse task lighting | Digitālais | Multiple on/off cycles during shifts; backup power protection |
| Residential porch lights | Fotoelements | Responds to actual darkness; simple application |
| Pool pump filtration | Digital 7-day | Different run times for pool use vs. off days; power outage protection |
| Holiday display lights | Mehāniskais | Temporary seasonal use; simple daily repeat; no criticality |
Pro Tip #3: For outdoor lighting, astronomic timers beat photocells in reliability. A photocell can be “confused” by car headlights, nearby building lights, or even heavy storm clouds—causing lights to cycle on/off unpredictably. Astronomic timers calculate sunset independently of local interference and automatically adjust as seasons change (later sunset in summer, earlier in winter) with zero reprogramming.
Step 3: Avoid the 3 Most Common Installation Mistakes
You’ve selected the right timer type. Now don’t sabotage it with installation errors that cause failures or false trips.
Mistake #1: Undersizing for Inrush Current
Standard timer switches are rated for resistive loads (heaters) or general lighting. But motors, transformers, and LED drivers create inrush current 5-10× higher than running current during startup.
Kas jāpārbauda: If you’re controlling a motor load (pump, fan, compressor), verify the timer is rated for “motor loads” or “inductive loads”—not just amp rating. A 10A timer rated for resistive loads will fail quickly on a 5A motor due to inrush.
The fix: Look for “AC-3” or “motor-rated” specifications. Or upsize the timer by 2-3× the running current rating. A 5A motor load should use a 15-20A motor-rated timer switch.
Mistake #2: Ignoring Wire Gauge and Terminal Capacity
Timer switches have terminal screws sized for specific wire gauges. Forcing 12 AWG wire into a terminal designed for 14 AWG creates poor contact and resistance—leading to heating, arcing, and premature failure.
Kas jāpārbauda: Match wire gauge to timer terminal specifications. If your circuit uses 12 AWG but the timer accepts only 14 AWG maximum, you need a different timer or must splice to appropriate gauge using a junction box (not ideal).
The fix: Check the timer spec sheet for “conductor size” or “wire range.” Don’t assume “20A rating” means it accepts 12 AWG wire—rating and terminal size don’t always correlate.
Mistake #3: Programming Without Understanding Load Behavior
A bathroom fan timer switch set to “30 minutes” might seem logical, but if the fan needs 45 minutes to clear moisture after a shower, you’ve just created a mold problem while thinking you’re saving energy.
Kas jāpārbauda: Understand the actual duty cycle requirements of your load:
- Exhaust fans: Must run long enough to complete air exchanges (typically 45-60 min after occupancy)
- Water heaters: Need recovery time matching household hot water demand patterns
- HVAC sistēmas: Require proper pre-cooling/pre-heating windows before occupancy
- Pool pumps: Must complete full filtration cycles (6-8 hours minimum in most climates)
The fix: Research or calculate the actual operational requirements before programming “what seems reasonable.” Under-running critical loads to save energy creates bigger problems than the energy waste you’re solving.
Pro Tip #4: For loads where safety or equipment protection matters (ventilation, refrigeration, heating), always program conservatively. It’s better to run an extra 15 minutes than to short-cycle critical protection systems. The energy cost of that extra runtime is negligible compared to the cost of moisture damage, food spoilage, or frozen pipes.

Summary: Your Action Plan for Smarter Load Control
By implementing the right timer switches across your facility, you’ll achieve three immediate benefits:
- Energy cost reduction of 30-50% on controlled loads by eliminating unnecessary runtime
- Extended equipment life from proper duty cycling instead of continuous operation
- Hands-free automation that doesn’t depend on human memory or presence
Your implementation checklist:
- ✅ Audit current manual-control loads – Identify everything running on human intervention or 24/7
- ✅ Calculate waste cost – Use the formula in Step 1 to build your ROI case (focus on cumulative facility-wide impact)
- ✅ Apply the decision tree – Match each load to the appropriate timer type using the three questions
- ✅ Verify load compatibility – Check inrush ratings for motors; confirm terminal wire gauge capacity
- ✅ Program for actual requirements – Research proper duty cycles; don’t guess
The bottom line: Timer switches are one of the highest-ROI electrical investments you can make—but only if you match the technology to the application. A $30 mechanical timer in the wrong application wastes money. A $120 astronomic timer in the right application pays for itself in 90 days and delivers value for a decade.
Ready to start? Begin with your highest-waste loads (longest unnecessary runtimes) for the fastest payback, then systematically work through the rest of your facility. Most engineers report 6-12 month payback periods on facility-wide timer switch implementations, with the added benefit of never worrying about “who forgot to turn off the lights” again.
