
Elektros pagrindų supratimas yra labai svarbus visiems, pradedantiems „pasidaryk pats“ projektais ar studijuojantiems elektroniką. Įtampos ir srovės skirtumas yra viena iš svarbiausių sąvokų, su kuria susidursite, tačiau ji dažnai neteisingai suprantama. Šis išsamus vadovas supažindins jus su viskuo, ką reikia žinoti apie įtampą ir srovę, pateikiant praktinių pavyzdžių, saugos patarimų ir praktinių projektų, kurie padės šias sąvokas pritaikyti praktikoje.
Elektros pagrindų supratimas per voltus ir srovę
Prieš pasinerdami į technines detales, išsiaiškinkime, kodėl įtampa ir srovė yra tokie svarbūs atliekant elektros darbus. Nesvarbu, ar esate studentas, besimokantis elektros pagrindų, ar „pasidaryk pats“ entuziastas, planuojantis savo pirmąjį elektronikos projektą, šių sąvokų įvaldymas yra būtinas tiek saugumui, tiek sėkmei.
Elektra teka grandinėmis pagal nuspėjamus modelius, panašiai kaip vanduo tekėja vamzdžiais. Ši vandens analogija bus mūsų pagrindas suprasti tiek įtampą, tiek srovę, todėl sudėtingos elektros sąvokos bus suprantamos ir įsimenamos.
Šio vadovo mokymosi tikslai:
- Supraskite, ką reiškia įtampa ir srovė elektros grandinėse
- Sužinokite praktinius skirtumus tarp įtampos ir srovės
- Sužinokite, kaip saugiai matuoti ir dirbti su elektros vertėmis
- Užbaikite praktinius projektus, kurie demonstruoja šias koncepcijas
- Ugdykite įgūdžius spręsti dažniausiai pasitaikančias elektros problemas
Saugos peržiūra: Šiame vadove pabrėšime elektros saugą atliekant „pasidaryk pats“ projektus. Atminkite, kad net ir žemos įtampos grandinės gali būti pavojingos, jei jos netinkamai naudojamos, o elektros tinklo įtampą (buitinę elektrą) turėtų dirbti tik kvalifikuoti elektrikai.
Įtampa paaiškinta realaus pasaulio pavyzdžiais
Įtampa, matuojama voltais (V), reiškia elektrinį slėgį arba potencialų skirtumą. Įsivaizduokite įtampą kaip vandens slėgį savo namų vandentiekio sistemoje. Kaip vandens slėgis stumia vandenį vamzdžiais, taip įtampa stumia elektros srovę laidininkais, tokiais kaip laidai.
Vandens slėgio analogija
Įsivaizduokite, kad turite du vandens rezervuarus skirtinguose aukščiuose. Aukščiau esantis rezervuaras turi daugiau gravitacinės potencialinės energijos, todėl apačioje sukuriamas didesnis vandens slėgis. Panašiai įtampa parodo elektrinio potencialo skirtumą tarp dviejų taškų grandinėje. Kuo didesnė įtampa, tuo daugiau „elektrinio slėgio“ yra srovei per grandinę tekėti.
Pagrindinės įtampos charakteristikos:
- Matuojama voltais (V)
- Atspindi elektrinio potencialo skirtumą
- Gali egzistuoti be srovės tekėjimo (kaip baterija, padėta ant lentynos)
- Varo srovę grandinėse per varžą
- Didesnė įtampa reiškia didesnį elektros slėgį
Įtampa kasdienėse programose
Įprasti įtampos lygiai, su kuriais susidursite:
- Buitinė AA baterija: 1,5 V nuolatinė srovė
- Automobilio akumuliatorius: 12 V nuolatinė srovė
- USB įkrovimas: 5 V nuolatinė srovė
- Buitinės elektros lizdai: 120 V kintamoji srovė (JAV) arba 240 V kintamoji srovė (Europa)
- Aukštos įtampos elektros linijos: 10 000 V ir daugiau kintamosios srovės
Šių įtampos lygių supratimas yra labai svarbus elektros saugai. Nors 1,5 V bateriją saugu naudoti, buitinė įtampa gali būti mirtina. Visada naudokite tinkamas saugos priemones ir niekada nedirbkite su elektros tinklo įtampa be tinkamo mokymo.
Saugus įtampos matavimas
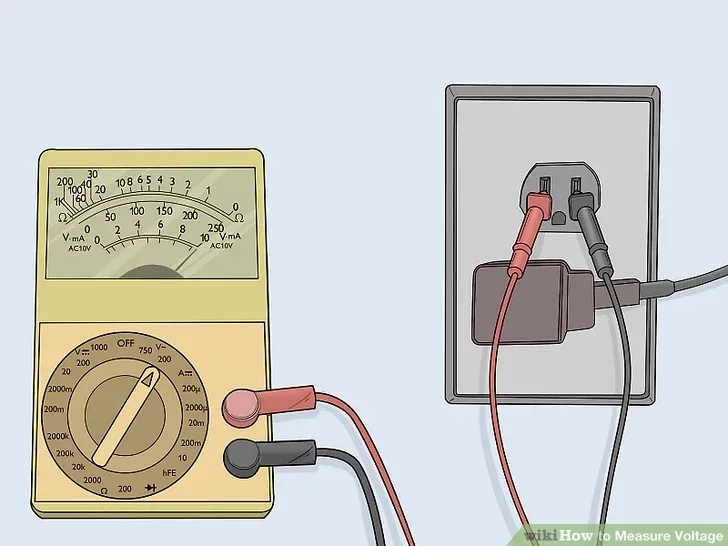
Kreditas WIKIHOW
Įtampai matuoti naudosite multimetrą, nustatytą įtampos funkcijai (V). Svarbi saugos pastaba: Visada pradėkite nuo didžiausio multimetro įtampos diapazono ir palaipsniui mažinkite jį, kad nepažeistumėte prietaiso ir nesukeltumėte pavojų saugai.
Pagrindiniai įtampos matavimo žingsniai:
- Išjunkite grandinės maitinimą (kai įmanoma)
- Nustatykite multimetrą tinkamame įtampos diapazone
- Prijunkite zondus prie komponento arba maitinimo šaltinio
- Nuskaitykite rodomą reikšmę
- Raudonas zondas prie teigiamo, juodas zondas prie neigiamo nuolatinės įtampos
Įprastos įtampos matavimo taikymo sritys:
- Baterijos įkrovos lygio tikrinimas
- Maitinimo šaltinio išėjimų tikrinimas
- Grandinės problemų trikčių šalinimas
- Komponentų įtampos kritimų tikrinimas
Dabartinis supaprastintas pradedantiesiems ir „pasidaryk pats“ projektams
Srovė, matuojama amperais arba stiprintuvais (A), rodo elektros krūvio srautą. Tęsdami vandens analogiją, jei įtampa yra kaip vandens slėgis, tai srovė yra kaip vandens kiekis, tekantis vamzdžiu per sekundę.
Srovės srauto supratimas
Srovė teka, kai įtampa taikoma per varžą, sukurdama visą elektros kelią, vadinamą grandine. Svarbiausia įžvalga: Srovė grandinėje „nesunaudojama“ – ji teka pilnu ciklu, grįždama į šaltinį. Tai panašu į tai, kaip vanduo teka uždaros kilpos vandentiekio sistema.
Svarbiausios dabartinės sąvokos:
- Matuojama amperais (A) arba miliamperais (mA)
- Rodo elektros krūvio tekėjimo greitį
- Reikalingas visas grandinės kelias tekėjimui
- Ta pati srovė teka per visus nuosekliosios grandinės komponentus
- Srovė dalijasi lygiagrečiose grandinėse
Dabartinis praktinis pritaikymas
Tipiniai įprastų įrenginių srovės reikalavimai:
- LED indikatoriaus lemputė: 10–20 mA
- Mažas variklis: 100–500 mA
- Išmaniojo telefono įkrovimas: 1-2 A
- Buitinė lemputė: 0,5–1 A
- Elektrinis virdulys: 10–15 val.
Šių srovės lygių supratimas padės jums pasirinkti tinkamus komponentus ir saugos priemones savo „pasidaryk pats“ elektros projektams.
Saugus srovės matavimas
Srovės matavimui reikia nutraukti grandinę, kitaip nei įtampos matavimas, kuris atliekamas tarp komponentų. Dėl to srovės matavimas yra šiek tiek sudėtingesnis, bet ne mažiau svarbus trikčių šalinimui.
Srovės matavimo procedūra:
- Išjunkite grandinės maitinimą
- Nutraukite grandinę toje vietoje, kur norite išmatuoti srovę
- Nustatykite multimetrą atitinkamam srovės diapazonui
- Prijunkite multimetrą nuosekliai prie grandinės
- Atkurkite maitinimą ir nuskaitykite matavimą
- Prieš išimdami multimetrą, išjunkite maitinimą
Saugos įspėjimas: Niekada nebandykite matuoti srovės prijungdami multimetro zondus prie maitinimo šaltinio – tai sukels trumpąjį jungimą ir gali sugadinti įrangą arba sužeisti žmones.
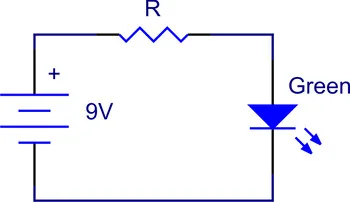
LED grandinės pavyzdys
Panagrinėkime paprastą LED grandinę, skirtą srovės tekėjimui pademonstruoti:
- 9 V baterija tiekia įtampą (elektrinį slėgį)
- 330Ω rezistorius riboja srovės srautą
- LED paverčia elektros energiją šviesa
- Srovės srautai nuo teigiamo akumuliatoriaus, per rezistorių, per šviesos diodą, atgal į neigiamą akumuliatoriaus jungtį
Šioje grandinėje per visus komponentus teka ta pati srovė, paprastai apie 20 mA, esant nurodytoms vertėms.
Praktiniai skirtumai tarp voltų ir srovės
Dabar, kai suprantame įtampą ir srovę atskirai, panagrinėkime jų praktinius skirtumus ir kaip jie sąveikauja realiose elektros sistemose. Šis skyrius yra labai svarbus visiems, planuojantiems „pasidaryk pats“ elektros projektus arba studijuojantiems elektros pagrindus.
Palyginimas greta
| Aspektas | Įtampa (voltai) | Srovė (amperais) |
|---|---|---|
| Apibrėžimas | Elektrinis slėgis / potencialų skirtumas | Elektros krūvio srautas |
| Vandens analogija | Vandens slėgis | Vandens srautas |
| Simbolis | V. | Aš arba A |
| Matavimas | Tarp komponentų (lygiagrečiai) | Per komponentus (nuosekliai) |
| Grandinės reikalavimas | Gali egzistuoti be srovės | Reikalinga visa grandinė |
| Saugos problema | Aukšta įtampa = elektros smūgio pavojus | Didelė srovė = gaisro / nudegimo pavojus |
| Ryšys | Varo srovę per varžą | Valdoma įtampos ir varžos |
Omo dėsnis: pagrindinis ryšys
Įtampos, srovės ir varžos santykis atitinka Ohmo dėsnį: V = I × R
Ši pagrindinė lygtis parodo, kaip sąveikauja įtampa, srovė ir varža:
- Padidinkite įtampą: Srovė didėja (jei varža išlieka ta pati)
- Padidinkite pasipriešinimą: Srovė mažėja (jei įtampa išlieka ta pati)
- Dviguba įtampa: Srovės padvigubėjimas (esant pastoviam pasipriešinimui)
Praktinis Ohmo dėsnio taikymas:
- LED rezistoriaus verčių apskaičiavimas
- Galios poreikio nustatymas
- Grandinės problemų trikčių šalinimas
- Saugių elektros sistemų projektavimas
Įtampa ir srovė skaičiuojant galią
Galia (matuojama vatais) sujungia įtampą ir srovę: P = V × I
Supratimas apie galią padeda:
- Pasirinkite tinkamus maitinimo šaltinius
- Apskaičiuokite baterijos veikimo laiką
- Užtikrinkite, kad komponentai atlaikytų elektros apkrovas
- Projektuokite efektyvias elektros sistemas
Skaičiavimo pavyzdys:
12 V grandinės brėžinys, kurio srovės stipris yra 2A, sunaudoja: P = 12 V × 2A = 24 vatai
Tie patys 24 vatai gali būti: 24 V × 1 A arba 6 V × 4 A
Saugos pasekmės
Skirtingi įtampos ir srovės deriniai kelia skirtingus saugumo klausimus:
Aukšta įtampa, maža srovė (statinė elektra):
- Gali sukelti šokiruojantį pojūtį
- Paprastai nėra mirtina dėl mažos srovės
- Gali pažeisti jautrią elektroniką
Žema įtampa, didelė srovė (automobilio akumuliatorius):
- Saugūs įtampos lygiai (12 V)
- Trumpojo jungimo atveju gali susidaryti pavojinga srovė
- Nudegimų ir gaisro pavojus
Aukšta įtampa, didelė srovė (buitinis elektros tinklas):
- Ypač pavojingas derinys
- Gali sukelti sunkius sužalojimus ar mirtį
- Reikalingas profesionalus elektros darbas
Trikčių šalinimo scenarijai
Dažniausios elektros problemos ir jų įtampos / srovės charakteristikos:
Neveikianti grandinė (nėra įtampos, nėra srovės):
- Patikrinkite maitinimo šaltinio jungtį
- Patikrinkite grandinės pertraukiklius / saugiklius
- Nutrūkusių laidų patikrinimas
Aukšta įtampa, nėra srovės:
- Nutraukta grandinė (nutrūkęs ryšys)
- Sugedęs komponentas blokuoja srovės tekėjimą
- Neteisingas laidų sujungimas
Normali įtampa, per didelė srovė:
- Trumpasis jungimas arba komponento gedimas
- Perkaitimo ir gaisro pavojus
- Reikalingas neatidėliotinas dėmesys
Esminiai elektros darbų saugos reikalavimai
Dirbant su elektra, saugumas turi būti svarbiausias prioritetas. Net ir žemos įtampos „pasidaryk pats“ projektai gali būti pavojingi, jei nesiimama tinkamų atsargumo priemonių. Šiame skyriuje pateikiamos išsamios saugos gairės studentams ir „pasidaryk pats“ entuziastams.
Įtampos lygio saugos gairės
Žema įtampa (iki 50 V nuolatinės srovės / 30 V kintamosios srovės):
- Paprastai saugus nuo elektros smūgio
- Vis dar gali sukelti nudegimus ar gaisrus
- Saugu daugumai „pasidaryk pats“ elektronikos projektų
- Modifikuodami grandines, visada atjunkite maitinimą
Vidutinė įtampa (50–1000 V):
- Pavojingas elektros smūgio ir elektros smūgio pavojus
- Reikalinga speciali saugos įranga
- Įprasta kai kuriose pramonės šakose
- Netinka atsitiktiniams „pasidaryk pats“ darbams
Aukšta įtampa (virš 1000 V):
- Didelis mirties ar sunkaus sužalojimo pavojus
- Reikalingas profesionalus elektrotechnikos išsilavinimas
- Niekada nebandykite atlikti „pasidaryk pats“ darbų tokiuose lygiuose
- Dėl bet kokių buitinių elektros problemų kreipkitės į kvalifikuotus elektrikus
Esminė saugos įranga
Pagrindinė saugos įranga atliekant elektros darbus:
- Izoliuoti įrankiai: Venkite atsitiktinio kontakto su srovėmis
- Apsauginiai akiniai: Apsaugokite nuo kibirkščių ir komponentų gedimų
- Izoliuotas darbo kilimėlis: Užtikrina elektros izoliaciją
- Multimetras su tinkamais parametrais: Įsitikinkite, kad prietaisas gali atlaikyti numatomą įtampą
- Pirmosios pagalbos vaistinėlė: Įtraukti elektros nudegimų gydymą
Pažangi saugos įranga aukštesnės įtampos darbams:
- Izoliuotos pirštinės: Įvertinta numatomiems įtampos lygiams
- Drabužiai, įvertinti lanko lygiu: Apsauga nuo elektros lanko
- Įtampos detektoriai: Patikrinkite, ar grandinės nėra įjungtos
- Blokavimo / žymėjimo įranga: Išvenkite atsitiktinio pakartotinio įjungimo
Saugaus darbo procedūros
Prieš pradedant bet kokius elektros darbus:
- Išjunkite maitinimą prie šaltinio (automatinio jungiklio arba atjungimo įtaiso)
- Išbandykite savo bandymo įrangą ant žinomos įtampos grandinės
- Patikrinkite, ar grandinė neveikia naudojant tinkamą bandymo įrangą
- Užrakinti ir pažymėti maitinimo šaltiniai, kai įmanoma
- Naudokite tinkamas asmenines apsaugos priemones
Elektros darbų metu:
- Dirbkite viena ranka, kai įmanoma (sumažina smūgio kelią per širdį).
- Darbo vietą laikykite švarią ir sausą
- Niekada nedirbkite vieni potencialiai pavojingose grandinėse
- Darykite pertraukas, kad išlaikytumėte dėmesį ir išvengtumėte nuovargio
- Nustokite dirbti, jei abejojate dėl kurios nors procedūros
Avarinės procedūros:
- Žinokite grandinės pertraukiklių ir elektros skydinių vietą
- Laikykite skubios pagalbos telefono numerius lengvai pasiekiamus
- Supraskite pagrindinius pirmosios pagalbos teikimo elektros traumų atvejus
- Netoliese turi būti gesintuvas, skirtas elektros prietaisų gaisrams
Dažniausios saugos klaidos, kurių reikia vengti
Pavojingos prielaidos, galinčios sukelti avarijas:
- „Žema įtampa visada saugi“ – Net 12 V įtampa gali sukelti gaisrą dėl trumpojo jungimo
- „Elektra išjungta“ – Visada patikrinkite naudodami tinkamą bandymo įrangą
- „Tai tik mažas projektas“ – Nelaimingi atsitikimai dažnai nutinka atliekant paprastas užduotis.
- „Galiu valdyti elektros tinklo įtampą“ – Palikite buitinės elektros darbus profesionalams
Praktiniai projektai, skirti suprasti voltus ir srovę
Geriausias būdas suprasti elektros sąvokas yra praktinis pritaikymas. Šie trys progresyvūs projektai padės jums patiems patirti skirtumą tarp įtampos ir srovės, kartu ugdydami naudingus įgūdžius būsimiems „pasidaryk pats“ elektros projektams.
1 projektas: pagrindinė LED grandinė (pradedančiųjų lygis)
Tikslas: Supraskite įtampos, srovės ir varžos ryšį naudodami paprastą LED grandinę.
Reikalingos medžiagos:
- 9 V baterija su jungtimi
- Raudonas šviesos diodas (5 mm)
- 330Ω rezistorius (oranžinės-oranžinės-rudos juostelės)
- Maketo lenta
- Jungiamieji laidai
- Multimetras
Saugos sumetimai:
- 9V yra saugus naudoti
- LED gali būti pažeistas dėl per didelės srovės
- Prieš įjungdami maitinimą, visada prijunkite komponentus
Žingsnis po žingsnio instrukcijos:
1 veiksmas: grandinės surinkimas
- Įdėkite šviesos diodą į duonos plokštę (ilgesnė koja yra teigiama)
- Prijunkite 330Ω rezistorių nuosekliai su LED
- Norėdami užbaigti grandinę, naudokite trumpiklius
- Prieš įjungdami maitinimą, dar kartą patikrinkite jungtis
2 veiksmas: įtampos matavimai
- Nustatykite multimetrą į nuolatinės įtampos režimą (20 V diapazonas)
- Išmatuokite akumuliatoriaus įtampą (turėtų būti maždaug 9 V)
- Išmatuokite įtampą LED (paprastai 2–3 V raudonam LED)
- Įtampos matavimas rezistoriuje (likutinė įtampa)
3 veiksmas: srovės matavimas
- Išjunkite maitinimą (atjunkite akumuliatorių)
- Nustatykite multimetrą į nuolatinės srovės režimą (200 mA diapazonas)
- Nutraukite grandinę ir įjunkite multimetrą nuosekliai
- Prijunkite maitinimą ir išmatuokite srovę (maždaug 20 mA)
Mokymosi rezultatai:
- Įtampos kritimai tarp komponentų sumuojasi ir padidina maitinimo įtampą
- Per visus nuosekliai sujungtus komponentus teka ta pati srovė
- Rezistorius kontroliuoja srovės tekėjimą per grandinę
- LED paverčia elektros energiją šviesos energija
Trikčių šalinimo patarimai:
- LED nešviečia: Patikrinkite poliškumą (teigiamas laidas – ilgesnės kojos).
- Šviesos diodas per ryškus / perdega: Srovė per didelė, reikia didesnio rezistoriaus
- Nėra srovės tekėjimo: Patikrinkite, ar nėra nutrūkusių jungčių
2 projektas: Baterijos įtampos indikatorius (vidutinis lygis)
Tikslas: Sukurkite vaizdinį įtampos indikatorių, naudodami kelis šviesos diodus, kad suprastumėte įtampos dalybas ir srovės pasiskirstymą.
Reikalingos medžiagos:
- Kintamas nuolatinės srovės maitinimo šaltinis (0–12 V) arba kelios baterijos
- 5 skirtingų spalvų šviesos diodai
- 5 rezistoriai (po 220 Ω)
- Maketavimo plokštė ir trumpiklio laidai
- Multimetras
Grandinės koncepcija: Šis projektas sukuria paprastą įtampos lygio indikatorių, kuriame skirtingi šviesos diodai užsidega esant skirtingam įtampos lygiui, parodydami, kaip įtampa veikia srovės tekėjimą.
Surinkimo instrukcijos:
1 veiksmas: sukurkite indikatoriaus grandinę
- Prijunkite šviesos diodus lygiagrečiai, kiekvienas su savo srovės ribojimo rezistoriumi
- Naudokite skirtingų spalvų šviesos diodus, kad pavaizduotumėte skirtingus įtampos lygius
- Pradėkite nuo vieno LED ir palaipsniui pridėkite kitus
2 veiksmas: įtampos atsako bandymas
- Pradėkite nuo 3 V įvesties (turėtų šviesti vienas šviesos diodas)
- Palaipsniui didinkite įtampą iki 6 V, 9 V ir 12 V
- Stebėkite, kaip daugiau šviesos diodų užsidega didėjant įtampai
- Išmatuokite srovę per kiekvieną grandinės šaką
3 veiksmas: analizė ir matavimai
- Įrašykite įtampos ir srovės matavimus kiekviename lygyje
- Apskaičiuokite energijos suvartojimą naudodami P = V × I
- Stebėkite, kaip lygiagrečios grandinės dalijasi srove, bet dalijasi įtampa
Mokymosi rezultatai:
- Lygiagrečios grandinės palaiko tą pačią įtampą tarp šakų
- Srovės dalijimasis tarp lygiagrečių šakų
- Didesnė įtampa leidžia naudoti daugiau šviesos diodų
- Bendra srovė yra atskirų šakų srovių suma
3 projektas: paprastas įtampos reguliatorius (aukštesnysis lygis)
Tikslas: Sukurkite paprastą įtampos reguliatorių, kad suprastumėte, kaip galima valdyti įtampą ir srovę skirtingose srityse.
Reikalingos medžiagos:
- LM317 reguliuojamo įtampos reguliatoriaus mikroschema
- Įėjimo maitinimas (12–15 V nuolatinė srovė)
- 240Ω rezistorius (R1)
- 1,5 kΩ potenciometras (R2)
- Du 10 μF kondensatoriai
- Maišymo plokštė ir multimetras
- LM317 šilumos kriauklė
Saugos pastaba: Šis projektas susijęs su didesnėmis srovėmis ir šilumos generavimu. LM317 veikimo metu gali įkaisti.
Grandinės paaiškinimas: LM317 įtampos reguliatorius palaiko pastovią 1,25 V įtampą tarp išėjimo ir reguliavimo kontaktų, todėl galite nustatyti išėjimo įtampą naudodami išorinius rezistorius pagal: Vout = 1,25 V × (1 + R2/R1)
Surinkimo žingsniai:
1 veiksmas: sukurkite reguliatoriaus grandinę
- Pritvirtinkite LM317 ant kepimo plokštės (gali prireikti radiatoriaus)
- Prijunkite įvesties ir išvesties kondensatorius, kad būtų užtikrintas stabilumas
- Prijunkite rezistorių tinklą (R1 ir potenciometrą R2)
- Prieš įjungdami maitinimą, dar kartą patikrinkite visas jungtis
2 veiksmas: testavimas ir reguliavimas
- Įjunkite 12 V įėjimo galią
- Išėjimo įtampos matavimas reguliuojant potenciometrą
- Bandymas su skirtingomis apkrovomis (šviesos diodais, mažais varikliais)
- Stebėti įvesties ir išvesties sroves
3 veiksmas: apkrovos testavimas
- Prijunkite įvairias apkrovas prie bandymo reguliavimo
- Išmatuokite, kaip išėjimo įtampa reaguoja į apkrovos pokyčius
- Apskaičiuokite efektyvumą: (Pout/Pin) × 100%
- Stebėkite šilumos susidarymą reguliatoriuje
Mokymosi rezultatai:
- Įtampos reguliavimas palaiko pastovią išėjimo galią, nepaisant įvesties svyravimų
- Srovės reikalavimai priklauso nuo apkrovos charakteristikų
- Galios išsklaidymas reguliatoriuose generuoja šilumą
- Realiose grandinėse atsižvelgiama į nuostolius ir efektyvumą
Išplėstinė analizė:
- Išėjimo įtampos ir apkrovos srovės grafiko diagrama
- Reguliavimo tikslumo matavimas skirtingomis sąlygomis
- Apskaičiuokite šiluminius reikalavimus didesnės srovės taikymams
Išplėstinių koncepcijų ir trikčių šalinimo vadovas
Kai įprasite prie pagrindinių įtampos ir srovės sąvokų, supratimas apie pažangius ryšius ir trikčių šalinimo metodus tampa būtinas sėkmingiems „pasidaryk pats“ elektros projektams.
AC ir DC aspektai
Nors daugiausia dėmesio skyrėme nuolatinės srovės (DC) grandinėms, norint visapusiškų žinių apie elektrą, svarbu suprasti kintamosios srovės (AC) skirtumus.
Nuolatinės srovės charakteristikos:
- Pastovios įtampos poliškumas
- Nuolatinės srovės tekėjimo kryptis
- Naudojamas baterijose, elektronikoje, LED apšvietime
- Pradedantiesiems lengviau išmatuoti ir suprasti
Kintamosios srovės charakteristikos:
- Įtampos poliškumas kaitaliojamas (60 Hz JAV, 50 Hz Europoje)
- Srovės kryptis periodiškai keičiasi
- Naudojamas buitinėse elektros energijos gamybos įmonėse, varikliuose, transformatoriuose
- Sudėtingiau išmatuoti ir analizuoti
Saugos pastaba: Kintamoji įtampa gali būti pavojingesnė nei lygiavertė nuolatinė įtampa dėl jos poveikio žmogaus raumenų kontrolei.
Galios koeficientas ir efektyvumas
Kintamosios srovės grandinėse ir kai kuriose nuolatinės srovės taikomosiose sistemose įtampos, srovės ir galios santykis tampa sudėtingesnis.
Tikroji galia ir tariamoji galia:
- Tikroji galia: Faktiškai sunaudota energija (vatais)
- Matoma galia: Įtampos ir srovės sandauga (voltamperai)
- Galios koeficientas: Tikrosios ir tariamosios galios santykis
Efektyvumo aspektai:
- Jokia elektros sistema nėra 100% efektyvi
- Galios nuostoliai atsiranda dėl šilumos varžose
- Perjungiamieji maitinimo šaltiniai gali pasiekti 85-95% efektyvumą
- Linijiniai reguliatoriai gali pasiekti tik 30-60% efektyvumą
Dažni trikčių šalinimo scenarijai
Problema: grandinė visiškai neveikia
Diagnostiniai žingsniai:
- Patikrinkite maitinimo šaltinį: Išmatuokite maitinimo įtampą
- Patikrinkite ryšius: Ieškokite atsilaisvinusių ar nutrūkusių laidų
- Bandymo tęstinumas: Naudokite multimetro varžos funkciją
- Patikrinkite saugiklius /jungikliai: Įsitikinkite, kad apsauginiai įtaisai nesuveikė
Problema: grandinė veikia su pertrūkiais
Galimos priežastys:
- Laisvos jungtys, sukeliančios pertraukiamą kontaktą
- Komponentų įkaitimas, sukeliantis šiluminius išjungimus
- Maitinimo įtampa krenta esant apkrovai
- Elektromagnetiniai trukdžiai, veikiantys jautrias grandines
Problema: Komponentas įkaista
Tyrimo procesas:
- Matuoti srovę: Patikrinkite, ar komponentas nevartoja per didelės srovės
- Patikrinkite įtampą: Patikrinkite, ar komponentas gauna tinkamą įtampą
- Apžiūrėkite krovinį: Įsitikinkite, kad komponentas nėra perkrautas
- Atsiliepimų įvertinimai: Įsitikinkite, kad komponentas tinka naudoti
Kada kreiptis į specialistus
Tam tikrus elektros darbus visada turėtų atlikti kvalifikuoti elektrikai:
Namų elektros instaliacijos projektai:
- Naujų lizdų ar grandinių įrengimas
- Elektros skydų atnaujinimas
- Bet kokie darbai, susiję su elektros tinklo įtampa (120 V / 240 V)
- Kodekso atitikties reikalavimai
Pramoninis pritaikymas:
- Variklių valdymo sistemos
- Aukštos įtampos įranga
- Komercinės elektros instaliacijos
- Saugai svarbios taikomosios programos
Požymiai, kad jums reikia profesionalios pagalbos:
- Pakartotiniai grandinės pertraukiklio išsijungimai
- Degimo kvapai iš elektros įrangos
- Šoko pojūčiai nuo prietaisų
- Šviesos pritemsta, kai įjungiami prietaisai
Elektros žinių gilinimas
Tęskite savo elektrotechnikos išsilavinimą ne tik šiame vadove:
Rekomenduojamos kitos temos:
- Elektromagnetiniai principai ir induktyvumas
- Talpa ir energijos kaupimas
- Skaitmeninė elektronika ir loginės grandinės
- Variklio valdymas ir galios elektronika
Praktinių įgūdžių lavinimas:
- PCB projektavimas ir surinkimas
- Mikrovaldiklių programavimas
- Namų automatizavimo projektai
- Atsinaujinančiosios energijos sistemos
Saugos sertifikatas:
- OSHA 10 valandų elektros saugos mokymai
- Vietinės elektros kodekso klasės
- Lankinio blyksnio saugos mokymai
- Blokavimo / žymėjimo procedūros
Išvada: Įtampos ir srovės įvaldymas sėkmei
Suprasti skirtumą tarp įtampos ir srovės yra labai svarbu norint sėkmingai dirbti su elektra, nesvarbu, ar esate studentas, kaupiantis pagrindines žinias, ar „pasidaryk pats“ entuziastas, besiimantis savo pirmojo elektronikos projekto. Svarbiausios šio išsamaus vadovo įžvalgos suteikia pagrindą saugiems ir sėkmingiems elektros darbams.
Pagrindinės išvados
Svarbiausios sąvokos, kurias reikia atsiminti:
- Įtampa yra elektrinis slėgis kuris varo srovę per grandines
- Srovė yra elektros krūvio tekėjimas kuris iš tikrųjų atlieka darbą
- Saugumas visada yra svarbiausia nepriklausomai nuo įtampos ar srovės lygių
- Praktinė patirtis sustiprina teorines žinias
- Profesionali pagalba yra būtinas atliekant sudėtingus arba aukštos įtampos darbus
Jūsų tolesni žingsniai
Norėdami toliau tobulinti savo elektros srities žinias:
- Praktika su žemos įtampos projektais įgyti praktinės patirties
- Studijuokite elektros saugą prieš pradėdami bet kokius darbus su elektros tinklo įtampa, atidžiai
- Sukurkite įrankių rinkinį su kokybiškais multimetrais ir saugos įranga
- Prisijunkite prie bendruomenių elektros entuziastų ir gamintojų
- Apsvarstykite oficialų mokymą sudėtingesniems elektros darbams
Saugos priminimas
Niekada nepamirškite, kad elektra gali būti pavojinga. Visada teikite pirmenybę saugumui, o ne patogumui, naudokite tinkamas apsaugos priemones ir nedvejodami kreipkitės į specialistus, kai dirbate viršydami savo kompetencijos lygį.
Tvirtų teorinių žinių, praktinės patirties ir nepalenkiamo dėmesio saugai derinys puikiai pasitarnaus visose jūsų būsimose su elektra susijusiose pastangose. Nesvarbu, ar šalinate paprastos LED grandinės triktis, ar projektuojate sudėtingas elektronines sistemas, esminis įtampos ir srovės supratimas bus jūsų sėkmės pagrindas.
Pradėkite nuo paprastų projektų, visada pabrėžkite saugumą ir palaipsniui lavinkite savo įgūdžius taikydami juos praktiškai. Elektros ir elektronikos projektų pasaulis siūlo begales galimybių mokytis, kūrybiškumui ir problemų sprendimui – visa tai paremta tvirtu įtampos ir srovės supratimo pagrindu.
