
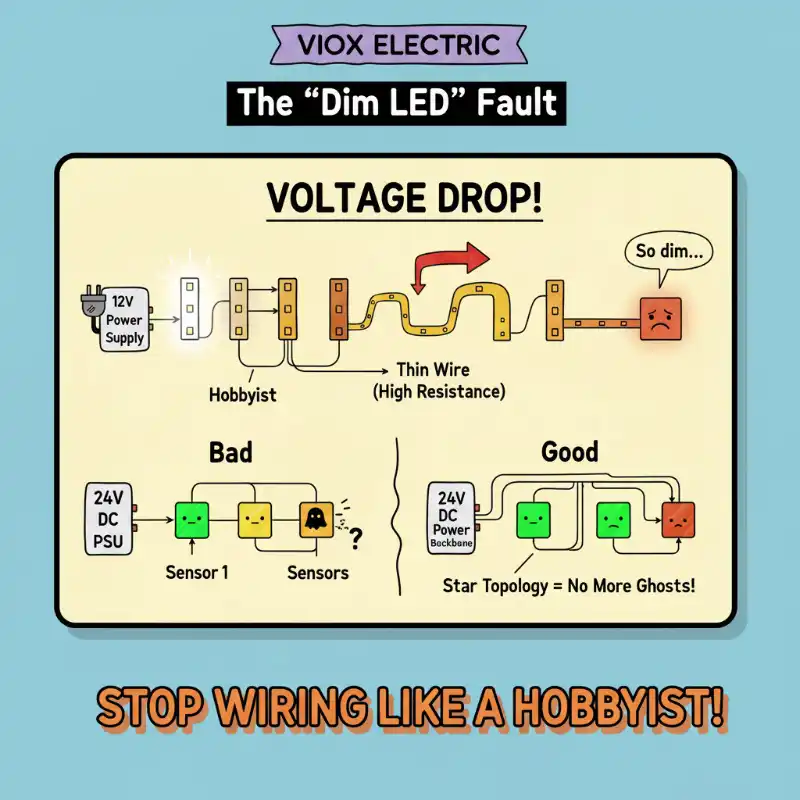
An ambitious LED hobbyist meticulously connects five meters of 12V light strips, one after another, in a long “daisy-chain” down his hallway.
He flips the switch. The first meter by the power supply is a brilliant, crisp white.
The last meter, 50 feet away? It’s a dim, “sad,” yellowish-red.
An online forum instantly diagnoses the problem: Spänningsfall. The single, thin copper trace in that LED strip can’t handle the massive current (amps) needed by all the strips. The “daisy-chain” is starving the end of the line.
This “dim LED” is the single best analogy for the “ghost faults” that are killing your industrial control panel. That “flickering” 24V sensor? That “weak” solenoid? They’re not broken—they’re “dim LEDs.”
Are you still wiring your panels like a hobbyist? Here’s how to build a robust panel that never suffers from “The ‘Dim LED’ Fault.”
The Root of All Evil: “The Daisy-Chain Trap”

In panel building, “The Daisy-Chain Trap” is the #1 cause of intermittent “ghost faults.”
It’s when you wire power like this:
PSU -> Sensor 1 -> Sensor 2 -> Sensor 3 -> Sensor 4 … -> Sensor 10
It seems efficient. But here’s what’s happening.
Your 24V DC power supply is a “water pump.” Your 20 sensors are “sprinklers” that all need full pressure to work. “Daisy-chaining” is like using one tiny, 50-meter-long plastic straw to feed all 20 sprinklers.
The first sprinkler gets great pressure. But the last one? It just dribbles.
Detta är “The ‘Dim LED’ Fault.” A sensor is rated to work at 24V. When crippling voltage drop (from the long, shared “straw”) forces it to run on 19V, it doesn’t just “get dim”—it “flickers,” “randomly faults,” and sends bad data to your PLC. You, the tech, get a 3 AM call for a “ghost.”
PRO-TIP: Your sensor isn’t ‘broken’—it’s starving. You’ll replace it, the new one will also starve, and the problem will return. Stop replacing the sensor and fix the starvation.
The Professional Solution: “Power Injection” (Star Topology)
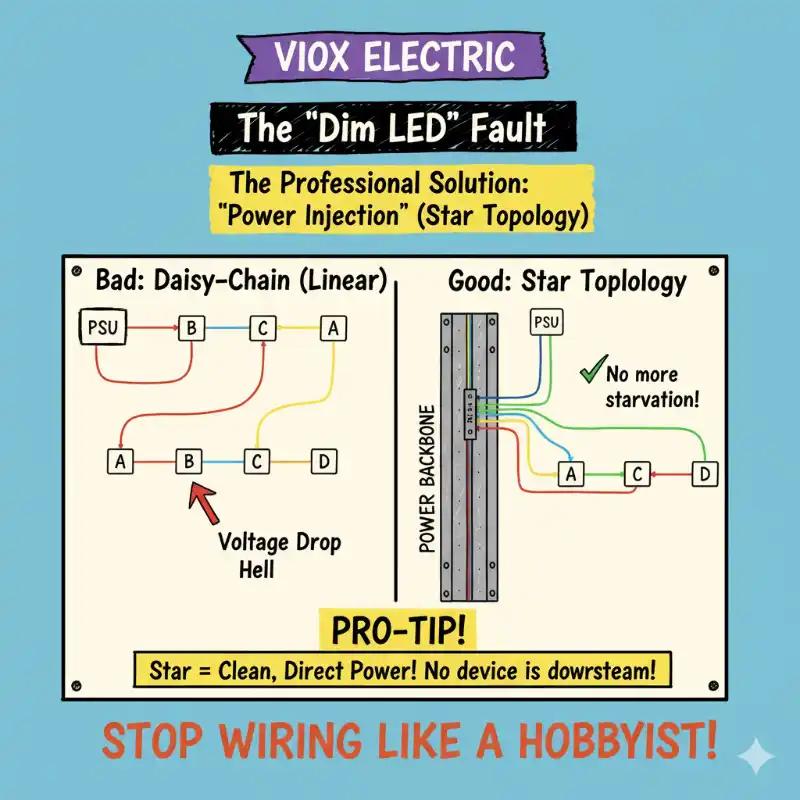
The “fix” for the hobbyist’s “dim LED” is a concept called “Power Injection.” Instead of one long, starving chain, he has to run a new, “thicker” wire from the power supply directly to the middle eller end of the strip.
In the industrial world, we have a more professional name for this: Star Topology.
Stop wiring in a line. Start wiring in a star.
- “Daisy-Chain” (Linear):
PSU -> A -> B -> C -> D (-> Voltage Drop Hell) - “Power Injection” (Star):
- PSU -> [POWER BACKBONE]
- [BACKBONE] -> A
- [BACKBONE] -> B
- [BACKBONE] -> C
- [BACKBONE] -> D
In a “Star,” every device (or small group of devices) gets a clean, direct “home run” of power from a central, high-current “backbone.” No device is “downstream” from another. No device is “starving.”
This is the only way to guarantee voltage stability for all your components.
How to Build “The 24V Power Backbone” (A 3-Step Guide)
Here is the step-by-step professional method. It’s the difference between a panel that lasts 20 years and one that’s a “ghost”-filled nightmare for 20 years.
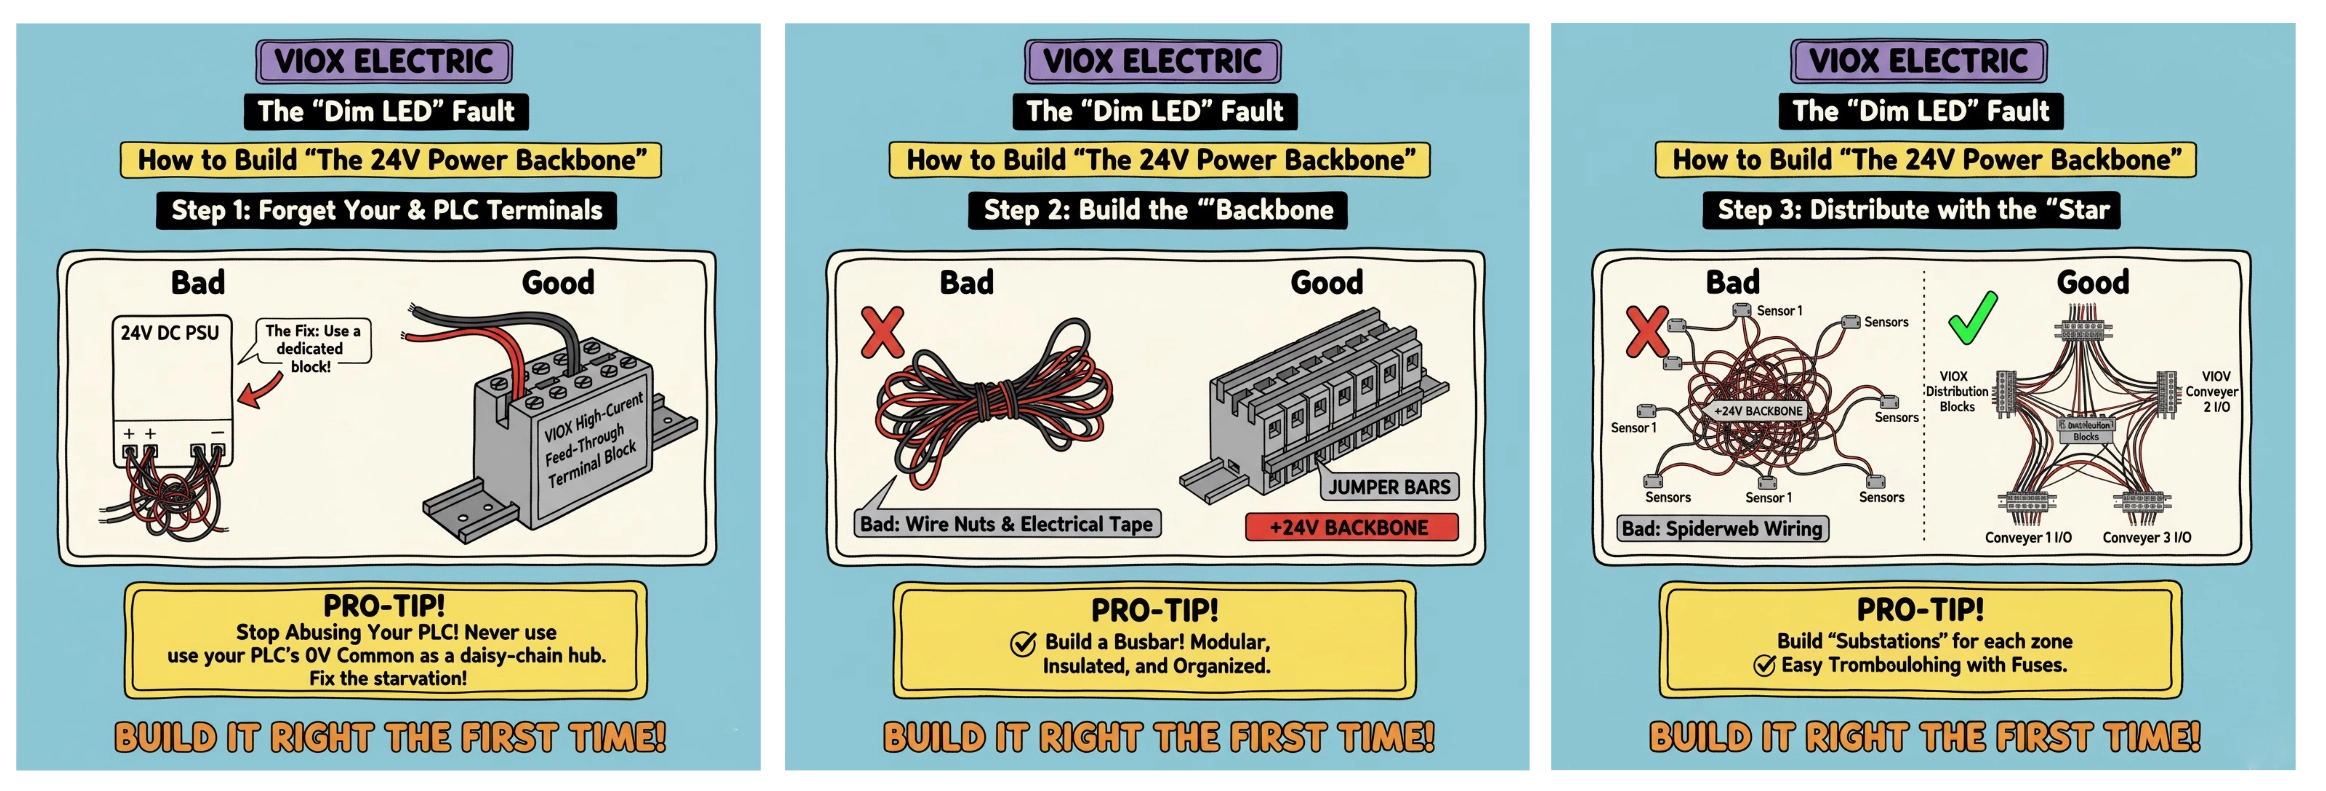
Step 1: Forget Your PSU & PLC Terminals
This is the most common mistake. A tech lands their 10A power supply, then tries to cram 8x 24V+ wires and 8x 0V wires into those two tiny screw terminals. It’s a high-resistance, melted-plastic-waiting-to-happen.
The Fix: Run one pair of heavy-gauge wires (e.g., 10-12 AWG) from your PSU to a VIOX High-Current Feed-Through Terminal Block on your DIN rail. This is the start of your backbone.
PRO-TIP: “Stop Abusing Your PLC!” Never, ever use your PLC’s 0V Common terminal as a “daisy-chain” power hub. You’re not “saving wire”; you’re injecting electrical noise (from motors/solenoids) and creating a high-resistance “hotspot” right on your $1,000 computer. It’s the #1 way to create “ghost faults.”
Step 2: Build the “Backbone”
Now that your main power is on the DIN rail, build the “bus” that the hobbyist was missing.
- The How-To: Mount your VIOX High-Current block. Next to it, add 5, 10, or 20 more VIOX “feed-through” blocks. Now, use VIOX Jumper Bars to connect them all.
- The Result: You’ve just created a “Busbar.” But it’s 100% modular, completely insulated, clearly labeled, and DIN-rail mountable. You now have two rows: one “Backbone” for +24V, and one for 0V.
Step 3: Distribute with the “Star”
Your “Backbone” is your “power plant.” Now you need “substations” for each zone.
- The How-To: Instead of running 20 individual sensor wires back to your backbone, use VIOX Distribution Blocks. Run one 12-AWG wire from your “Backbone” to a 1-to-8 distribution block mounted near your “Conveyor 1” I/O.
- The Result: You now have 8 fused, (often) LED-indicated, and clearly-labeled “home runs” for your 8 “Conveyor 1” sensors.
- The “Aha!” (Troubleshooting): A “daisy-chain” is a nightmare to troubleshoot (if Sensor 1 fails, 2-10 die). A “star” is a dream. Sensor 7 faulting? Pull its dedicated fuse on the VIOX block. If the rest of the panel stays on, you’ve isolated the problem in 3 seconds.
Conclusion: Stop Wiring Like a Hobbyist
The “dim LED” is a symptom. “The Daisy-Chain Trap” is the disease. “Power Injection” (Star Topology) is the cure.
A well-built panel isn’t just “neater”—it’s fundamentally more reliable. Voltage drop is the invisible killer of uptime, and “daisy-chaining” is its partner in crime.
Stop letting “The ‘Dim LED’ Fault” create ‘ghosts’ in your machine. Build it right the first time.
VIOX’s complete system of DIN-skenekopplingsblock, high-current feed-through blocks, jumper bars, and distribution blocks are the exact tools you need to build a professional “24V Power Backbone.”
Browse our Terminal Block solutions and stop starving your sensorer.
