An electrical panel, also known as a breaker box, is the central hub of a home’s electrical system, controlling the distribution of power and providing essential safety features. This guide explores the components, functions, installation, and maintenance of electrical panels to help homeowners better understand and manage their home’s electrical infrastructure.
Anatomy of Electrical Panels
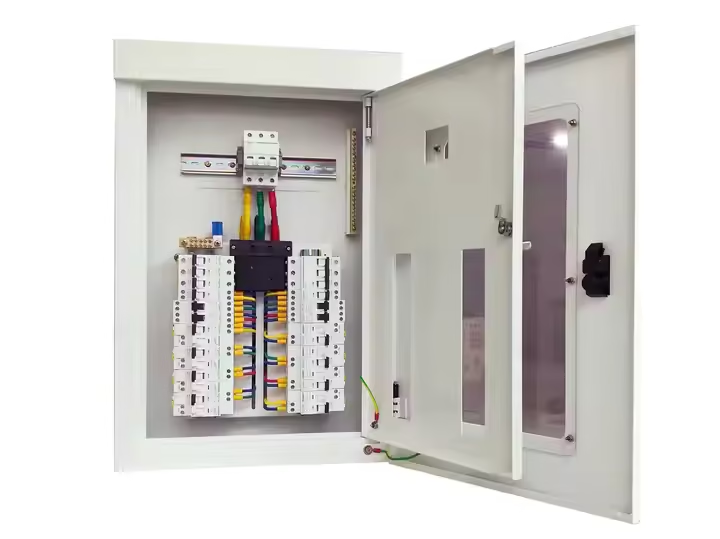
At the heart of an electrical panel is the metal enclosure that houses all essential components. Inside, you’ll find:
- A main breaker controlling power to the entire home, typically rated at 100, 150, or 200 amps.
- Individual circuit breakers for specific areas or appliances.
- Bus bars distributing electricity from the main breaker to circuit breakers.
- A ground bar for connecting ground wires from each circuit.
These components work together to distribute electricity safely throughout the house, with circuit breakers automatically tripping to prevent overloads and potential hazards. The panel’s design allows homeowners to control power to specific areas as needed, making it a crucial element for both safety and convenience in modern homes.
Functions of a Breaker Box
A breaker box serves three primary functions in a home’s electrical system. Firstly, it distributes power from the main supply to various circuits throughout the house, ensuring electricity reaches all areas and appliances as needed. Secondly, it provides crucial overload protection through circuit breakers that automatically trip when detecting excessive current flow, preventing potential fires and equipment damage. Lastly, it offers homeowners control over their electrical system, allowing them to shut off power to specific areas for maintenance or emergencies. This centralized control point is essential for managing electricity safely and efficiently within the home.
Installing an Electrical Panel
When installing an electrical panel, safety and proper planning are paramount. Begin by selecting an appropriate location, typically 1 to 1.8 meters above the floor and away from moisture-prone areas. The installation process involves:
- Turning off the main power supply.
- Mounting the panel enclosure securely to the wall.
- Connecting wires to corresponding circuit breakers, ensuring tight connections.
- Attaching ground wires to the ground bar.
- Performing final checks and labeling circuits for easy identification.
It’s crucial to note that electrical panel installation is a complex task that requires expertise. For safety reasons and to ensure compliance with local codes, it’s highly recommended to hire a licensed electrician for this job.
Explore on youtube
Maintenance and Safety Tips
Regular maintenance and adherence to safety protocols are crucial for the longevity and safe operation of your electrical panel. Conduct periodic inspections to check for signs of wear, damage, or loose connections in wiring and breakers. When resetting a tripped breaker, always turn it fully off before switching it back on to restore power. To enhance safety and efficiency, clearly label each circuit for quick identification during emergencies or maintenance tasks.
Safety precautions include working with dry hands and standing on a dry surface when operating the panel. Never attempt repairs on exposed wires; instead, contact a licensed electrician for assistance. If breakers frequently trip, it may indicate an overload, warranting professional evaluation. By following these guidelines, homeowners can ensure a safe and efficient electrical system while minimizing potential hazards.
Panel Organization Best Practices
To organize an electrical panel effectively, follow these best practices:
- Plan the layout before installation, grouping similar circuits together and balancing the load across both sides of the panel.
- Label each circuit clearly and concisely using a label maker or printable templates. Include specific descriptions like “Kitchen Outlets” or “2nd Floor Lights” rather than vague terms.
- Terminate wires on the side they enter the panel to minimize long loops and save space.
- Use color-coding or grouping techniques to easily identify circuit types (e.g., lighting, appliances, GFCI).
- Maintain a digital copy of your circuit map for easy reference and future updates.
Regular maintenance is crucial for an organized panel. Conduct periodic inspections, clean the panel to remove dust and debris, and tighten connections as needed. By following these practices, you’ll create a safer, more efficient electrical system that’s easier to work with and troubleshoot.
Panel Wiring Diagram Essentials
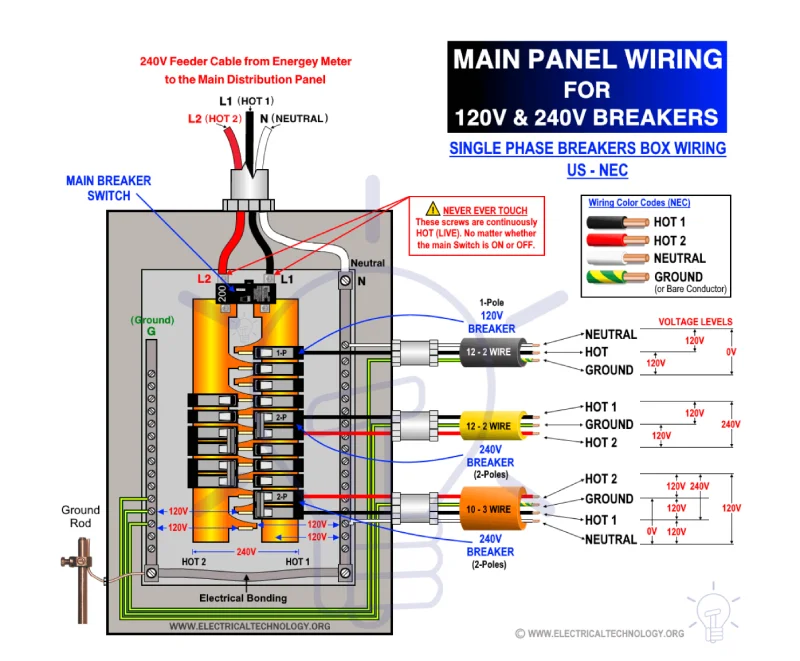
Credit to electricaltechnology
A typical panel box wiring diagram illustrates the connections between various components within an electrical panel. The main power supply enters the panel through two hot wires (usually black and red) and a neutral wire (white). These connect to the main circuit breaker, which feeds two bus bars running vertically through the panel. Circuit breakers for individual circuits clip onto these bus bars, with odd-numbered breakers on one side and even-numbered on the other.
Key elements of a panel box wiring diagram include:
- Main breaker connection to incoming hot wires.
- Neutral wire connection to the neutral bus bar.
- Ground wire connection to the ground bus bar.
- Individual circuit breakers connected to the hot bus bars.
- Neutral and ground wires from each circuit connected to their respective bus bars.
The diagram also shows how 240V circuits are created by using double-pole breakers that span both hot bus bars. Understanding this wiring layout is crucial for safe installation and maintenance, but any actual wiring should be performed by a licensed electrician to ensure compliance with local codes and safety standards.
Signs Your Electrical Panel Needs Replacement
An aging or outdated electrical panel can pose serious safety risks and may struggle to meet modern power demands. Key signs that indicate it’s time to replace your electrical panel include:
- Frequent circuit breaker trips, especially when using high-wattage appliances.
- Flickering or dimming lights.
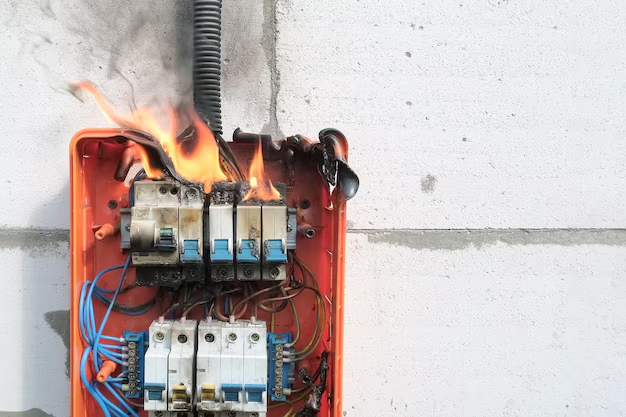
- Burning odors, visible scorch marks, or unusual noises coming from the panel.
- Panel is warm to the touch.
- Home is over 25-30 years old with the original electrical system.
- Use of multiple extension cords due to insufficient outlets.
- Presence of a fuse-based system or outdated brands like Federal Pacific or Zinsco.
If you notice any of these signs, it’s crucial to have a licensed electrician inspect your panel. Ignoring these warnings can lead to electrical fires, appliance damage, and inefficient power distribution. Upgrading your electrical panel ensures your home can safely handle modern electrical loads while improving overall system reliability and efficiency.
Signs of Panel Overload
An overburdened electrical panel can pose serious safety risks and compromise your home’s electrical system. Key indicators of an overloaded panel include:
- Frequent circuit breaker trips, especially when using multiple appliances simultaneously.
- Flickering or dimming lights, particularly when high-power devices are turned on.
- Buzzing sounds coming from the electrical panel or outlets.
- Warm or hot spots on the panel, outlet covers, or switch plates.
- Burning smells or visible sparks near the panel or outlets.
If you notice any of these signs, it’s crucial to address the issue promptly. Unplug unnecessary appliances to reduce the load in the short term. However, for a long-term solution, consult a licensed electrician to assess your panel’s capacity and potentially upgrade your electrical service to meet your home’s power demands.


